
My grandmother used to say that soup was the answer to everything – a bad day, a cold night, or just needing something to bring everyone together. This winter squash soup has that same magic. It’s the kind of recipe that fills your kitchen with warmth and makes everyone ask for seconds.
What I love most about this soup is how simple it is. You don’t need fancy skills or hard-to-find ingredients. Just roast some squash, simmer it with aromatics, blend until silky, and you’ve got restaurant-quality soup at home. The natural sweetness of winter squash pairs beautifully with savory herbs and a hint of spice.

Perfect for weeknight dinners or meal prep, this butternut squash soup takes about 50 minutes from start to finish. It’s creamy without heavy cream (though you can add some if you like), naturally gluten-free, and freezes beautifully. The taste? Think sweet, earthy, with a subtle nuttiness and just enough seasoning to make each spoonful interesting.
Tired of Deciding What to Cook Every Night?
I’ve put together a simple 7-day dinner meal plan using my most-loved recipes — complete with a grocery list and flexible swaps.
Just $2.99 – Instant Download
Get the Meal PlanWhy This Winter Squash Soup Recipe Works

This isn’t just another soup recipe. Roasting the squash first brings out its natural sugars and creates depth you can’t get from boiling. The caramelization on the edges adds a subtle smokiness that makes this soup taste like it simmered for hours.
I’ve tested this recipe with different types of winter squash – butternut, acorn, kabocha – and they all work. Butternut is easiest to peel and has the smoothest texture, which is why it’s my go-to. But honestly? Use what you can find at the market.
The soup base is flexible too. Vegetable broth keeps it vegetarian, but chicken broth adds richness. Some people swear by bone broth for extra nutrients. I’ve made it with all three and loved each version differently.
Ingredients You’ll Need
For Roasting the Squash:
- 1 large butternut squash (about 1.2 kg or 2.5 lbs), peeled, seeded, and cubed
- 2 tbsp olive oil
- 1/2 tsp salt
- 1/4 tsp black pepper
For the Soup Base:
- 2 tbsp butter (or olive oil for dairy-free)
- 1 medium yellow onion (about 200g), diced
- 3 garlic cloves, minced
- 1 medium carrot (about 100g), peeled and chopped
- 1 celery stalk, chopped
- 4 cups (960 ml) vegetable or chicken broth
- 1/2 tsp ground cumin
- 1/4 tsp ground nutmeg
- 1/4 tsp cinnamon
- 1 tsp fresh thyme leaves (or 1/2 tsp dried)
- Salt and pepper to taste
For Finishing:
- 1/2 cup (120 ml) heavy cream or coconut milk (optional, for extra richness)
- 1 tbsp maple syrup or honey (optional, enhances sweetness)
- Fresh herbs for garnish (thyme, sage, or parsley)
- Toasted pumpkin seeds (optional topping)
- Crusty bread for serving
Substitutions: No butternut squash? Use acorn squash, kabocha, or even pumpkin. Skip the cream for a lighter version – the soup is naturally creamy when blended. Use coconut oil instead of butter for a vegan option.
Step-by-Step Instructions
Step 1: Roast the Squash
Preheat your oven to 400°F (200°C). Toss the cubed squash with olive oil, salt, and pepper. Spread evenly on a large baking sheet lined with parchment paper. Roast for 30-35 minutes, flipping halfway through. The squash should be tender and golden at the edges. This caramelization is key for flavor depth.
Step 2: Sauté the Aromatics
While the squash roasts, heat butter in a large pot over medium flame. Add diced onion and cook for 5-6 minutes until soft and translucent. Add minced garlic, carrot, and celery. Sauté for another 4 minutes. You’ll smell the garlic becoming fragrant – that’s when you know it’s ready.
Step 3: Build the Flavor Base
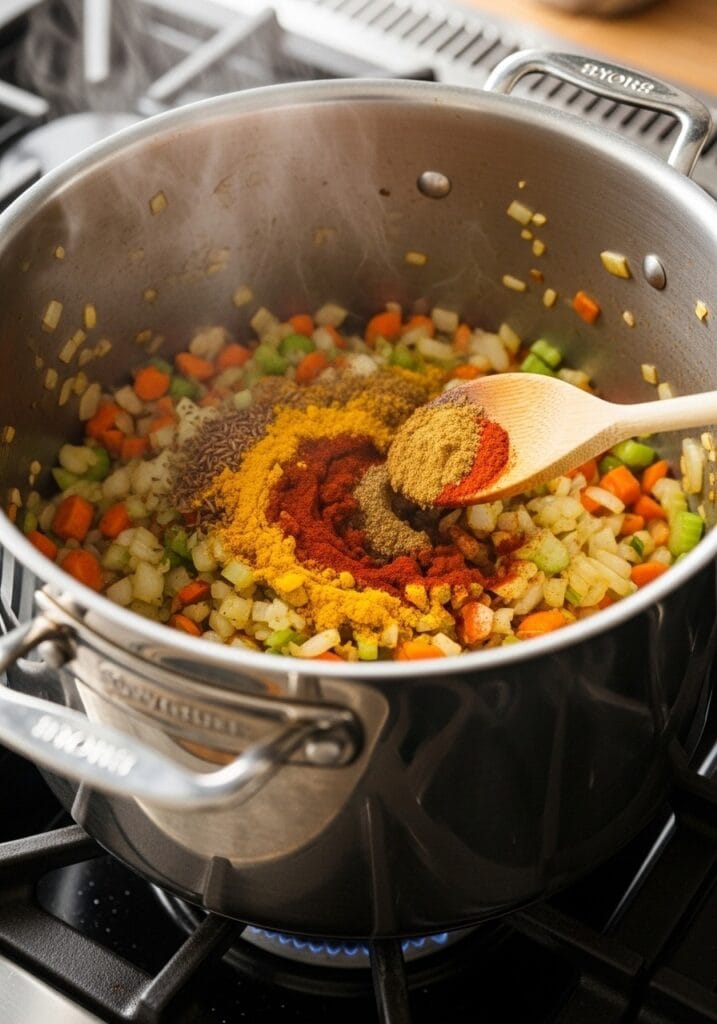
Sprinkle in cumin, nutmeg, cinnamon, and thyme. Stir for 30 seconds to toast the spices. This releases their essential oils and makes the soup more aromatic. Don’t skip this step – it makes a noticeable difference.
Step 4: Combine and Simmer
Add the roasted squash to the pot. Pour in the broth. Bring to a boil, then reduce to a gentle simmer. Cover partially and cook for 15 minutes. This allows all the flavors to meld together. The vegetables should be very soft and easy to pierce with a fork.
Step 5: Blend Until Silky
Remove from heat and let cool slightly (about 5 minutes). Use an immersion blender directly in the pot, or carefully transfer in batches to a countertop blender. Blend until completely smooth – this takes about 1-2 minutes. The soup should be velvety with no chunks remaining.
Safety tip: If using a countertop blender, never fill it more than halfway with hot liquid. Hold the lid down with a towel to prevent splattering.
Step 6: Final Touches

Return the blended soup to the pot (if you used a countertop blender). Stir in cream and maple syrup if using. Taste and adjust seasoning – you might need more salt or a pinch of black pepper. Heat gently for 2-3 minutes until warmed through. Don’t let it boil after adding cream or it might separate.
Serving Suggestions
This winter butternut squash soup is complete on its own, but I like to serve it with crusty sourdough bread or garlic butter steak bites on the side for a heartier meal. A simple green salad works too.
For toppings, try crispy bacon bits, croutons, or a dollop of sour cream. Toasted pumpkin seeds add nice crunch. Sometimes I drizzle a bit of good quality olive oil on top with a sprinkle of smoked paprika.
If you’re serving this for guests, you can make it ahead. The soup actually tastes better the next day after the flavors have had time to develop. Just reheat gently on the stove and add the cream right before serving.
Storage and Reheating Tips
Store leftover soup in airtight containers in the refrigerator for up to 5 days. It thickens as it sits, so you might need to add a splash of broth when reheating. Warm it slowly over medium-low heat, stirring occasionally.
For freezing, cool the soup completely first. Pour into freezer-safe containers, leaving about an inch of space at the top for expansion. It keeps frozen for up to 3 months. Thaw overnight in the fridge before reheating. I don’t recommend freezing soup that already has cream in it – add the cream fresh after reheating instead.
You can also freeze individual portions in mason jars (leave them slightly open until frozen to prevent cracking). This makes it easy to grab a single serving for quick easy meals during busy weeks.
Variations to Try
Spicy Version: Add 1/2 tsp cayenne pepper or a diced jalapeño when sautéing the onions. The heat balances the sweetness nicely.
Apple Squash Soup: Add one peeled, diced apple when you add the squash. It brings extra sweetness and a subtle fruity note that’s perfect for fall.
Curry Twist: Replace cumin and nutmeg with 1 tbsp curry powder. Finish with coconut milk instead of cream. This makes it taste like a Thai-inspired soup.
Protein Boost: Top with shredded rotisserie chicken or crispy chickpeas for a complete meal. The soup itself is vegetarian but adding protein makes it more filling.
Ginger Zing: Add 1 tbsp fresh grated ginger with the garlic. It gives the soup a warming, slightly spicy kick that’s amazing on really cold days.
Frequently Asked Questions
Can I use frozen squash? Yes, but the texture won’t be quite as good. If using frozen, skip the roasting step and add it directly when you add the broth. You’ll miss some of that caramelized flavor though.
Why is my soup watery? This usually means too much broth or not enough squash. Let it simmer uncovered for 10-15 extra minutes to reduce and concentrate the flavors. Or add a small boiled potato before blending to thicken it naturally.
Can I make this in a slow cooker? Absolutely. Sauté the aromatics first (you can do this in a pan on the stove), then transfer everything including raw cubed squash to the slow cooker. Cook on low for 6-7 hours or high for 3-4 hours. Blend and finish as directed. It won’t have the roasted flavor but it’s still delicious.
What’s the difference between butternut and other winter squash? Butternut has the smoothest texture and mildest sweet flavor. Acorn squash is nuttier and slightly drier. Kabocha is sweeter and denser. All work in this recipe – just adjust liquid if needed.
Why You’ll Love This Recipe
This winter squash soup recipe has become a staple in my kitchen for good reason. It’s simple enough for a Tuesday night but impressive enough for company. The ingredients are affordable and mostly pantry staples.
I make a big batch every couple of weeks during winter. It’s one of those healthy meal options that doesn’t feel like you’re sacrificing flavor for nutrition. Kids usually love it too because of the natural sweetness.
The best part? It’s endlessly adaptable. Make it dairy-free, add more spices, throw in different vegetables, change the toppings – it works every time. That’s the kind of recipe worth keeping in your rotation.
Recipe Information:
- Serving Size: 6 bowls (about 1.5 cups each)
- Prep Time: 15 minutes
- Cook Time: 50 minutes
- Total Time: 1 hour 5 minutes
- Difficulty Level: Easy
- Equipment Needed: Large baking sheet, large pot, immersion blender or countertop blender, cutting board, sharp knife
Next time you’re looking for something warm and satisfying, give this a try. Pair it with something from our weeknight dinners collection or enjoy it on its own. Either way, you’re in for a cozy, delicious meal that feels like a warm hug on a cold night.
Still wondering what to cook tomorrow? Take the stress out of dinner with my simple 7-day meal plan.
Get the 7-Day Meal Plan for $2.99