My daughter walked into the kitchen last Tuesday and asked if we could make “something sweet and salty at the same time.” I had a bag of pretzels in the pantry, some chocolate chips, and about 20 minutes before her soccer practice. That’s how this toffee pretzel chocolate bark was born – and honestly, it’s become our most-requested treat ever since.
This chocolate bark recipe takes less time than driving to the store, costs a fraction of fancy chocolate gifts, and tastes like something from a gourmet candy shop. The combination of crunchy pretzels, buttery toffee, and rich chocolate hits every craving at once. It’s ridiculously easy too – if you can melt chocolate and spread it on a pan, you can make this.
The best part? You only need five ingredients and zero special equipment. No candy thermometer, no double boiler required. Just a baking sheet and a microwave (or stovetop if you prefer). I’ve made this for holiday parties, teacher gifts, movie nights, and those random Wednesday afternoons when everyone needs a pick-me-up.
Tired of Deciding What to Cook Every Night?
I’ve put together a simple 7-day dinner meal plan using my most-loved recipes — complete with a grocery list and flexible swaps.
Just $2.99 – Instant Download
Get the Meal PlanWhy This Sweet and Salty Combination Works
There’s actual science behind why sweet and salty flavors are so addictive together. The salt enhances the chocolate’s flavor while the sweetness balances the saltiness – your taste buds get excited by the contrast. That’s why pretzel toffee bark disappears so fast at parties.
The pretzels add a satisfying crunch that keeps you coming back for more. Unlike nuts, pretzels are budget-friendly and most people don’t have allergies to them. The toffee brings a buttery richness that makes the whole thing taste more expensive than it actually is.
I’ve tried this with different chocolate types – dark, milk, and even white chocolate. Each version has its fans. Dark chocolate makes it feel a bit more sophisticated, milk chocolate is classic and crowd-pleasing, and white chocolate creates a beautiful color contrast with the pretzels.
What Makes This Recipe Different
Most chocolate bark recipes require tempering chocolate or use complicated techniques. This one skips all that. We’re using regular chocolate chips that set up perfectly at room temperature. No fuss, no stress.
The key is getting quality chocolate chips. I usually go for semi-sweet or dark chocolate chips with at least 60% cacao. They melt smoothly and have enough chocolate flavor to stand up to the salty pretzels. Store-brand chips work fine – you don’t need to splurge on expensive chocolate here.
Another thing that sets this apart is the toffee. You can buy pre-made toffee bits (like Heath bar pieces) or crush up toffee candy bars. Both work great. The toffee adds a caramelized butter flavor that makes this taste incredibly rich.
Ingredients You’ll Need
For the Chocolate Base:
- 340g (12 oz) semi-sweet or dark chocolate chips
- 1 tablespoon coconut oil or butter (helps chocolate spread smoothly)
For the Toppings:
- 2 cups (about 100g) pretzel twists or sticks, broken into pieces
- ¾ cup (90g) toffee bits or crushed toffee bars
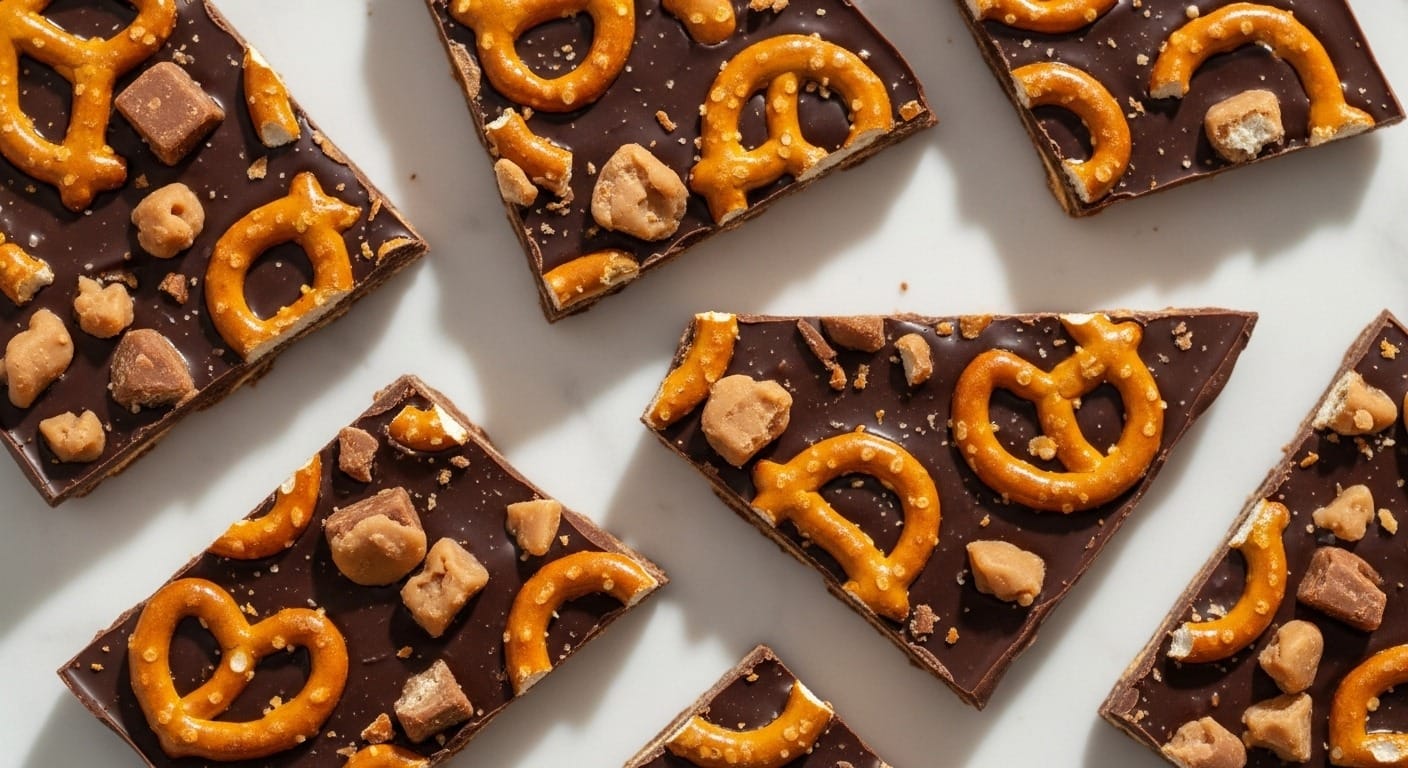
- ½ teaspoon flaky sea salt (like Maldon)
Substitutes and Variations:
- No toffee bits? Use crushed butterscotch chips or skip them entirely
- Coconut oil can be replaced with butter or even heavy cream
- Regular pretzels work, but mini pretzel twists look prettier
- Try white chocolate chips mixed with dark chocolate for a swirled effect
- Add chopped pecans or almonds for extra crunch
Step-by-Step Instructions
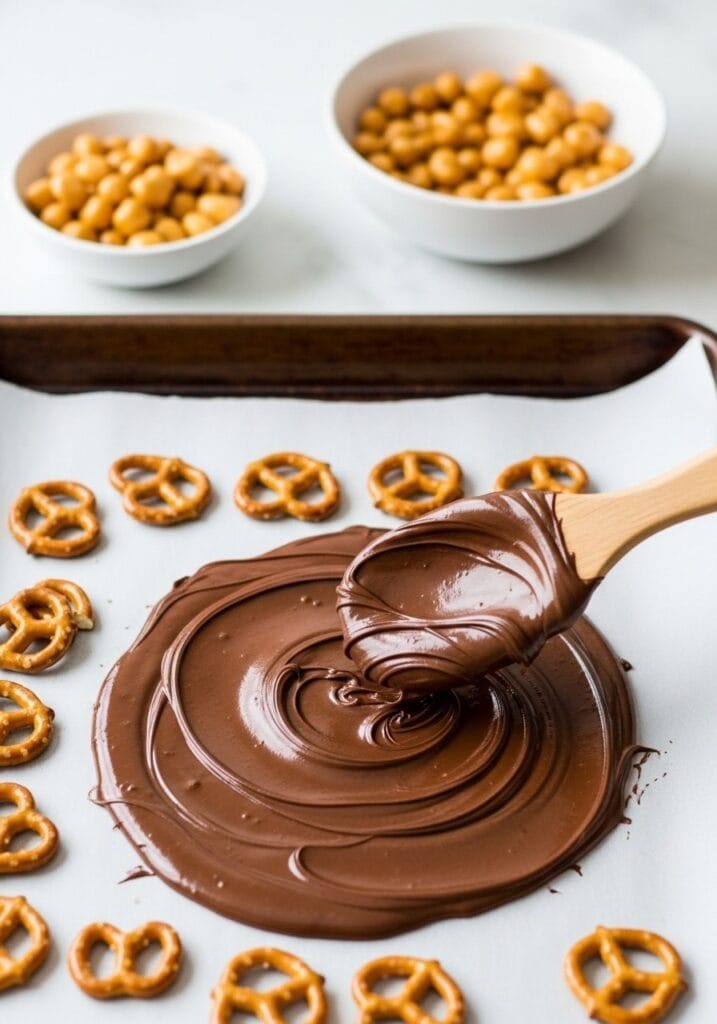
Step 1: Line a large baking sheet (about 9×13 inches or bigger) with parchment paper. Make sure the paper extends over the edges – this makes it easier to lift out the bark later. Set aside.
Step 2: Break the pretzel twists into bite-sized pieces. You want some bigger chunks and some smaller bits for variety. Place them in a bowl and set aside. Don’t crush them too small or they’ll get lost in the chocolate.
Step 3: Add chocolate chips and coconut oil to a microwave-safe bowl. Microwave on 50% power for 30 seconds, stir, then repeat. Keep doing this until the chocolate is almost completely melted – about 2-3 minutes total. The low power prevents burning.
Step 4: Stir the chocolate vigorously for about 30 seconds after removing from the microwave. The residual heat will melt any remaining chunks. The mixture should be smooth and glossy.
Step 5: Pour the melted chocolate onto your prepared baking sheet. Use a spatula to spread it into an even layer, about ¼ inch thick. Don’t worry about making it perfectly rectangular – rustic edges look charming.
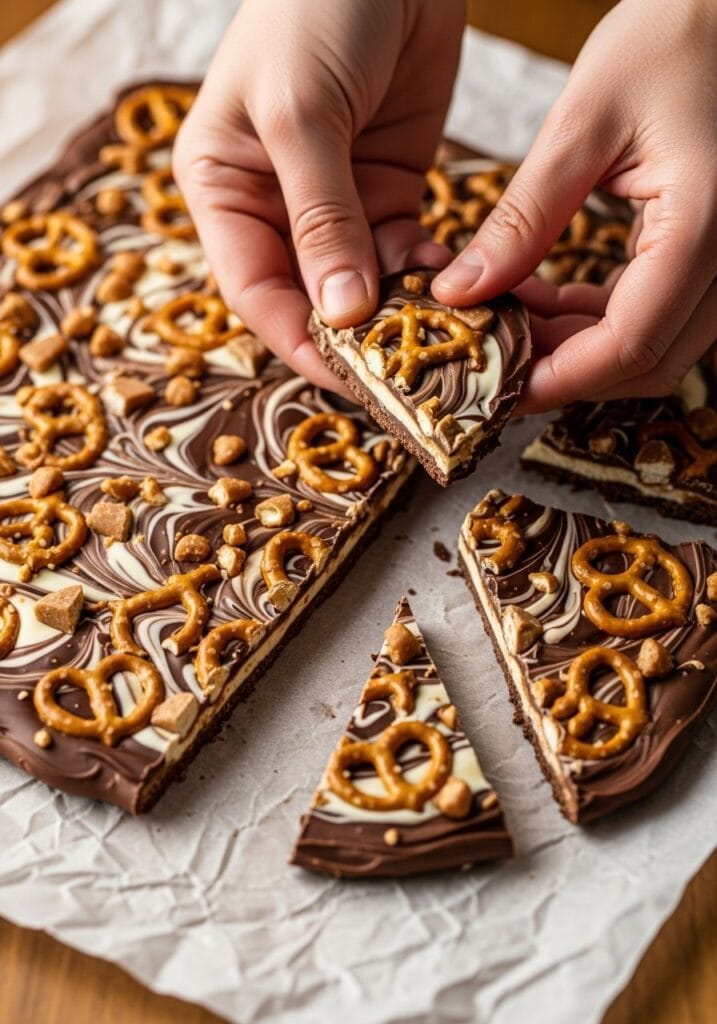
Step 6: Working quickly before the chocolate starts to set, scatter the pretzel pieces evenly over the surface. Press them down gently so they stick into the chocolate. Cover the entire surface but leave some chocolate visible.
Step 7: Sprinkle the toffee bits over everything. Again, press them down slightly. The chocolate should still be wet enough that everything sticks. If it’s starting to set, you can gently warm it with a hair dryer for a few seconds.
Step 8: Finish with a light sprinkle of flaky sea salt across the top. Don’t skip this – the salt crystals add visual appeal and enhance all the flavors. Just a pinch is enough.
Step 9: Transfer the baking sheet to the refrigerator. Let it chill for at least 30 minutes, or until the chocolate is completely firm and has lost its shine.
Step 10: Once set, lift the parchment paper out of the pan. Place the bark on a cutting board. Use your hands to break it into irregular pieces – I like chunks about 2-3 inches across. The random shapes look more artisanal than perfect squares.
Recipe Information
Serving Size: Makes about 24 pieces (depending on how you break it) Prep Time: 10 minutes Chill Time: 30 minutes Total Time: 40 minutes Difficulty Level: Beginner – seriously, if you can melt chocolate, you can make this Equipment Needed: Baking sheet, parchment paper, microwave-safe bowl, spatula
Tips for Perfect Chocolate Bark Every Time
Don’t rush the melting process. Chocolate burns easily, so using 50% power and stirring frequently is crucial. Burned chocolate tastes bitter and won’t set properly. If you see any lumps that won’t melt, that’s okay – the stirring will work them out.
Room temperature matters more than you’d think. If your kitchen is really warm (above 75°F), the chocolate might not set well at room temperature. That’s when the refrigerator becomes your friend. Just don’t store it there long-term or condensation can form.
Press those toppings down. I learned this the hard way when half my pretzels fell off the first batch I made. You want everything embedded in the chocolate slightly, not just sitting on top. Give everything a gentle press after sprinkling.
The fresher the better, but this bark keeps well for up to two weeks in an airtight container at room temperature. Layer pieces between parchment paper to prevent sticking. In hot weather, store it in the fridge.
Flavor Variations to Try
Once you’ve mastered the basic version, this recipe becomes a canvas for creativity. I’ve experimented with dozens of combinations, and here are the winners.
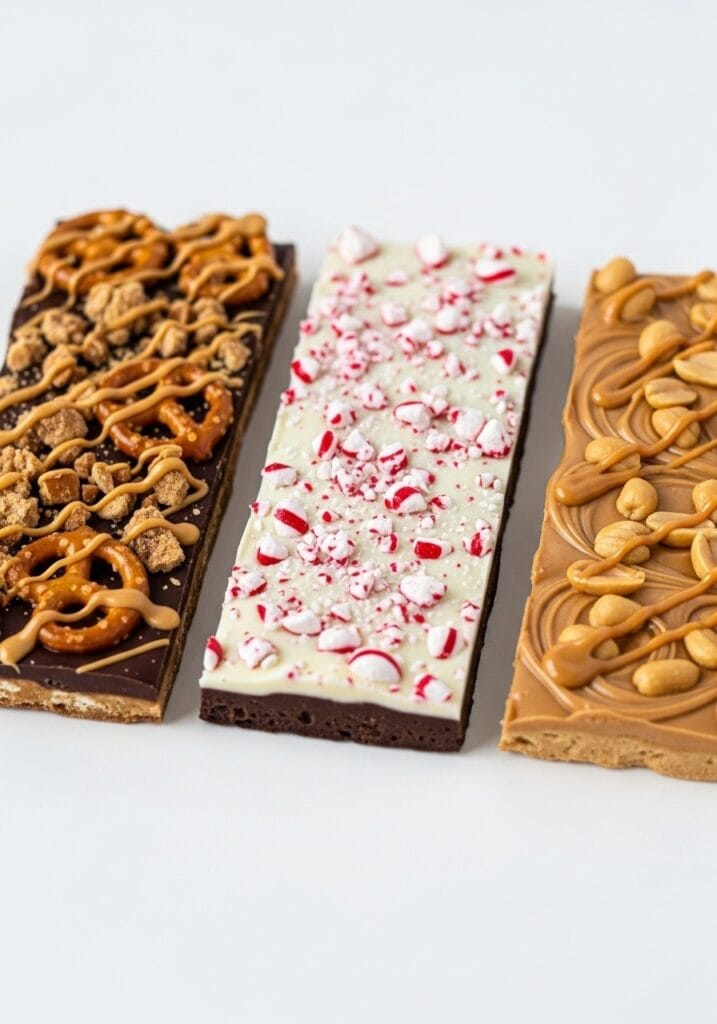
For a holiday version, swap regular pretzels for red and green candy-coated pretzels. Add crushed peppermint candy instead of toffee. The mint-chocolate combination feels festive and looks beautiful with the color contrast.
My kids love a s’mores version – use milk chocolate, top with broken graham crackers instead of pretzels, mini marshmallows, and chocolate chips. Pop it under the broiler for 30 seconds to toast the marshmallows before chilling.
For adults, try dark chocolate with sea salt pretzels, espresso powder mixed into the chocolate, and a drizzle of caramel on top. The coffee enhances the chocolate flavor and makes it taste incredibly sophisticated.
A peanut butter lover’s version uses half chocolate chips and half peanut butter chips, topped with pretzels and chopped Reese’s cups. It’s dangerously good – like homemade peanut butter chocolate swirl brownies in bark form.
Common Questions and Troubleshooting
Why won’t my chocolate melt smoothly? Chocolate seizes (gets grainy and clumpy) when it comes into contact with water. Make sure your bowl and spatula are completely dry. Even a tiny drop of water can ruin the whole batch. The coconut oil or butter helps prevent seizing and makes spreading easier.
Can I use chocolate bars instead of chips? Absolutely. Chop them into small, uniform pieces first. Bars often melt more smoothly than chips because they don’t contain stabilizers. You might need slightly less coconut oil if using bar chocolate.
My bark is too thick and hard to bite through. What happened? You probably poured the chocolate too thick. Aim for about ¼ inch thickness – it should be substantial but not chunky. If you accidentally make it too thick, let it warm up slightly at room temperature before breaking it apart.
The toppings keep falling off when I break the bark. This happens if the chocolate was too set when you added toppings. Next time, work faster or press the toppings in more firmly. You can also drizzle a little extra melted chocolate over the top to “glue” everything down.
How do I prevent the chocolate from blooming (getting white spots)? Temperature fluctuations cause blooming. Store the bark in a cool, consistent environment. If you refrigerate it, let it come to room temperature slowly before serving. The white spots are just cocoa butter rising to the surface – they’re safe to eat but don’t look as pretty.
Why This Works as a Gift
I’ve given this bark as gifts more times than I can count. It looks expensive and impressive but costs maybe $8 to make a full batch. Package it in clear cellophane bags tied with ribbon, or layer pieces in a decorative tin with parchment between layers.
People love receiving homemade treats, especially during holidays. This one travels well – it won’t melt in the car like cookies might, and it doesn’t crumble. I’ve mailed it to friends across the country with no issues.
The sweet-and-salty combination appeals to almost everyone. Even people who say they don’t like “fancy” desserts enjoy this because it’s basically elevated candy. It’s similar to making desserts and sweet treats that feel special without complicated techniques.
For teacher gifts, I make individual bags with about 4-5 pieces each. For holiday parties, I break it into larger chunks and arrange them on a platter. Either way, it disappears fast.
Serving Suggestions
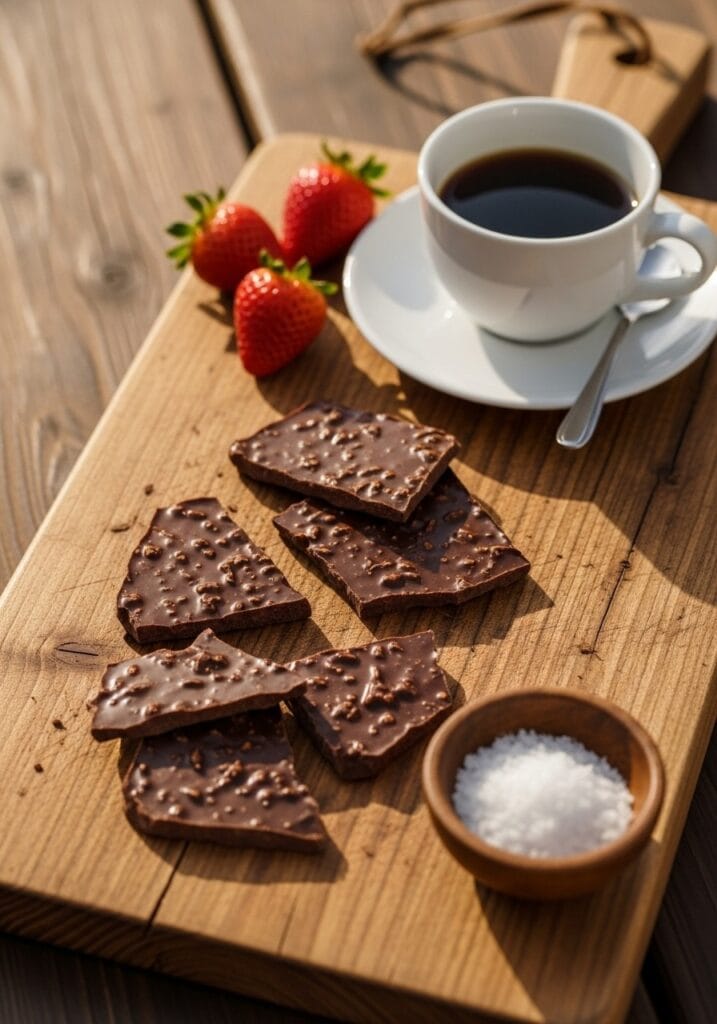
This bark works as an after-dinner treat, an afternoon snack, or a party dessert. I like putting out a platter with coffee after dinner – the combination is perfect.
For movie nights, break it into smaller pieces and serve in individual bowls. It’s less messy than popcorn and hits the sweet-salty craving that always shows up during movies.
You can also crumble it over ice cream for a DIY sundae topping. The pieces add amazing texture and flavor to vanilla ice cream. Sometimes I’ll make a batch specifically for this purpose and break it into smaller bits.
At parties, pair it with fresh fruit like strawberries or sliced apples. The fruit provides a refreshing contrast to the rich chocolate. It’s a nice balance if you’re serving this alongside other quick easy meals or snacks.
Storing and Shelf Life
At room temperature in an airtight container, this bark lasts about two weeks. Layer pieces between parchment paper to prevent them from sticking together. Keep it away from direct sunlight and heat sources.
In the refrigerator, it keeps for up to a month. The cold makes it extra crunchy, which some people prefer. Just let it sit at room temperature for 5-10 minutes before serving so it’s not too hard to bite through.
You can also freeze it for up to three months. Wrap pieces individually in plastic wrap, then store in a freezer bag. Thaw at room temperature when you’re ready to eat. Freezing doesn’t affect the taste or texture at all.
Humidity is the enemy of chocolate bark. In really humid climates, the chocolate can get sticky or develop condensation. Store it in the coolest, driest place you have, or keep it refrigerated and accept that it’ll need to warm up before serving.
Making It Kid-Friendly
My kids help make this all the time. They love breaking the pretzels and sprinkling the toppings. It’s a great easy snack idea for when you want to involve children in the kitchen without worrying about sharp knives or hot stoves.
For younger kids, use milk chocolate instead of dark. The milder flavor appeals more to children’s palates. You can also skip the sea salt on top if your kids are sensitive to salty flavors.
Let them customize their sections. Divide the chocolate into quarters on the pan, and let each kid decorate their section. One might want extra pretzels, another might prefer more toffee. It makes them more excited to try it.
This is also a fun activity for playdates or birthday parties. Set up a “bark bar” with melted chocolate and various toppings – pretzels, toffee, mini marshmallows, crushed cookies, sprinkles. Let kids make their own combinations.
The Science of Texture
What makes this bark so satisfying to eat? It’s all about texture contrast. The smooth chocolate melts on your tongue while the pretzels provide crunch. The toffee adds a different kind of crunch – sharper and more brittle than the pretzels.
Your brain registers multiple textures in each bite, which keeps the experience interesting. That’s why you can eat several pieces without getting bored. Single-texture foods get monotonous, but this bark keeps surprising you.
The temperature matters too. At room temperature, the chocolate has a slight snap when you break it but melts smoothly when you eat it. Too cold, and it’s hard to bite. Too warm, and it loses that satisfying snap.
This textural variety is what makes the recipe work so well. It’s similar to why Nutella stuffed chocolate cookies are so popular – the combination of textures creates a more memorable eating experience.
Scaling the Recipe Up or Down
The recipe doubles easily if you’re making it for a crowd or gifts. Use two baking sheets and work quickly so the chocolate doesn’t set before you finish topping it. You might need to melt the chocolate in two batches depending on your bowl size.
For a smaller batch, halve everything and use an 8×8 inch pan. This makes about 12 pieces – perfect if you’re just making a treat for your immediate family. The timing stays the same.
When tripling the recipe, I recommend working in two batches. Melting too much chocolate at once makes it harder to control the temperature. Plus, if you mess up one batch, you haven’t wasted everything.
The beauty of this recipe is its flexibility. Unlike baking, where ratios matter tremendously, you can adjust the topping amounts based on what you have. More pretzels? Great. Less toffee? Still delicious.
Why It’s Perfect for Last-Minute Situations
I keep chocolate chips, pretzels, and toffee bits stocked in my pantry specifically for this recipe. When someone drops by unexpectedly or I need a quick dessert for a potluck, I can whip this up in less time than it takes to run to the store.
The minimal hands-on time is key. You’re really only actively working for about 10 minutes. The rest is just waiting for it to chill. That means you can start it, do something else, and come back to finished bark.
It works well alongside other simple recipes too. If you’re already making something like one pot creamy pesto chicken for dinner, you can throw together this bark while the chicken cooks. Easy dessert, done.
No one needs to know it took 10 minutes to make. The glossy chocolate and artful arrangement of pretzels and toffee look like you spent way more time than you actually did. That’s my favorite kind of recipe – maximum impact, minimum effort.
This toffee pretzel chocolate bark has earned its spot in my regular rotation. It’s become the thing I’m known for bringing to parties, the treat my kids request for special occasions, and my go-to homemade gift. The sweet-salty combination never gets old, and every batch disappears within days (sometimes hours). If you’re looking for an easy snack that feels special, this is it.
Still wondering what to cook tomorrow? Take the stress out of dinner with my simple 7-day meal plan.
Get the 7-Day Meal Plan for $2.99