My sister calls me every December asking for the same thing – that candy cane bark I brought to her party three years ago. She swears it’s better than anything from a fancy chocolate shop, and honestly? She’s not wrong.
This peppermint chocolate bark takes maybe 20 minutes of actual work, requires zero baking skills, and disappears faster than you can say “holiday dessert.” The best part is watching people’s faces when that cool peppermint hits their tongue right after the rich chocolate melts.
Why This Recipe Works
Here’s what makes this different from store-bought versions. You control the chocolate quality, the peppermint intensity, and the crunch factor. No weird waxy texture or artificial flavors. Just real chocolate, real peppermint, and a satisfying snap when you break off a piece.
Tired of Deciding What to Cook Every Night?
I’ve put together a simple 7-day dinner meal plan using my most-loved recipes — complete with a grocery list and flexible swaps.
Just $2.99 – Instant Download
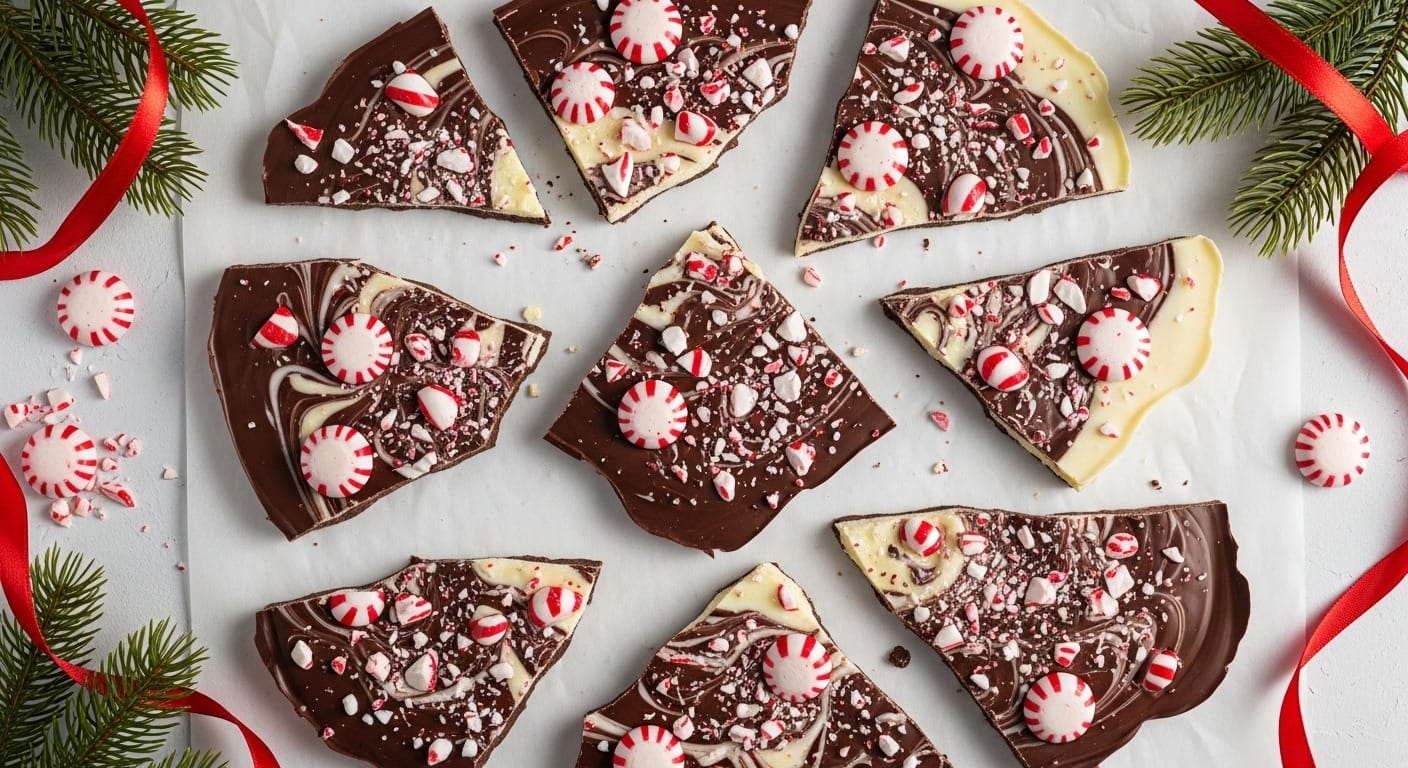
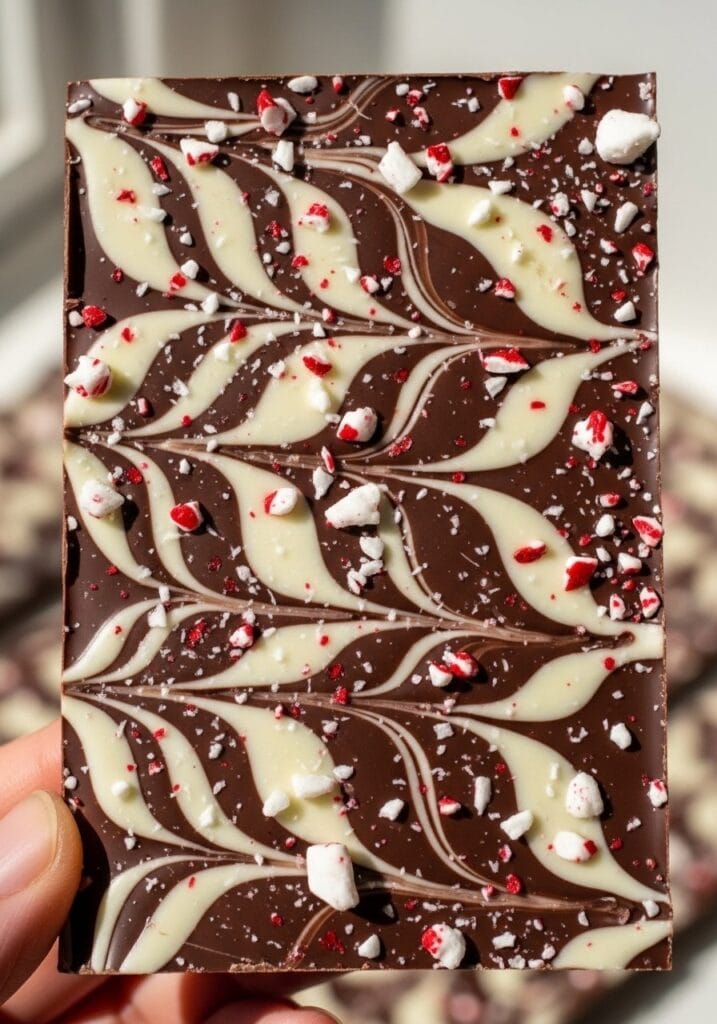
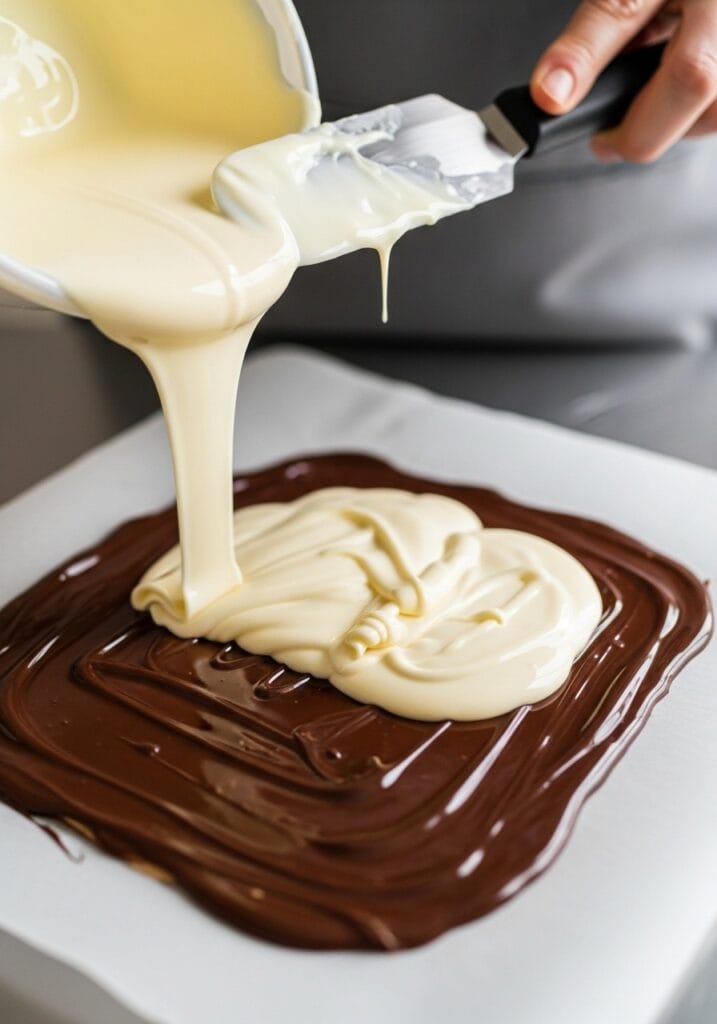
Get the Meal PlanThe recipe uses a two-layer technique – dark chocolate on bottom, white chocolate on top – which gives you that pretty marbled effect everyone loves on Pinterest. Total time from start to fridge is about 30 minutes, plus 2 hours chilling. Skill level? If you can melt chocolate and stir, you’re golden. The taste is minty, sweet, and just a little bitter from the dark chocolate, which keeps it from being too sugary.
What Makes Peppermint Chocolate Bark Special
This treat shows up at every holiday gathering for a reason. It’s impressive without being fussy. You can make it days ahead, it ships well if you’re sending gift boxes, and it satisfies that specific craving for something sweet and refreshing at the same time.
The contrast between smooth chocolate and crunchy candy cane pieces creates an addictive texture. Some bites are more minty, some more chocolatey – it’s never boring. Plus, you can customize it easily. Want white chocolate peppermint bark only? Done. Prefer dark chocolate peppermint bark throughout? Go for it.
Ingredients You’ll Need
For the Dark Chocolate Layer
- 12 oz (340g) dark chocolate chips or chopped dark chocolate (60-70% cocoa)
- 1 tsp coconut oil or vegetable oil
- 1/4 tsp peppermint extract
For the White Chocolate Layer
- 12 oz (340g) white chocolate chips or chopped white chocolate
- 1 tsp coconut oil or vegetable oil
- 1/2 tsp peppermint extract
For the Topping
- 1/2 cup (60g) crushed candy canes or peppermint candies
- 1/4 cup (30g) roughly chopped peppermint candies (for bigger pieces)
- Flaky sea salt (optional, but recommended)
Ingredient Notes: Use good quality chocolate here. The cheap stuff doesn’t melt smoothly and tastes waxy. Ghirardelli, Guittard, or even Trader Joe’s chocolate chips work great. For peppermint extract, a little goes a long way – too much tastes like toothpaste. If you can’t find peppermint candies, regular candy canes work perfectly. Crush them by placing them in a sealed plastic bag and smacking with a rolling pin. Therapeutic and effective.
Equipment Needed
- Large baking sheet (about 13×18 inches)
- Parchment paper or silicone baking mat
- 2 microwave-safe bowls or double boiler setup
- Spatula or offset spatula
- Butter knife or toothpick (for marbling)
- Rolling pin (for crushing candy canes)
- Plastic zip bag
Step-by-Step Instructions
Prep Your Workspace
- Line your baking sheet with parchment paper, letting it hang over the edges slightly for easy removal later.
- Place candy canes in a sealed plastic bag and crush them with a rolling pin until you have a mix of fine pieces and slightly larger chunks.
- Set aside about 1/4 of the crushed candy for sprinkling on top.
Make the Dark Chocolate Layer
- Combine dark chocolate and 1 tsp coconut oil in a microwave-safe bowl.
- Microwave in 30-second intervals, stirring between each, until chocolate is about 80% melted – usually 1.5 to 2 minutes total.
- Stir continuously until completely smooth (the residual heat will melt remaining chunks).
- Add 1/4 tsp peppermint extract and mix well.
- Pour chocolate onto prepared baking sheet and spread into a thin, even layer about 1/4-inch thick using a spatula.
- Work quickly as chocolate starts setting within 2-3 minutes.
- Place in freezer for 8-10 minutes until just firm but not completely hardened.
Timing Tip: Don’t skip the freezer step. If the dark chocolate layer is too soft, the white chocolate will mix in instead of sitting on top. If it’s too hard, the layers won’t bond properly.
Add the White Chocolate Layer
- While dark chocolate chills, melt white chocolate with 1 tsp coconut oil using the same method – 30-second intervals, stirring well.
- White chocolate burns easier than dark, so watch it carefully and stop when it’s just melted.
- Stir in 1/2 tsp peppermint extract.
- Remove baking sheet from freezer – the dark chocolate should feel firm to touch.
- Pour white chocolate over dark chocolate layer, spreading gently to cover completely.
- Don’t press too hard or you’ll mix the layers.
Create the Marble Effect
- Drop small dollops of leftover dark chocolate (if any) onto the white chocolate surface.
- Use a butter knife or toothpick to swirl the chocolates together in figure-eight motions.
- Don’t over-swirl – you want distinct streaks, not a muddy brown color.
- Three to four swirls across the surface is usually enough.
Add the Toppings
- Immediately sprinkle crushed candy canes evenly over the surface while chocolate is still wet.
- Press larger candy pieces gently into the chocolate so they stick.
- Add a light sprinkle of flaky sea salt if using (trust me on this – it makes the flavors pop).
- Refrigerate for at least 2 hours or freeze for 45 minutes until completely firm.
Break and Serve
- Remove from fridge and let sit at room temperature for 5 minutes – this prevents the chocolate from shattering when you break it.
- Lift parchment paper to remove bark from baking sheet.
- Break into irregular pieces by hand or cut with a sharp knife for cleaner edges.
- Store in an airtight container with parchment paper between layers.
Storage and Gifting Tips

Keep this chocolate peppermint bark in an airtight container in the refrigerator for up to 2 weeks. The candy cane pieces will start to soften after about a week, losing some of their crunch. For longer storage, freeze for up to 2 months – just layer pieces between parchment paper so they don’t stick together.
If you’re making this for gifts, wrap individual pieces in small cellophane bags tied with ribbon. It looks fancy with minimal effort. Stack pieces in decorative tins between sheets of wax paper. The bark ships surprisingly well – just pack it tightly so pieces don’t slide around and break into tiny bits.
Room temperature makes the chocolate slightly soft, which some people prefer. I like it cold straight from the fridge because the snap is more satisfying. Either way, this no-bake dessert needs to stay cool or it’ll turn into a melty mess.
Variations to Try
White Chocolate Peppermint Bark Only: Skip the dark chocolate base entirely and make a double batch of the white chocolate layer. Add crushed Oreos or graham crackers for texture instead of the second chocolate layer.
Dark Chocolate Peppermint Bark: Use all dark chocolate – make one batch for the base, let it set almost completely, then add a second thin layer on top before sprinkling with peppermint.
Milk Chocolate Version: Swap dark chocolate for milk chocolate if you prefer something sweeter and less intense. Kids usually love this version.
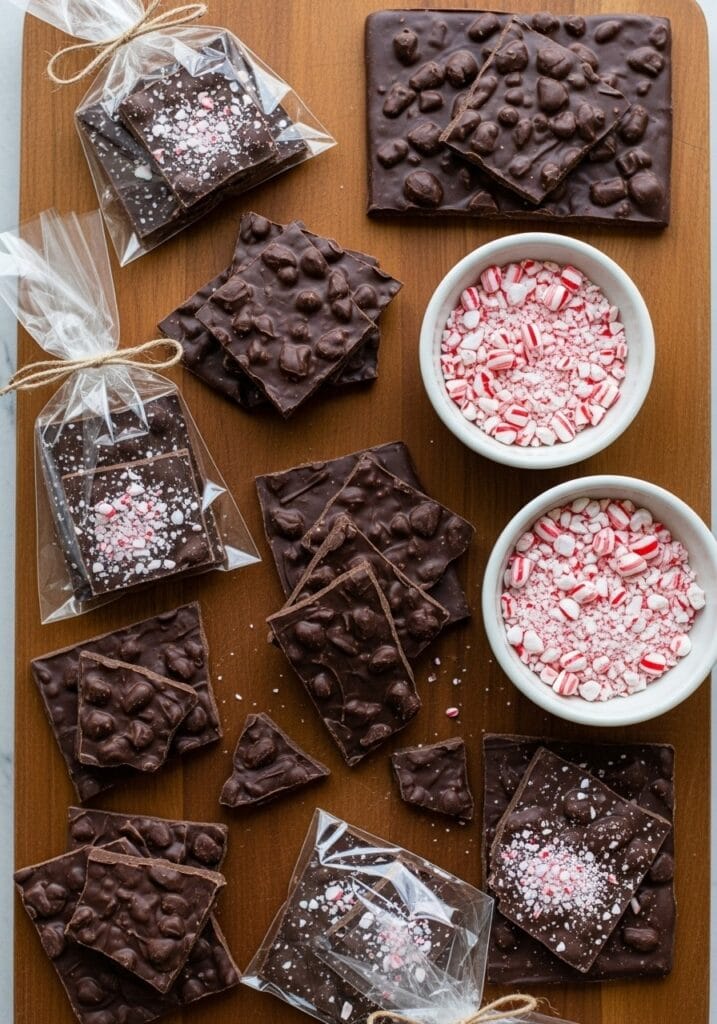
Nutty Addition: Mix 1/2 cup toasted almonds or pecans into the dark chocolate layer before it sets. The nuts add another dimension of crunch.
Espresso Mint: Add 1 tsp instant espresso powder to the dark chocolate layer. Coffee and mint together taste surprisingly good.
Triple Chocolate: Use dark chocolate, milk chocolate, and white chocolate in three separate layers. It takes longer but looks incredible when you break it apart.
Common Mistakes to Avoid
Getting water in your chocolate ruins everything. Even a single drop makes chocolate seize up into a grainy mess. Make sure all your bowls and utensils are completely dry. Steam from a double boiler can cause the same problem, so keep the pot lid off.
Overheating chocolate is the second biggest issue. Once chocolate gets too hot, it separates and turns greasy. Microwave in short bursts and remove it when there are still a few unmelted chunks. The residual heat will finish the job.
Using too much peppermint extract makes the bark taste medicinal. Start with less than you think you need. You can always add more, but you can’t take it away.
Not crushing the candy canes enough leaves huge pieces that fall off when you bite into the bark. Aim for a mix of fine crumbs and quarter-inch pieces.
Letting the dark chocolate layer get too warm before adding white chocolate creates a blended layer instead of distinct stripes. The first layer should feel cool and firm to your finger.
Why This Recipe Beats Store-Bought
Most commercial peppermint bark uses compound chocolate (made with vegetable oil instead of cocoa butter) which has that weird waxy mouthfeel. Real chocolate melts on your tongue differently – it’s silkier and tastes cleaner. You’re also controlling the peppermint level, which means it won’t be overwhelmingly minty like some brands.
The cost difference is significant too. A pound of decent peppermint bark from a chocolate shop runs about $25-30. This recipe makes roughly the same amount for under $12, even using quality chocolate chips. If you’re making treats for a crowd or filling holiday gift boxes, the savings add up fast.
Making it yourself means you can adjust everything. Want extra candy cane crunch? Add more. Prefer dark chocolate peppermint bark exclusively? Easy change. Need it nut-free for someone with allergies? You know exactly what’s in it.
Serving Suggestions

Break bark into small pieces and serve alongside coffee or hot chocolate. The minty-chocolate combination works perfectly with warm drinks. I’ve seen people stir broken pieces into vanilla ice cream, which sounds chaotic but apparently tastes amazing.
Add it to holiday dessert boards between strawberry shortcake mousse jars and other quick desserts. The bark adds color and texture variety without requiring any last-minute prep.
Crush larger pieces and sprinkle over chocolate pudding, cheesecake, or brownies. Some people even chop it finely and mix it into cookie dough before baking, which creates little pockets of peppermint throughout.
Frequently Asked Questions
Can I use candy cane flavored chips instead of extract? Yes, but the flavor won’t be as strong. You might want to add a tiny bit of extract anyway for that punch of mint.
Why is my chocolate streaky and dull? This happens when chocolate gets too hot or cools too quickly. Next time, melt it more gently and let it set at room temperature for 10 minutes before refrigerating.
Can I make this without peppermint extract? Sure, but then it’s just chocolate bark. The crushed candy canes alone will give you some mint flavor, just less intense.
How thin should I spread the chocolate? Aim for about 1/4 inch thick for both layers. Too thin and it’ll be fragile and break into tiny shards. Too thick and it’s hard to bite through.
My white chocolate seized up – what happened? Probably got too hot or water got in. White chocolate is finicky. Throw it out and start over with fresh chocolate, being extra careful about temperature and moisture.
Can I use peppermint oil instead of extract? Peppermint oil is much stronger than extract. Use just 2-3 drops total or it’ll taste like you’re eating mouthwash.
Make-Ahead Strategy
This is honestly one of the best make-ahead treats out there. I usually make three batches the first week of December and keep them in the freezer. Pull out a container whenever you need a hostess gift or want something sweet after dinner.
The bark actually tastes better after sitting for a day. The peppermint flavor mellows slightly and distributes more evenly through the chocolate. Fresh bark sometimes has stronger peppermint spots where the extract didn’t fully incorporate.
For parties, arrange pieces on a platter an hour before guests arrive and keep it in a cool spot. Don’t put it outside if it’s warm – chocolate will sweat and look unappetizing. If you’re doing a weeknight dinner and want a fast dessert option, having this ready to go makes life so much easier.
The Perfect Holiday Gift
My go-to gift packaging method: Stack 4-5 pieces of bark in a small cellophane bag, tie it with ribbon, and attach a tag. Done. It looks expensive but costs maybe $2 per bag. Last year I made 40 bags for teacher gifts and neighbor treats. Total time including breaking and wrapping: about an hour.
For coworkers or friends, pack bark pieces in small mason jars with a ribbon around the lid. Add a layer of crushed candy canes at the bottom for a nice visual effect. The jars are reusable, which people appreciate.
If you’re shipping bark to someone, use a sturdy box and pack it tightly with bubble wrap or crumpled paper. Include a cold pack if it’s going somewhere warm. Most pieces survive shipping intact, and honestly, broken bark still tastes exactly the same.
Final Thoughts
Every December I tell myself I’m going to try new holiday treats, maybe something more sophisticated. And every December I end up making this peppermint chocolate bark again because nothing else gets the same reaction. It’s festive without being complicated, delicious without being too rich, and quick enough that I can make it on a random Tuesday evening.
The recipe is forgiving too. I’ve made versions where the layers got a bit mixed together, or I forgot the sea salt, or used the wrong type of chocolate – and it always turned out fine. Not necessarily Pinterest-perfect, but definitely delicious.
Whether you’re looking for easy desserts to bring to a party or trying to fill a holiday treat tin without spending all weekend in the kitchen, this bark solves the problem. Make it once and you’ll understand why my sister keeps asking for it year after year.
Recipe at a Glance:
- Prep Time: 15 minutes
- Chill Time: 2 hours
- Total Time: 2 hours 15 minutes
- Difficulty: Beginner
- Servings: About 24 pieces
- Equipment: Baking sheet, parchment paper, microwave or double boiler
Still wondering what to cook tomorrow? Take the stress out of dinner with my simple 7-day meal plan.
Get the 7-Day Meal Plan for $2.99