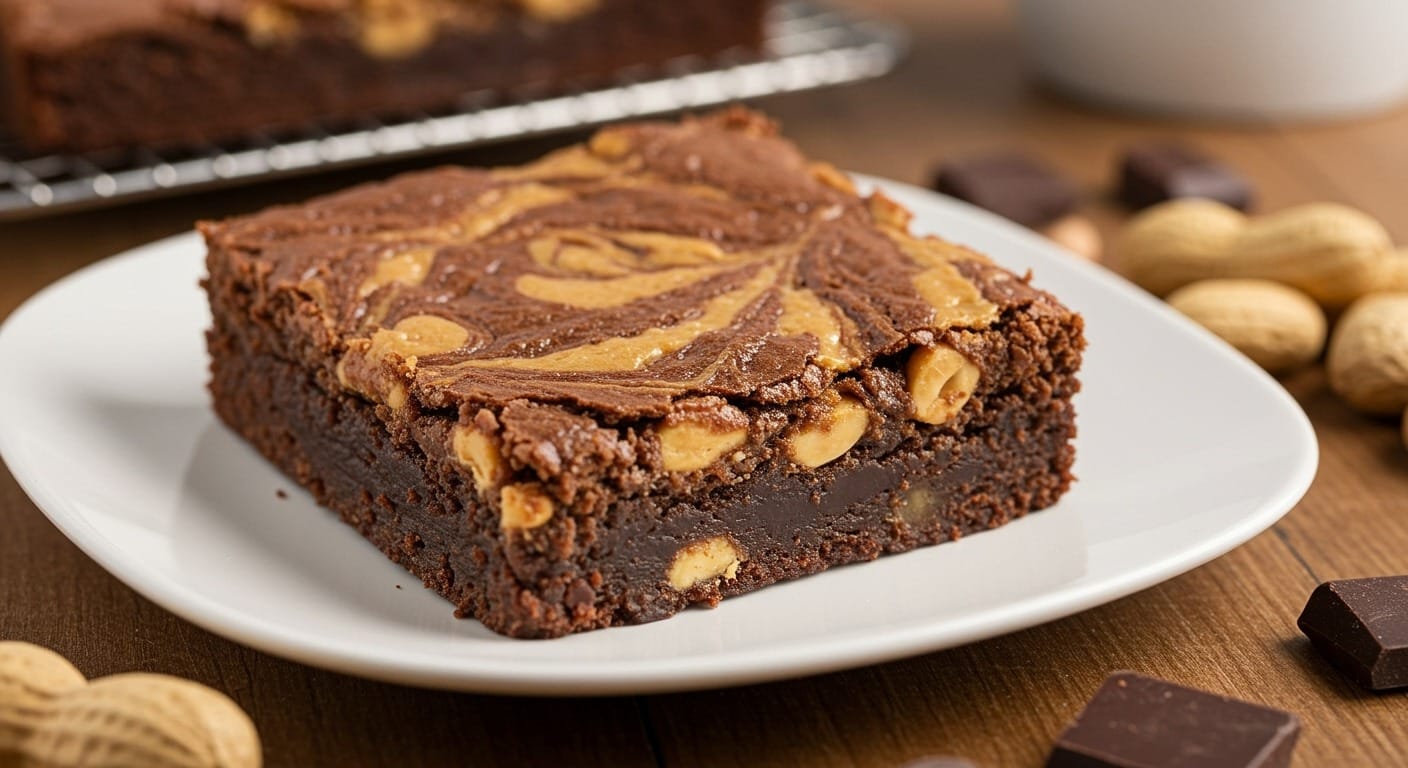
There’s something magical about the combination of chocolate and peanut butter. It’s like they were made for each other. I remember the first time I made these peanut butter chocolate swirl brownies for a family gathering – they disappeared faster than I could cut them into squares. My cousin kept asking for the recipe, and honestly, I was surprised at how simple it was to create something that looked and tasted so impressive.
These brownies bring together two worlds: the deep, fudgy richness of chocolate brownies and the creamy, nutty sweetness of peanut butter. The swirl isn’t just pretty – it creates pockets of flavor in every bite. Some bites are more chocolatey, others more peanut buttery, and that variety makes them so addictive.
What makes this recipe special? It takes about 45 minutes from start to finish, requires no fancy equipment, and uses ingredients you probably already have. The skill level is beginner-friendly, though the result looks bakery-worthy. The taste profile hits all the right notes – rich, sweet, nutty, and just a hint of salt to balance everything out.
Tired of Deciding What to Cook Every Night?
I’ve put together a simple 7-day dinner meal plan using my most-loved recipes — complete with a grocery list and flexible swaps.
Just $2.99 – Instant Download
Get the Meal PlanWhy You’ll Love This Recipe
Look, I’ve tried plenty of brownie recipes over the years. Some are too cakey, others too dense. These peanut butter brownies strike the perfect balance. They’re fudgy without being undercooked, rich without being overwhelming, and the peanut butter swirl adds a creamy texture that breaks up the intensity of the chocolate.
The beauty of this chocolate swirl dessert is its versatility. Serve them warm with vanilla ice cream for an indulgent treat, pack them in lunchboxes, or bring them to potlucks where they’ll definitely steal the show. They store well for days (if they last that long), and you can even freeze them for later.
Plus, there’s something deeply satisfying about creating those swirls. It’s almost meditative – dragging a knife through the batter, watching the peanut butter marble into the chocolate. Kids love helping with this part, and it’s nearly impossible to mess up. Even if your swirls aren’t perfect, they’ll still taste incredible.
Ingredients You’ll Need
For the Chocolate Brownie Base:
- 170g (¾ cup) unsalted butter
- 200g (1¼ cups) dark chocolate chips or chopped chocolate (60-70% cocoa)
- 200g (1 cup) granulated sugar
- 100g (½ cup) light brown sugar, packed
- 3 large eggs, at room temperature
- 1 tsp vanilla extract
- 95g (¾ cup) all-purpose flour
- 30g (¼ cup) unsweetened cocoa powder
- ½ tsp salt
- ¼ tsp baking powder
For the Peanut Butter Swirl:
- 150g (½ cup) creamy peanut butter (not natural, separating kind)
- 50g (¼ cup) granulated sugar
- 1 large egg yolk
- ½ tsp vanilla extract
- Pinch of salt
Substitutes: If you’re allergic to peanuts, try almond butter or cashew butter. For a deeper chocolate flavor, use espresso powder (1 tsp) in the brownie base. Coconut sugar can replace granulated sugar for a caramel-like note.
Equipment You’ll Need
- 9×9 inch (23×23 cm) square baking pan
- Parchment paper
- Two mixing bowls (medium-sized)
- Whisk or electric mixer
- Rubber spatula
- Butter knife or skewer for swirling
- Measuring cups and spoons
- Digital kitchen scale (optional but helpful)
Step-by-Step Instructions
Preparing the Base
- Preheat your oven to 175°C (350°F).
- Line a 9×9 inch baking pan with parchment paper, leaving some overhang on the sides for easy removal.
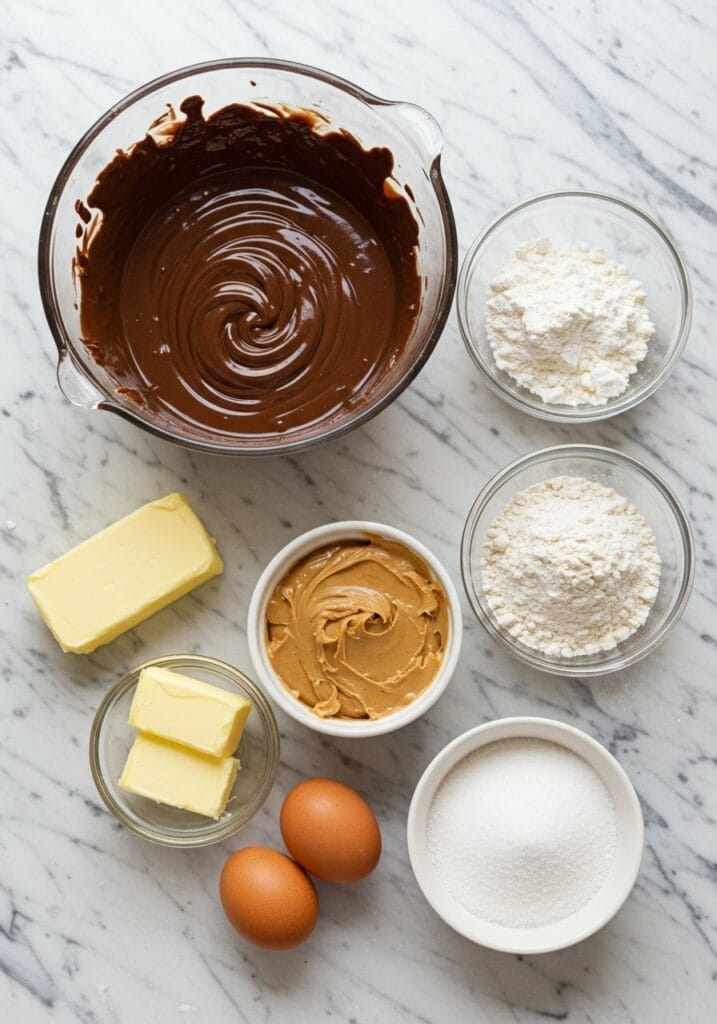
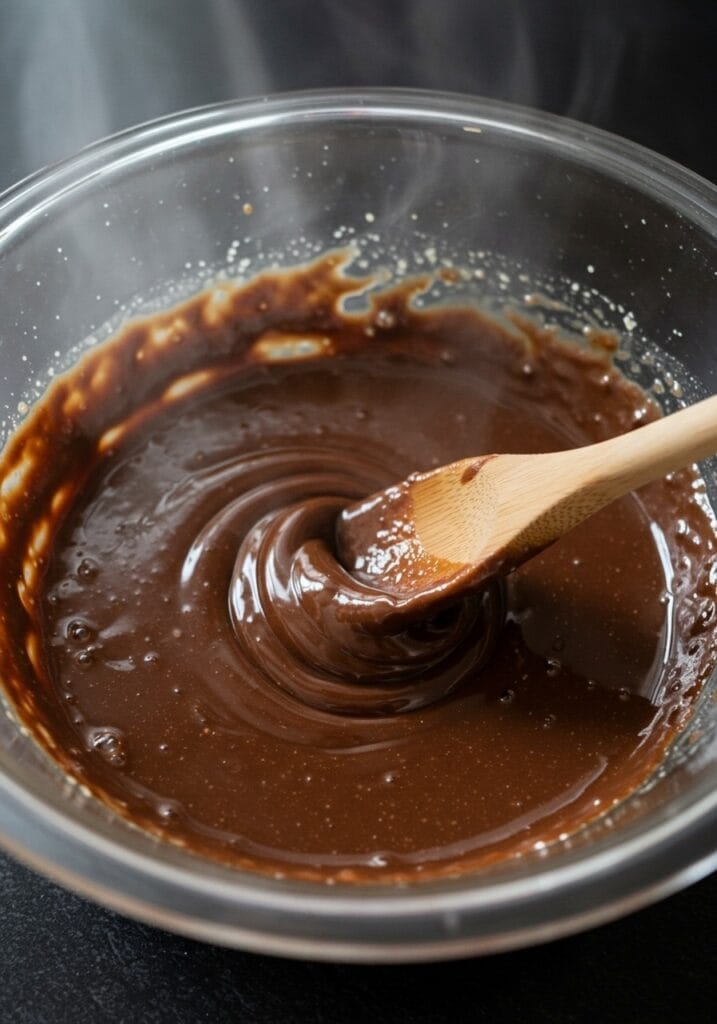
- Melt butter and dark chocolate together in a heatproof bowl over simmering water (double boiler method) or in 30-second microwave intervals, stirring between each interval.
- Stir until completely smooth and glossy, then remove from heat.
- Let the chocolate mixture cool for 5 minutes while you prepare other ingredients.
Making the Brownie Batter
- Add granulated sugar and brown sugar to the cooled chocolate mixture.
- Whisk vigorously for about 1 minute until well combined and slightly thickened.
- Crack in the eggs one at a time, whisking well after each addition.
- Add vanilla extract and whisk until the batter is smooth and glossy.
- Sift together flour, cocoa powder, salt, and baking powder in a separate bowl.
- Fold the dry ingredients into the wet mixture using a rubber spatula, mixing just until no flour streaks remain (don’t overmix).
Creating the Peanut Butter Mixture
- In a separate medium bowl, combine peanut butter, sugar, egg yolk, vanilla extract, and a pinch of salt.
- Stir with a spoon or whisk until smooth and creamy, about 30 seconds.
- The mixture should be thick but pourable.
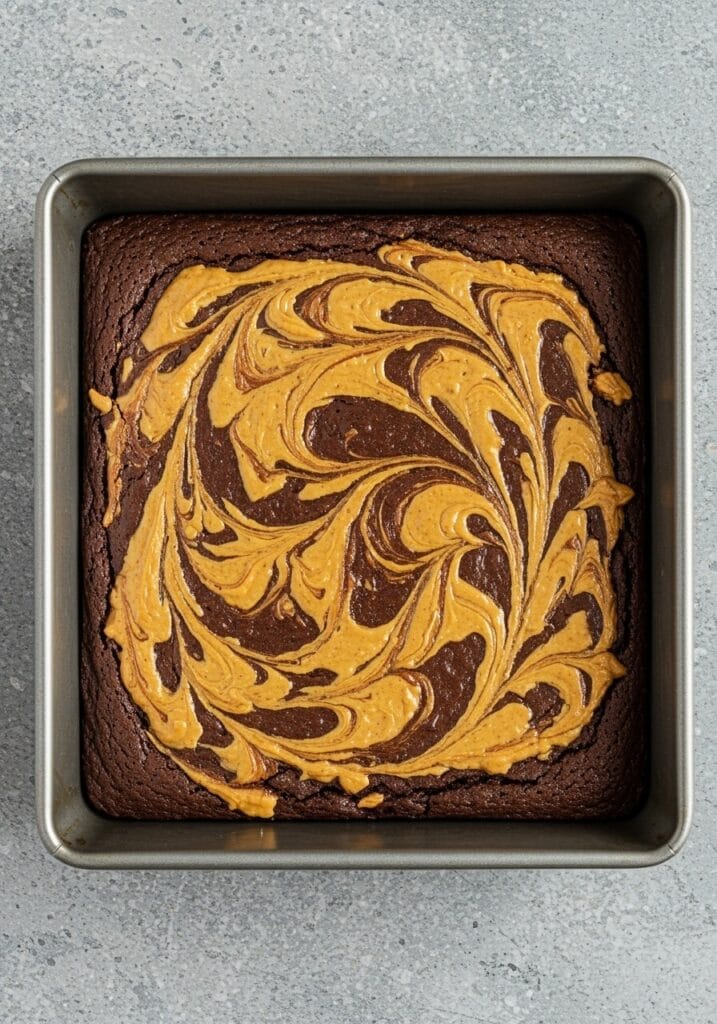
Assembling and Swirling
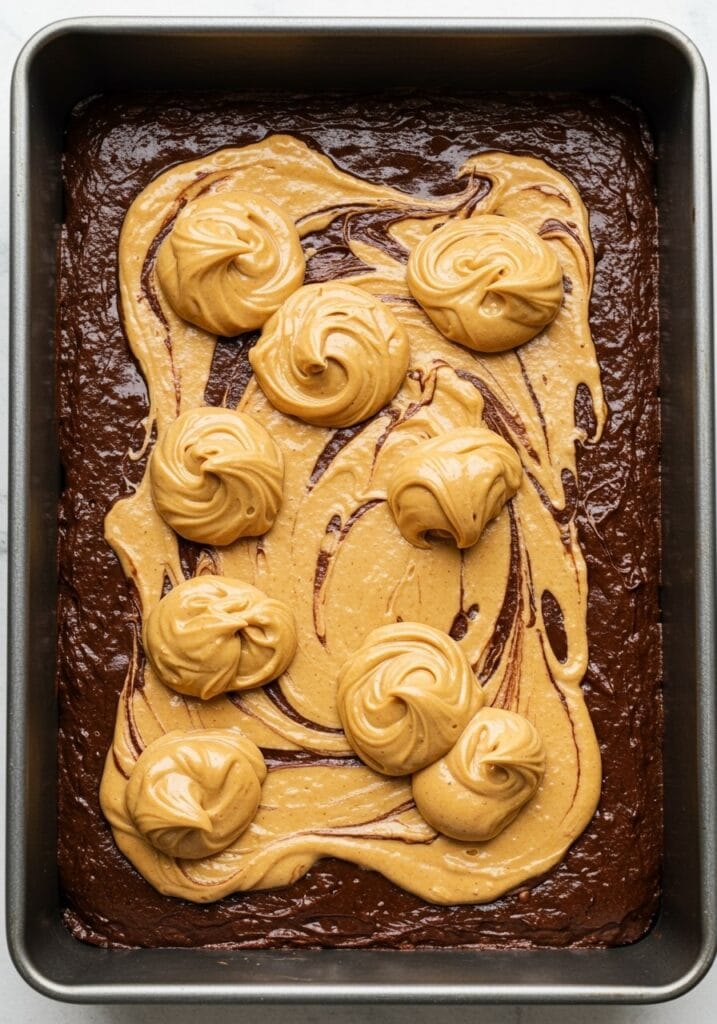
- Pour the chocolate brownie batter into the prepared pan, spreading it evenly with a spatula.
- Drop spoonfuls of the peanut butter mixture over the top of the brownie batter (about 8-10 dollops).
- Use a butter knife or skewer to create swirls by dragging it through both batters in a zigzag or figure-eight pattern.
- Don’t over-swirl – you want distinct ribbons of peanut butter, not a completely mixed batter.
- Tap the pan gently on the counter 2-3 times to release air bubbles.
Baking
- Place the pan on the middle rack of your preheated oven.
- Bake for 28-32 minutes at 175°C (350°F).
- The brownies are done when the edges look set and the center has a slight jiggle (a toothpick inserted should come out with a few moist crumbs, not wet batter).
- Watch carefully after 25 minutes – overbaking makes them dry instead of fudgy.
- Remove from oven and let cool in the pan for 15 minutes.
Cooling and Serving
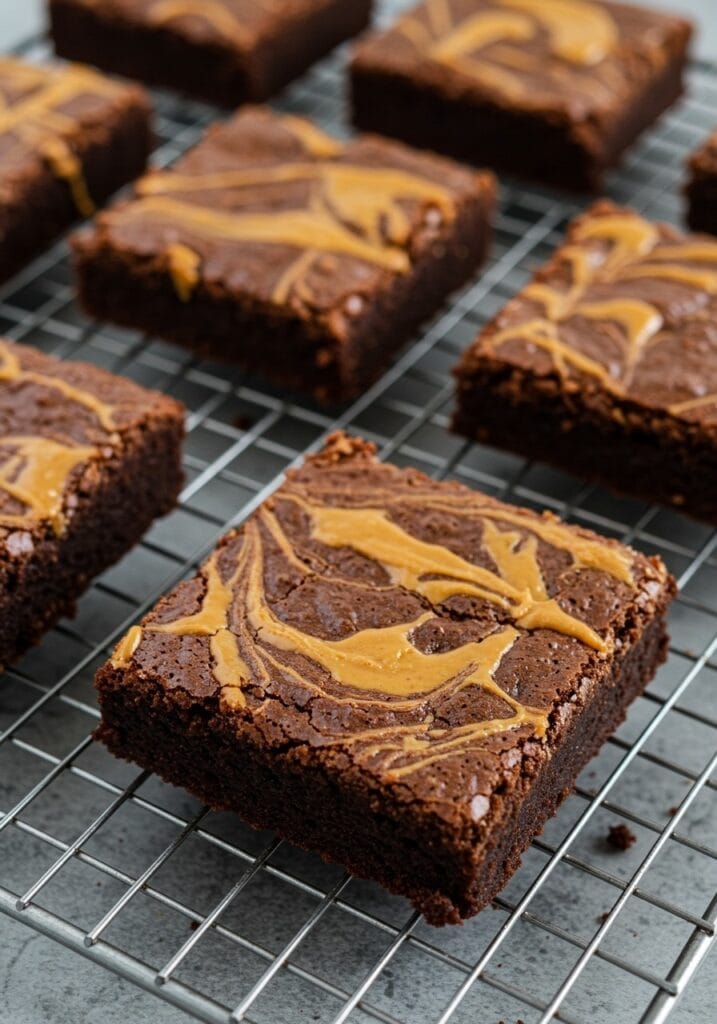
- Use the parchment paper overhang to lift the brownies out of the pan onto a cutting board.
- Let cool completely for at least 30 minutes before cutting (this makes cleaner cuts).
- Use a sharp knife, wiping it clean between cuts, to slice into 16 squares.
- Store in an airtight container at room temperature for up to 4 days, or refrigerate for up to 1 week.
Tips for Perfect Nutty Brownies
The difference between good and great brownies often comes down to small details. Here’s what I’ve learned from making these dozens of times.
Don’t skip the cooling time for the melted chocolate. If you add eggs to chocolate that’s too hot, you’ll end up with scrambled eggs in your batter. Not appetizing. Five minutes is usually enough – the bowl should feel warm but not hot to the touch.
Room temperature eggs make a huge difference. They incorporate more smoothly into the batter, creating that signature shiny, crackly top. If you forget to take them out ahead of time, place them in a bowl of warm (not hot) water for 5 minutes.
The swirling technique matters, but don’t stress too much about making it perfect. I’ve found that simple back-and-forth motions work just as well as elaborate patterns. The key is not to over-swirl, which can muddy the distinct chocolate and peanut butter flavors.
Baking time can vary depending on your oven and the pan you use. Metal pans conduct heat faster than glass, so you might need an extra 2-3 minutes with a glass pan. Trust your eyes and that slight jiggle in the center more than the timer.
For cleaner cuts, refrigerate the brownies for an hour before slicing. They’ll be firmer and less likely to crumble. Run your knife under hot water, dry it off, then make your cut. Repeat for each cut.
Variations to Try
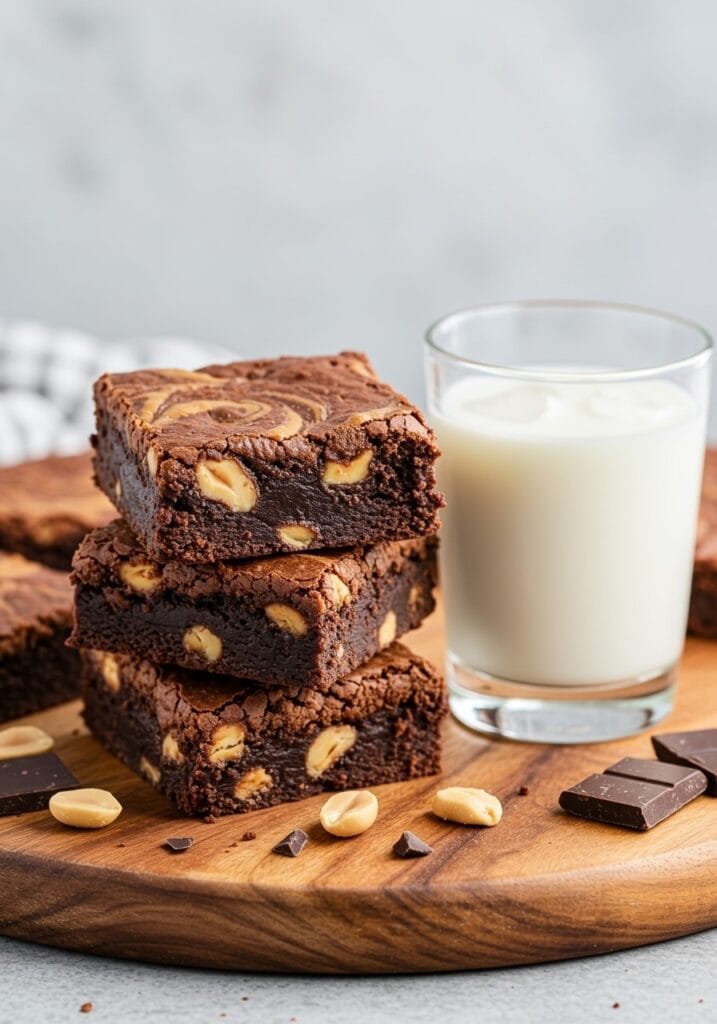
Once you’ve mastered the basic recipe, there’s room to play around. I’ve added a handful of chocolate chips to the brownie batter for extra chocolatey pockets. Some people love stirring chopped peanuts or peanut butter chips into the base for more texture.
For a salted version, sprinkle flaky sea salt over the top right after swirling and before baking. The salt crystals create a sweet-savory contrast that’s pretty addictive. If you’re a fan of desserts and sweet treats, this variation might become your new favorite.
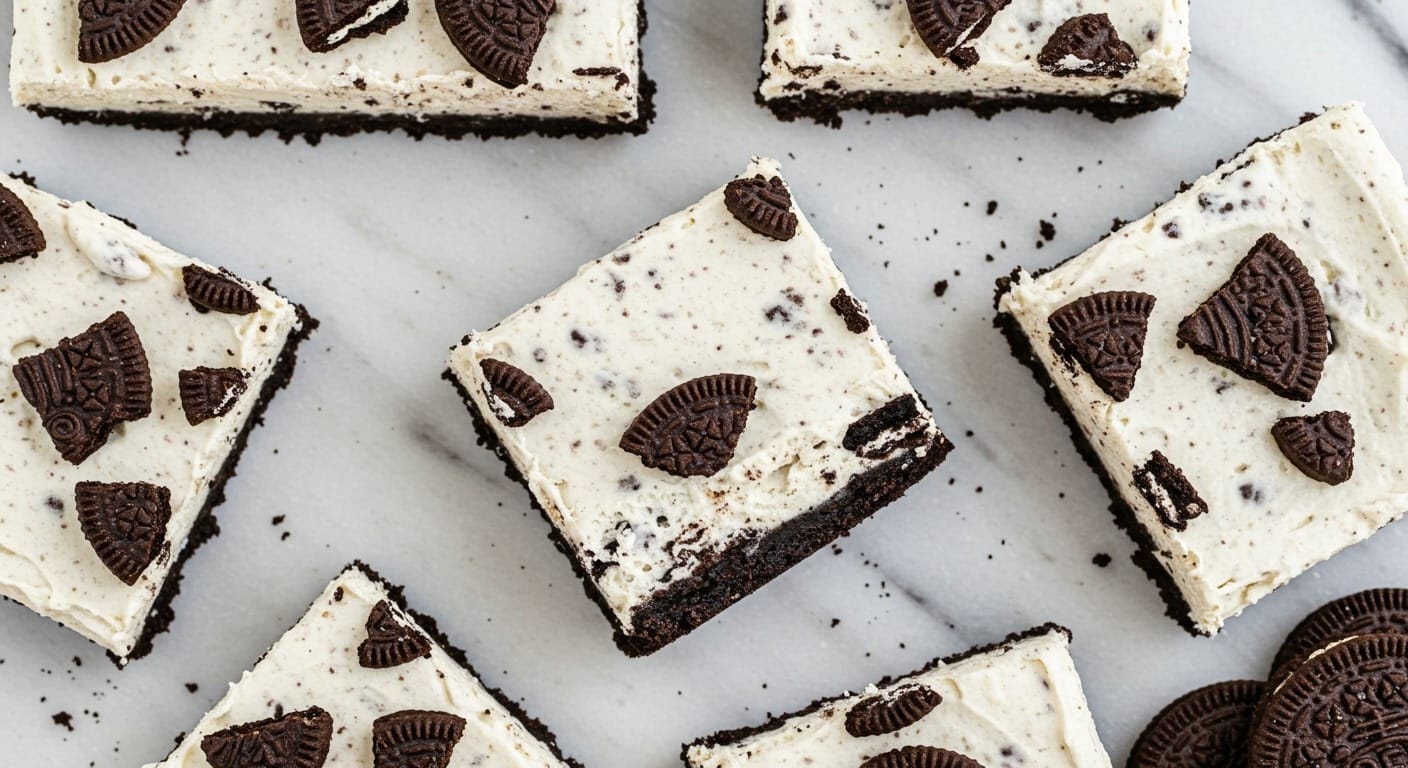
You could also try white chocolate chips mixed into the brownie batter, or drizzle melted peanut butter over the top after baking. A cream cheese swirl (using softened cream cheese instead of peanut butter) is another direction worth exploring, similar to what you might find in no-bake Oreo cheesecake bars.
Serving Suggestions
These brownies are pretty perfect on their own, but there are ways to take them up a notch. Warm them slightly in the microwave (about 15 seconds) and top with vanilla ice cream. The contrast between warm, fudgy brownie and cold, creamy ice cream is unbeatable.
For a fancier presentation, dust them with powdered sugar or drizzle with melted chocolate. They’re great alongside coffee or hot chocolate, especially on a lazy weekend afternoon.
If you’re packing these for lunch or gifting them, they travel well. Just make sure they’re completely cooled and stored in a container with parchment paper between layers so they don’t stick together.
Storage and Make-Ahead Tips
These brownies actually taste better the next day. Something about letting the flavors meld overnight makes them even more rich and fudgy. Store them in an airtight container at room temperature for up to 4 days.
For longer storage, refrigerate them for up to a week. They’ll become a bit firmer when cold, which some people prefer. Just let them come to room temperature for 10-15 minutes before serving, or warm them slightly in the microwave.
You can freeze these brownies for up to 3 months. Wrap individual squares in plastic wrap, then place them in a freezer bag. Thaw at room temperature for about an hour, or warm them in the microwave for 20-30 seconds.
The unbaked batter can also be frozen. Pour it into the lined pan, swirl the peanut butter on top, cover tightly with plastic wrap and foil, then freeze for up to 2 months. Bake from frozen, adding 10-15 minutes to the baking time.
Why This Recipe Works
The science behind these brownies is actually pretty interesting. The combination of both granulated and brown sugar creates the right texture – granulated sugar gives structure and crispness to the top, while brown sugar adds moisture and chewiness.
Using both melted chocolate and cocoa powder intensifies the chocolate flavor. Melted chocolate provides richness and fudginess, while cocoa powder contributes that deep, pure chocolate taste without adding extra fat.
The peanut butter mixture is thick enough to hold its shape during baking but soft enough to swirl. The egg yolk adds richness without making it too loose. This balance is what creates those distinct ribbons instead of the peanut butter sinking or completely mixing into the chocolate.
If you enjoy quick and easy meals or treats that don’t require hours in the kitchen, this recipe fits perfectly. It’s straightforward enough for a weeknight but impressive enough for special occasions.
Common Questions
Can I use natural peanut butter? I’d recommend against it for this recipe. Natural peanut butter (the kind that separates) is too oily and can make the swirl mixture too loose. It also doesn’t have the same creamy texture. Stick with regular creamy peanut butter like Skippy or Jif for best results.
Why are my brownies cakey instead of fudgy? This usually happens from overbaking or using too much flour. Make sure you’re measuring flour correctly (spoon it into the measuring cup, don’t pack it) and watch your baking time carefully. Pull them out when there’s still a slight jiggle in the center.
Can I double this recipe? Absolutely. Use a 9×13 inch pan and keep the same baking temperature. You’ll need to add 5-10 minutes to the baking time, but start checking at 30 minutes.
My swirls disappeared during baking. What happened? The peanut butter mixture might have been too thin, or you swirled too much. Make sure your peanut butter mixture is thick and only swirl 4-5 times through the batter. Over-swirling causes the two batters to mix too much.
Recipe Information
Serving Size: 16 brownies Prep Time: 15 minutes Baking Time: 28-32 minutes Total Time: 45 minutes (plus cooling time) Difficulty Level: Easy to Intermediate Calories per serving: Approximately 280 calories
These peanut butter chocolate swirl brownies have become a staple in my kitchen. They’re the kind of dessert that makes people think you spent hours in the kitchen, when really, you just mixed a few bowls and did some artistic swirling. The combination of flavors, that fudgy texture, and those beautiful marbled patterns make them worth every calorie. Whether you’re baking for a special occasion or just craving something indulgent on a random Tuesday, this recipe delivers. And if you’re looking for more inspiration, check out Tasty Dish Diary for endless recipe ideas that are just as simple and satisfying. Happy baking!
Still wondering what to cook tomorrow? Take the stress out of dinner with my simple 7-day meal plan.
Get the 7-Day Meal Plan for $2.99