There’s something about cheesecake that feels fancy, right? Like you need special skills or hours of patience. But here’s a secret – you don’t. I stumbled onto this recipe during a summer when I refused to turn on my oven, and honestly, these no-bake Oreo cheesecake bars became my go-to whenever someone asked me to bring dessert. They’re ridiculously easy, require no baking whatsoever, and taste like you spent way more effort than you actually did.
The best part? They only take about 15 minutes of actual hands-on work. The hardest part is waiting for them to chill in the fridge. These bars are creamy, sweet, and have that satisfying Oreo crunch in every bite. Whether you’re hosting a party, need a quick dessert after a weeknight dinner, or just want to satisfy a cheesecake craving without the fuss, this Oreo bars recipe has you covered.
Why You’ll Love This No-Bake Cheesecake Recipe
Let me be real with you – traditional cheesecake intimidates me. The water baths, the precise temperatures, the risk of cracks. These bars? None of that drama. You literally mix, press, chill, and you’re done.
Tired of Deciding What to Cook Every Night?
I’ve put together a simple 7-day dinner meal plan using my most-loved recipes — complete with a grocery list and flexible swaps.
Just $2.99 – Instant Download
Get the Meal Plan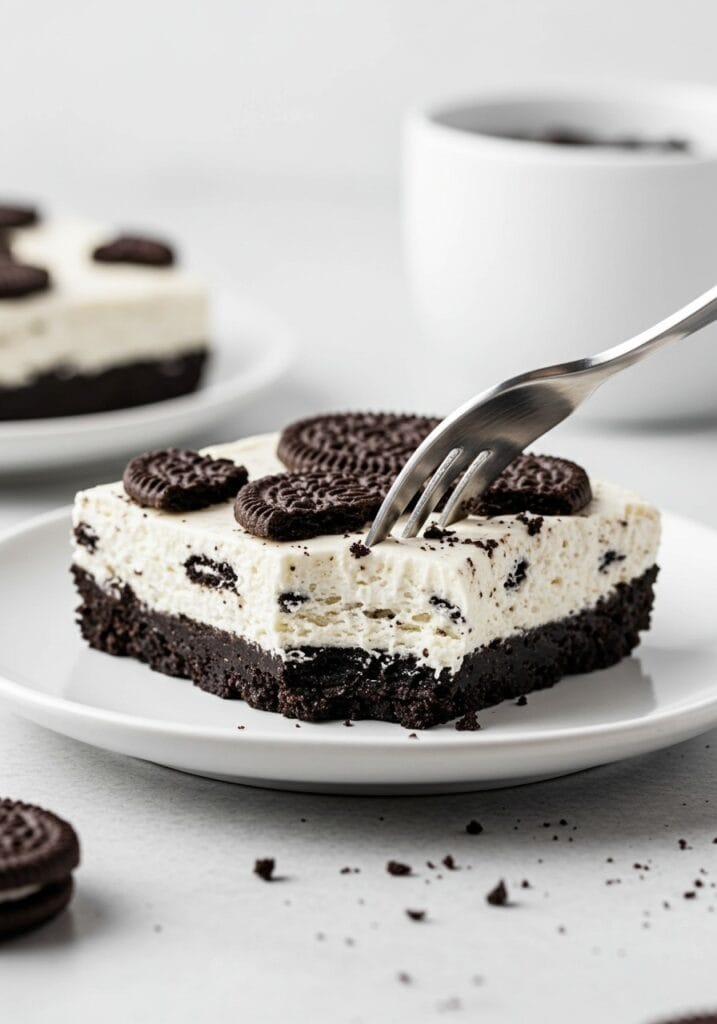
The texture is what really gets me. That buttery Oreo crust is firm but not hard, the cream cheese filling is silky and tangy-sweet, and those crushed cookies on top add the perfect crunch. Plus, since there’s no oven involved, you can make these even on the hottest days without heating up your kitchen.
If you’re someone who loves easy recipes that don’t compromise on flavor, you’re going to want to bookmark this one. It’s become one of those recipes I make so often I don’t even need to look at measurements anymore.
What You’ll Need
Here’s what makes this recipe so approachable – the ingredient list is short and everything’s easy to find. No fancy equipment, no obscure ingredients.
For the Oreo Crust:
- 36 Oreo cookies (about 425g or one standard package)
- 6 tablespoons (85g) unsalted butter, melted
- Pinch of salt (optional, but it balances the sweetness)
Substitutes: You can use any chocolate sandwich cookies if Oreos aren’t available. For a gluten-free version, swap with gluten-free chocolate cookies.
For the Cream Cheese Filling:
- 16 oz (450g) cream cheese, softened to room temperature
- 1/2 cup (60g) powdered sugar (also called icing sugar or confectioners’ sugar)
- 1 teaspoon (5ml) pure vanilla extract
- 1 cup (240ml) heavy whipping cream, cold
- 8-10 Oreo cookies, roughly crushed for topping
Substitutes: If you can’t find heavy cream, you can use whipping cream with at least 30% fat content. Greek yogurt can replace half the cream cheese for a tangier flavor, though the texture will be slightly less rich.
Equipment Needed:
- 9×9 inch (23x23cm) square baking pan
- Food processor or blender
- Electric hand mixer or stand mixer
- Parchment paper
- Mixing bowls
Serving Size: 16 bars Prep Time: 15 minutes Chilling Time: 4 hours (or overnight) Difficulty Level: Beginner-friendly
Step-by-Step Instructions
Step 1: Prepare Your Pan
Line your 9×9 inch pan with parchment paper, leaving some overhang on the sides. This makes it super easy to lift the bars out later for clean cutting. Trust me, this step saves so much frustration.
Step 2: Make the Oreo Crust
Place 36 Oreo cookies (cream filling and all) into your food processor. Pulse until you have fine crumbs – it should look like dark sand. Pour in the melted butter and pulse again until everything is moistened and holds together when you squeeze it.
Visual Cue: The mixture should look like wet sand and clump together when pressed between your fingers.
Step 3: Press the Crust
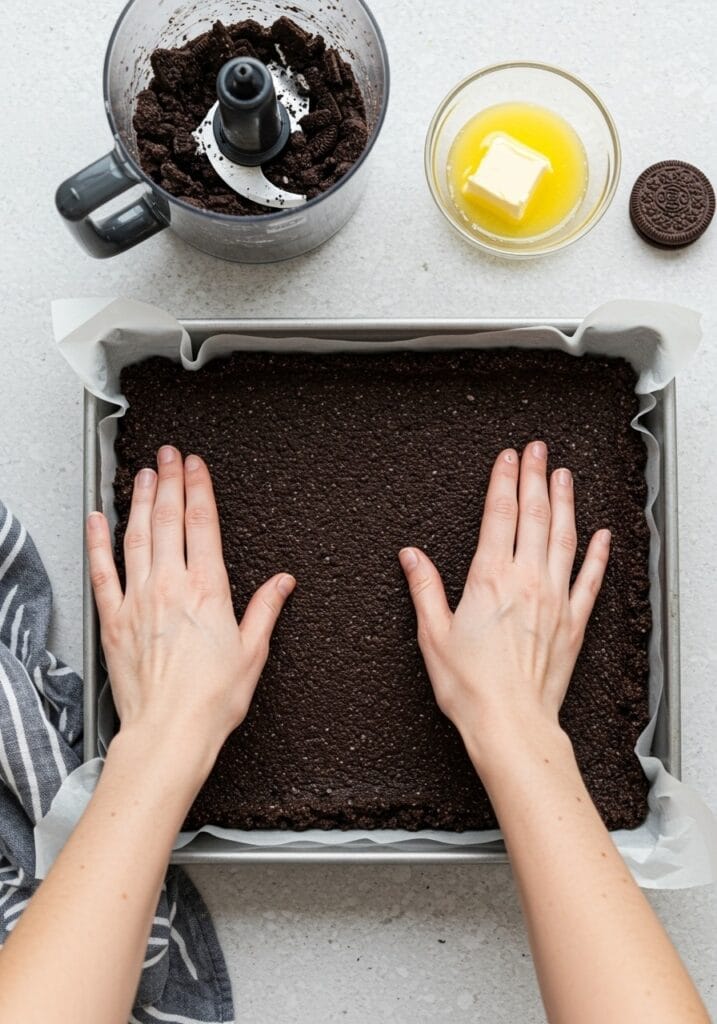
Dump the Oreo mixture into your prepared pan. Use the bottom of a measuring cup or your hands to press it firmly and evenly into the bottom. Really pack it down – a firm crust won’t crumble when you cut the bars later. Pop this in the fridge while you make the filling.
Timing: This takes about 3-4 minutes. Don’t rush it.
Step 4: Beat the Cream Cheese
In a large bowl, beat the softened cream cheese with an electric mixer on medium speed for about 2 minutes until it’s completely smooth and fluffy. Scrape down the sides of the bowl.
Flame Level: N/A (no cooking required)
Add the powdered sugar and vanilla extract. Beat again for another minute until fully combined.
Important: Your cream cheese must be at room temperature. Cold cream cheese will give you lumps no matter how long you beat it.
Step 5: Whip the Cream
In a separate bowl, pour your cold heavy cream. Beat it with clean beaters on medium-high speed until stiff peaks form. This usually takes 3-4 minutes. You’ll know it’s ready when the cream holds its shape and doesn’t slide around the bowl.
Visual Cue: When you lift the beaters, the cream should form peaks that stand straight up without drooping.
Step 6: Fold Everything Together
Gently fold the whipped cream into the cream cheese mixture using a spatula. Use a folding motion (like you’re scooping from the bottom and bringing it over the top) rather than stirring. This keeps everything light and airy. Keep folding until you see no more white streaks, but don’t overmix.
Step 7: Assemble the Bars
Pour the cream cheese filling over your chilled crust. Use a spatula to spread it evenly into all the corners. The filling should be thick and smooth.
Step 8: Add the Topping
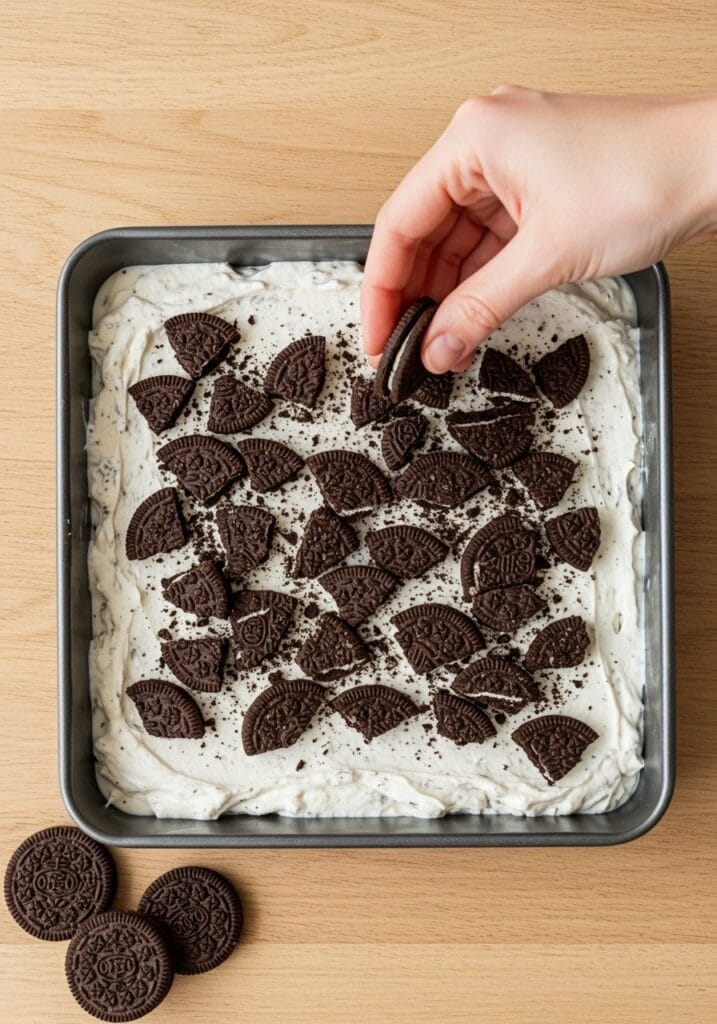
Take your 8-10 reserved Oreos and crush them into chunky pieces (not fine crumbs this time). Sprinkle them evenly over the top of the filling. Press them down very gently so they stick.
Step 9: Chill and Set
Cover the pan with plastic wrap and refrigerate for at least 4 hours, but overnight is even better. The bars need this time to firm up properly. I know waiting is hard, but this step is crucial.
Step 10: Cut and Serve
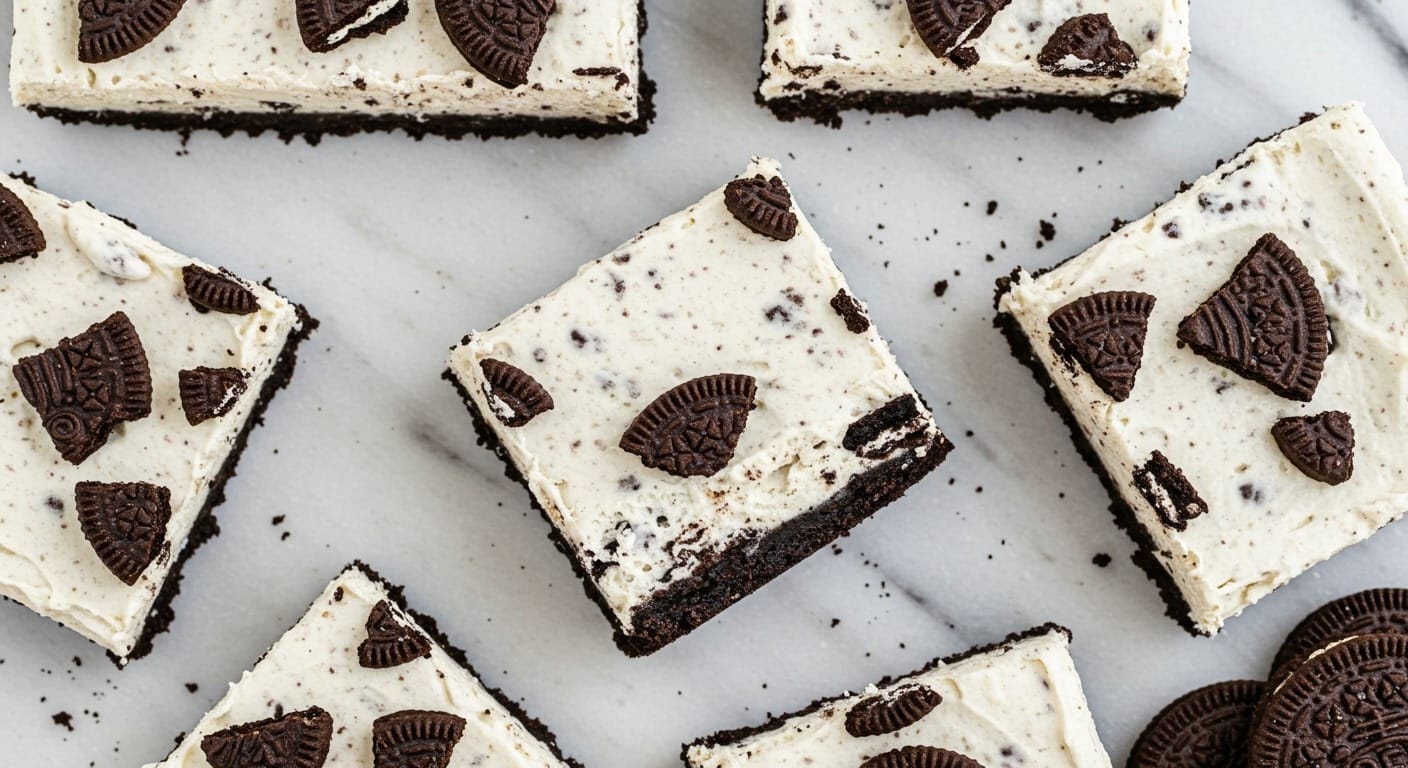
When you’re ready to serve, lift the whole thing out of the pan using the parchment paper overhang. Place it on a cutting board. Use a sharp knife, wiping it clean between each cut, to slice into 16 squares.
Pro Tip: Run your knife under hot water and wipe it dry before each cut. This gives you super clean edges.
Tips for Perfect No-Bake Oreo Cheesecake Bars
After making these dozens of times, I’ve learned a few tricks that make a real difference.
Room Temperature Matters: I can’t stress this enough. If your cream cheese is cold, you’ll end up with lumps. Take it out of the fridge at least an hour before you start.
Don’t Skip the Crust Pressing: A loosely packed crust will crumble when you cut the bars. Really press it down firmly with the back of a measuring cup.
Fold, Don’t Stir: When combining the whipped cream with the cream cheese mixture, use a gentle folding motion. Stirring deflates all that air you just whipped in, and you’ll lose that light, fluffy texture.
Patience with Chilling: I know 4 hours feels like forever, but cutting into these too early means messy, soft bars that don’t hold their shape. Plan ahead and make them the night before if possible.
Clean Cuts: That hot knife trick really works. Wipe it clean between each cut for bakery-perfect squares.
Variations to Try
Once you’ve mastered the basic recipe, there are so many fun ways to switch things up.
Peanut Butter Lovers: Add 1/2 cup of creamy peanut butter to the cream cheese mixture. Use peanut butter Oreos for the crust and topping.
Mint Chocolate: Swap regular Oreos for mint Oreos. Add a drop of green food coloring to the filling if you want that classic mint look.
Cookies and Cream: Use golden Oreos for a lighter version. Mix some mini chocolate chips into the filling before spreading.
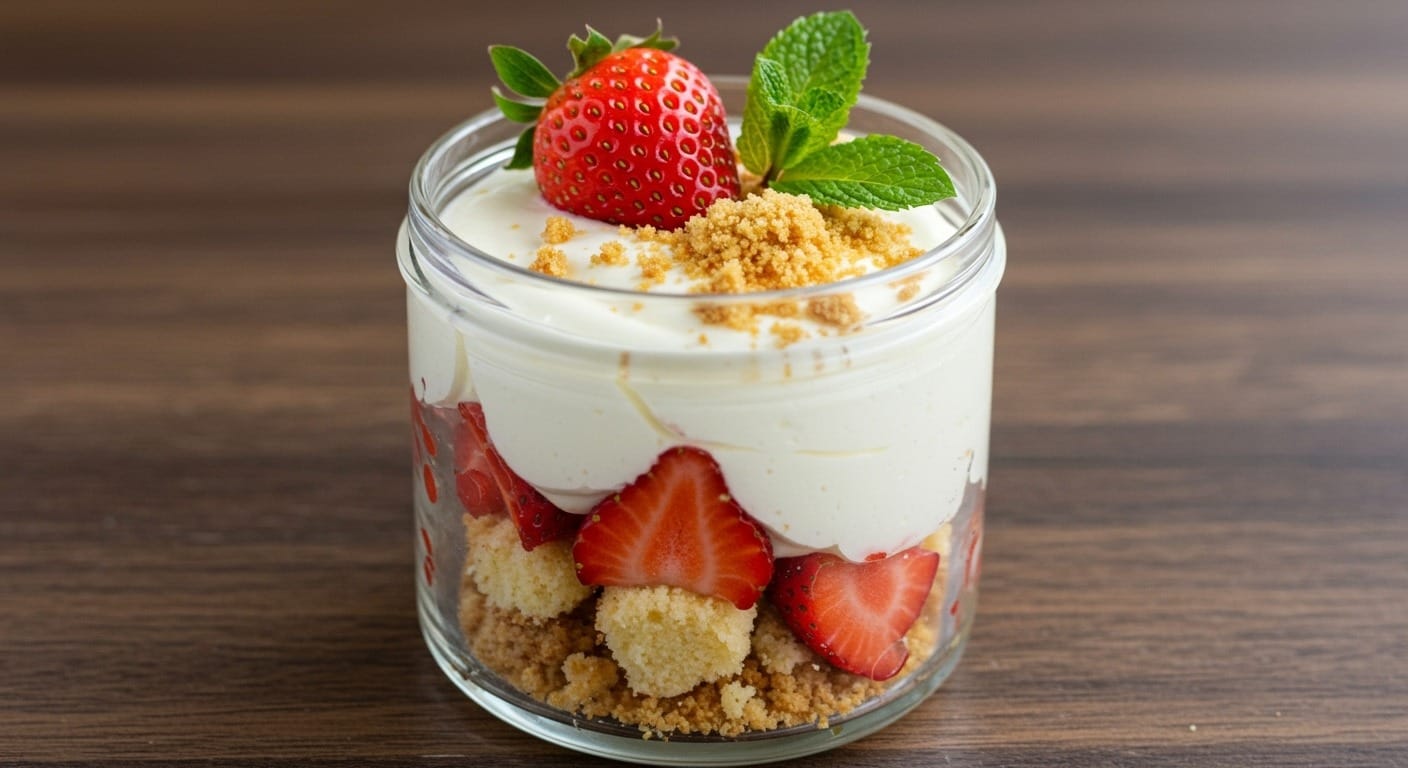
Strawberry Swirl: Swirl 1/4 cup of strawberry jam through the filling before chilling. Top with fresh strawberry slices along with the crushed Oreos.
Coffee Kick: Dissolve 1 tablespoon of instant espresso powder into 1 tablespoon of hot water. Let it cool, then mix it into the cream cheese filling.
Storage and Make-Ahead Tips
These bars store beautifully, which makes them perfect for planning ahead.
Refrigerator: Keep them covered in an airtight container for up to 5 days. The crust might soften slightly after day three, but they’re still delicious.
Freezer: Yes, these freeze wonderfully! Cut them into individual bars, wrap each one in plastic wrap, then store in a freezer-safe container for up to 2 months. Thaw in the fridge for a few hours before serving.
Make-Ahead Strategy: I often make these 2 days before I need them. They actually taste better after sitting in the fridge for a day – the flavors meld together and the whole thing firms up perfectly.
Transporting: If you’re taking these somewhere, keep them chilled until right before serving. They can sit out at room temperature for about an hour, but longer than that and they start to soften.
Serving Suggestions
While these bars are amazing on their own, sometimes it’s fun to dress them up a bit.
Serve them on a platter with fresh berries scattered around. The bright red of strawberries or raspberries looks gorgeous against the black and white bars.
For a party, drizzle some chocolate sauce or caramel over the top just before serving. It’s not necessary, but it looks impressive.
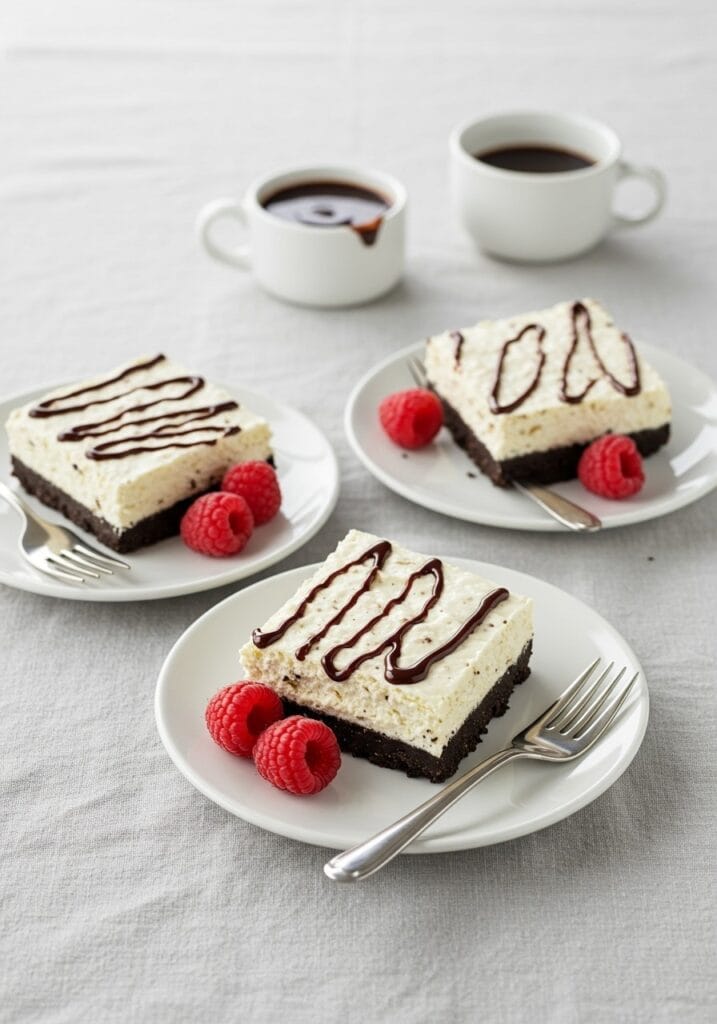
Pair them with coffee or cold milk for the ultimate treat. There’s something nostalgic about eating Oreos with milk, and these bars bring that same feeling.
If you’re feeling extra, top each bar with a dollop of whipped cream and a whole mini Oreo right before serving.
Why This Recipe Works
The magic of this no bake cheesecake really comes down to the texture contrast. You’ve got that firm, chocolatey crust that gives way to the smooth, tangy cream filling. Then there’s that satisfying crunch from the Oreo topping. Each bite has all three textures, and it’s just… perfect.
The other thing is the sweetness level. Cheesecake can sometimes be cloyingly sweet, but the cream cheese adds that slight tang that balances everything out. The Oreos bring enough chocolate flavor and sweetness without going overboard.
And honestly? The simplicity is part of what makes this work. There’s no tempering, no baking, no stress. It’s foolproof. I’ve taught friends who claim they “can’t bake” how to make these, and they’ve nailed it every time.
Common Questions
Can I use low-fat cream cheese? I wouldn’t recommend it. The full-fat version gives you that rich, creamy texture that makes these bars special. Low-fat cream cheese has more water content and less fat, which means softer bars that might not set properly.
Do I need to use name-brand Oreos? Nope! Any chocolate sandwich cookie works. I’ve made these with store-brand cookies many times and they taste just as good.
Why is my filling runny? Usually this happens when the cream cheese was too cold and didn’t incorporate properly, or the whipped cream wasn’t beaten to stiff peaks. Make sure both components are the right consistency before folding them together.
Can I make these in a different sized pan? Sure! An 8×8 pan will give you thicker bars (increase chill time to 6 hours). A 9×13 pan makes thinner bars that set faster (about 3 hours). Just keep the same ingredient amounts.
Final Thoughts
This recipe has become my answer to so many situations. Need a dessert for a potluck? These. Want something sweet after a simple weeknight dinner? These. Looking for something impressive that doesn’t require actual baking skills? You guessed it.
I love that they look fancy but come together so easily. And the fact that kids and adults both go crazy for them doesn’t hurt either. The combination of Oreos and cheesecake is kind of unbeatable.
If you’ve been intimidated by cheesecake or just don’t want to deal with your oven, please try these. They’re forgiving, delicious, and honestly hard to mess up. Plus, there’s something satisfying about creating something this good without turning on a single appliance beyond your mixer.Make them for your next gathering and watch them disappear. Then get ready for everyone to ask you for the recipe – which, lucky for them, you can now share from Tasty Dish Diary. Happy no-baking!
Still wondering what to cook tomorrow? Take the stress out of dinner with my simple 7-day meal plan.
Get the 7-Day Meal Plan for $2.99