My mom used to make something similar every Friday night when I was growing up, though she never called it bulgogi. Years later, when I first tried authentic Korean beef bulgogi at a tiny restaurant in Seoul, everything clicked. That perfect balance of sweet and savory, the way the meat caramelizes just right – I knew I had to recreate it at home.
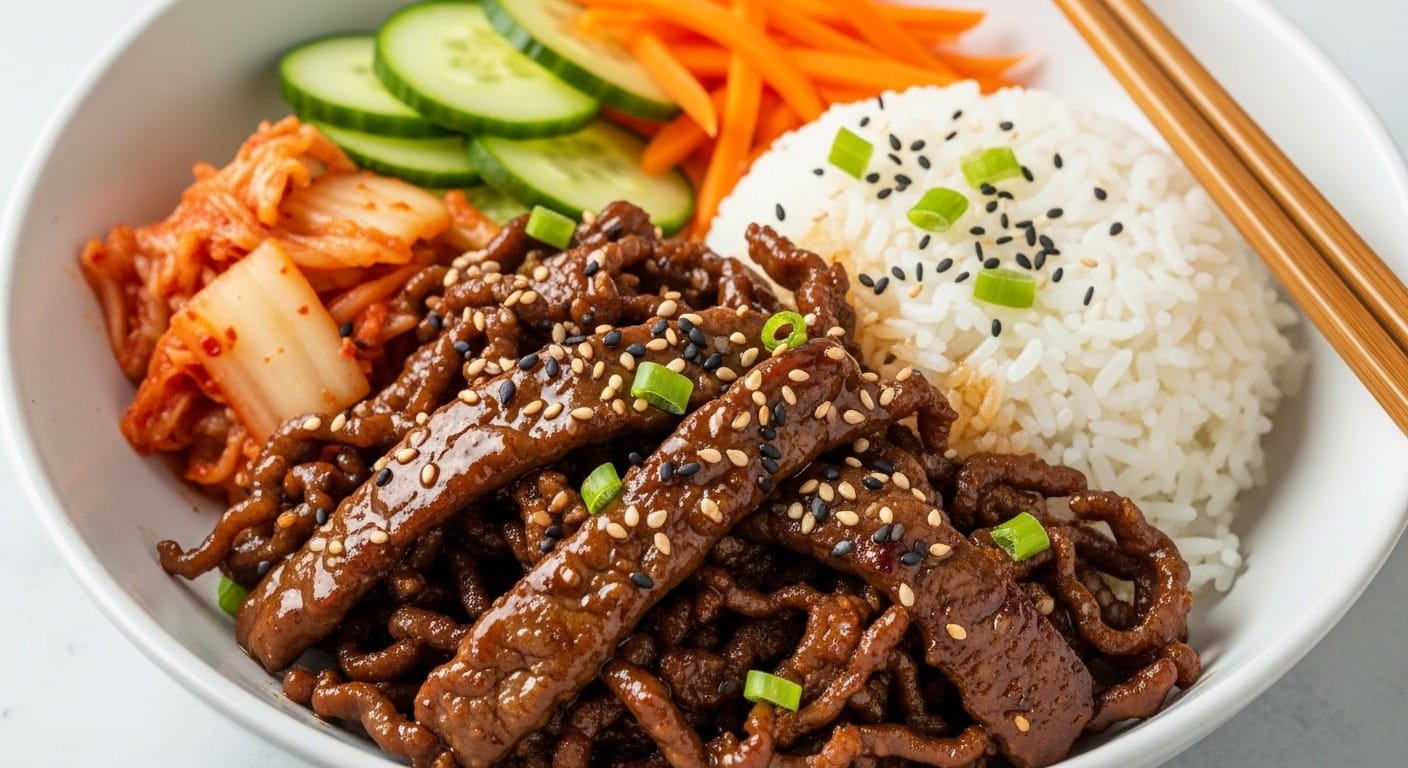
These Korean beef bulgogi bowls are everything you want in a weeknight dinner. Ready in 30 minutes, they require minimal cooking skills but deliver maximum flavor. The beef comes out tender and slightly charred, coated in a marinade that’s sweet from pear and brown sugar, savory from soy sauce, and just a bit spicy if you add gochugaru. It’s the kind of meal that makes you feel like you’ve accomplished something special, even on a busy Tuesday
 What I love most? You can prep the marinade the night before, let the beef soak up all those flavors, and dinner practically cooks itself the next day. Plus, everyone can customize their bowl with their favorite toppings – pickled veggies, kimchi, a fried egg, or extra sesame seeds.
Tired of Deciding What to Cook Every Night?
I’ve put together a simple 7-day dinner meal plan using my most-loved recipes — complete with a grocery list and flexible swaps.
Just $2.99 – Instant Download
Get the Meal PlanServes: 4 bowls
Total Time: 30 minutes (plus 30 minutes marinating time)
Difficulty Level: Easy
Equipment Needed: Large skillet or wok, mixing bowls, knife, cutting board
Ingredients
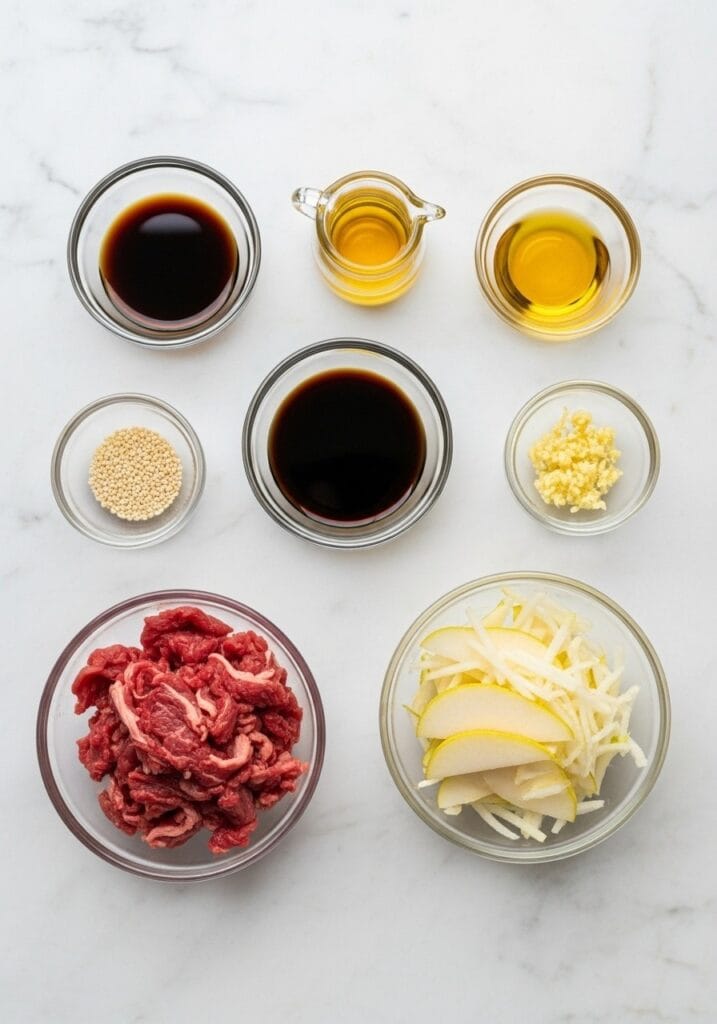
For the Bulgogi Marinade
- 600g (1.3 lbs) ribeye or sirloin steak, thinly sliced against the grain
- 60ml (¼ cup) soy sauce
- 30ml (2 tbsp) sesame oil
- 45g (3 tbsp) brown sugar
- 4 garlic cloves, minced
- 1 tbsp fresh ginger, grated
- 60g (¼ cup) Asian pear, grated (substitute: apple or kiwi)
- 15ml (1 tbsp) rice wine or mirin
- 1 tsp gochugaru (Korean red pepper flakes) – optional for heat
- ½ tsp black pepper
- 2 green onions, chopped
For the Bowls
- 600g (4 cups) cooked white or brown rice
- 2 medium carrots, julienned
- 1 cucumber, thinly sliced
- 200g (1 cup) kimchi (optional)
- 4 fried eggs (optional)
- 2 tbsp toasted sesame seeds
- Extra green onions, sliced for garnish
- Sriracha or gochujang sauce for drizzling
Instructions
Step 1: Prepare the Beef
Slice your beef as thinly as possible against the grain, about 3mm thick. Pop the beef in the freezer for 15 minutes before slicing – it firms up and makes cutting much easier. Place the sliced beef in a large mixing bowl.
Step 2: Make the Marinade
In a separate bowl, whisk together soy sauce, sesame oil, brown sugar, minced garlic, grated ginger, and grated pear. Add rice wine, gochugaru (if using), black pepper, and chopped green onions. Stir until the sugar dissolves completely. The pear contains enzymes that help tenderize the meat while adding natural sweetness.
Step 3: Marinate the Beef
Pour the marinade over the sliced beef. Use your hands to massage the marinade into every piece, ensuring even coating. Cover with plastic wrap and refrigerate for at least 30 minutes, or up to 8 hours for deeper flavor. If you’re really pressed for time, 15 minutes works, but the flavor won’t be as developed.
Step 4: Cook the Rice
While the beef marinates, cook your rice according to package directions. For 4 servings, you’ll need about 300g (1.5 cups) uncooked rice. Keep it warm until serving time.
Step 5: Prep the Vegetables
Julienne the carrots into thin matchsticks. Slice the cucumber thinly – I like using a mandoline for uniform cuts. Set aside your kimchi and any other toppings you’re using. Having everything ready before cooking makes assembly quick and easy.
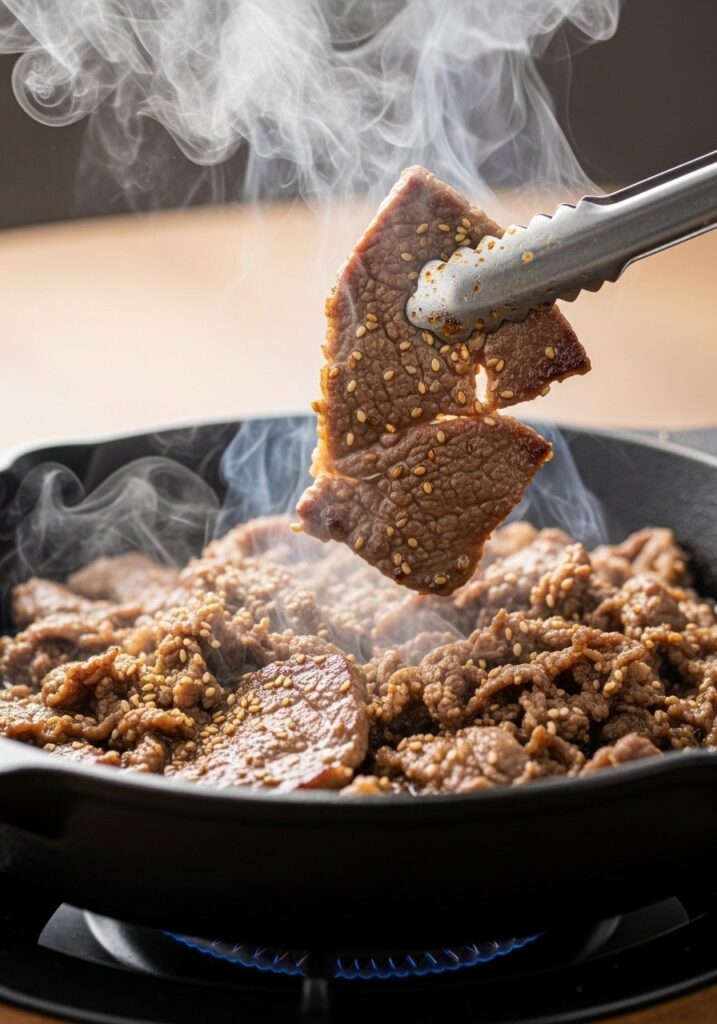
Step 6: Cook the Bulgogi
Heat a large skillet or wok over high heat until very hot – this is crucial for that caramelized char. Add the marinated beef in a single layer, working in batches if needed to avoid overcrowding. Cook for 2-3 minutes without moving, allowing the bottom to caramelize. Flip and cook another 1-2 minutes until the beef is cooked through with crispy edges. The sugar in the marinade should create a beautiful glaze. Transfer to a plate and repeat with remaining beef.
Step 7: Fry Eggs (Optional)

In the same skillet, add a bit of oil over medium heat. Crack eggs and fry until whites are set but yolks remain runny, about 3-4 minutes. The runny yolk adds incredible richness when mixed into the bowl.
Step 8: Assemble the Bowls
Divide warm rice among 4 bowls. Top each with a portion of Korean beef bulgogi, arranging it on one side. Add julienned carrots, cucumber slices, and kimchi around the beef. Place a fried egg on top if using. Sprinkle generously with toasted sesame seeds and sliced green onions. Drizzle with sriracha or gochujang if you want extra heat.
Step 9: Serve
Serve immediately while the beef is hot and the egg yolk is still runny. Encourage everyone to mix everything together before eating – that’s when the magic happens. The runny yolk coats the rice, the bulgogi sauce mingles with everything, and each bite becomes this perfect combination of textures and flavors.
Tips for Perfect Korean Beef Bulgogi
The type of beef matters more than you’d think. Ribeye gives you the most tender, flavorful results because of its marbling, but sirloin works well too if you’re watching fat content. I’ve tried making this with flank steak, and while it’s good, it can get chewy if you’re not careful with slicing.
Don’t skip the pear. I know it seems like an odd ingredient, but it’s traditional for a reason. The enzymes break down the meat fibers, making even tougher cuts incredibly tender. If you can’t find Asian pear, a regular pear or even a kiwi works. Just avoid canned pear – it doesn’t have the same effect.
Your skillet needs to be screaming hot before the beef hits it. This creates that restaurant-style caramelization and prevents the meat from steaming in its own juices. I usually let my cast iron heat for a solid 3-4 minutes on high before adding the first batch of beef.
Batch cooking is non-negotiable. Overcrowding the pan drops the temperature, and you end up with gray, steamed beef instead of that beautiful caramelized exterior. It takes a few extra minutes, but the difference is huge.
Make it a meal prep superstar. The marinated beef keeps in the fridge for up to 24 hours before cooking, and the cooked bulgogi reheats beautifully for lunches throughout the week. Just store the components separately and assemble fresh bowls each day.
Why This Korean Beef Bulgogi Recipe Works
The marinade hits every flavor note you’re craving. Sweet from brown sugar and pear, salty and umami-rich from soy sauce, aromatic from garlic and ginger, and nutty from sesame oil. It’s balanced in a way that makes you want another bite immediately.
Thin slicing is the secret to quick cooking and maximum flavor absorption. When beef is sliced thin against the grain, the marinade penetrates every piece, and it cooks in literally 3-4 minutes. No waiting around for thick steaks to reach temperature.
The high heat creates texture contrast that makes this dish addictive. You get crispy, caramelized edges with a tender interior. That slight char from the sugar caramelizing adds a subtle bitterness that balances the sweetness perfectly.
This recipe is incredibly flexible. Swap the beef for chicken thighs, pork shoulder, or even mushrooms for a vegetarian version. The marinade works with everything. I’ve made this with teriyaki chicken rice bowls marinade before when I ran out of soy sauce, and it still turned out delicious.
Common Questions
Can I use a different cut of beef?
Absolutely. While ribeye is ideal for tenderness and flavor, sirloin, flank steak, or even skirt steak work well. Just make sure to slice very thin against the grain. Tougher cuts benefit from longer marinating times – aim for 4-8 hours.
What if I don’t have Asian pear?
Regular pear, apple, or even kiwi work as substitutes. Each brings similar enzymes that tenderize the meat. In a pinch, I’ve used pineapple juice (about 2 tbsp) with good results, though the flavor profile changes slightly.
How spicy is this dish?
As written with 1 tsp gochugaru, it has a very mild heat – more of a gentle warmth than actual spice. You can easily adjust up or down based on preference, or leave it out entirely for a completely mild version kids will love.
Can I grill the bulgogi instead of pan-frying?
Yes, and it’s delicious that way. Thread the marinated beef onto skewers and grill over high heat for 2-3 minutes per side. You lose some of the marinade that would caramelize in the pan, but the smoky char is incredible.
How long does leftover bulgogi keep?
Cooked beef bulgogi stays fresh in an airtight container for 3-4 days in the fridge. Reheat in a skillet over medium-high heat for best results. The microwave works too, though you’ll lose some of that crispy texture.
Can I freeze the marinated beef?
You can freeze it either before or after cooking. Raw marinated beef freezes beautifully for up to 3 months – just thaw overnight in the fridge before cooking. Cooked bulgogi freezes well too, though the texture is slightly different after thawing.
Serving Suggestions
These Korean beef bulgogi bowls are filling enough to stand alone, but sometimes you want a little something extra on the side. A simple cucumber salad with rice vinegar and sesame oil adds refreshing crunch. Mediterranean chickpea salad works surprisingly well alongside if you want more vegetables.
For a complete Korean meal experience, serve with pickled radish (danmuji), seaweed salad, or steamed edamame. Sometimes I’ll throw together some miso soup for a warming starter, especially during colder months.
If you’re feeding a crowd, set up a bulgogi bowl bar. Cook the beef, prep all the toppings in separate bowls, and let everyone build their own. It’s interactive, fun, and accommodates different preferences easily. Some people want extra kimchi, others skip it entirely. Some load up on veggies, others want mostly rice and beef.
For quick easy meals throughout the week, this pairs wonderfully with other Asian-inspired dishes. I often make these alongside sticky salmon rice bowls for variety, or follow up with quick Thai noodle stir-fry later in the week.
Variations to Try
Spicy Gochujang Bulgogi: Add 2 tbsp gochujang (Korean red pepper paste) to the marinade for deeper, fermented spice. This creates a richer, more complex heat than just using gochugaru alone.
Bulgogi Lettuce Wraps: Skip the rice entirely and serve the beef in butter lettuce or perilla leaves with ssam sauce. It’s lighter, fresher, and perfect for low-carb eating. Add some cauliflower rice taco bowls on the side if you want more substance.
Pineapple Bulgogi: Add 100g diced fresh pineapple to the marinade along with the pear. The tropical sweetness creates an interesting fusion flavor that kids especially love.
Mushroom Bulgogi (Vegetarian): Replace beef with 600g thick-sliced shiitake or king oyster mushrooms. Marinate and cook the same way. The mushrooms absorb the marinade beautifully and develop an almost meaty texture.
Bulgogi Fried Rice: Use leftover bulgogi chopped into smaller pieces, mixed into fried rice with the egg, vegetables, and rice all combined. It’s a great way to stretch leftovers into a completely different meal.
Cheese Bulgogi Bowl: This sounds weird but trust me – add a slice of American cheese on top of the hot rice before adding the beef. Let it melt slightly. It’s a popular Korean variation that creates this creamy, umami-rich base. My teenager requests it this way every time.
Storage and Meal Prep
Store components separately for best quality. Cooked bulgogi keeps in an airtight container for 3-4 days. Rice stores for up to 5 days. Fresh vegetables should be prepped no more than 2 days ahead.
For meal prep, portion everything into individual containers – rice on one side, beef on the other, vegetables in a small compartment. Keep the egg and sesame seeds separate to add fresh when reheating. Reheat rice and beef together in the microwave for 2-3 minutes, or in a skillet with a splash of water.
The raw marinated beef freezes exceptionally well. Divide into portion-sized freezer bags, flatten them for quick thawing, and freeze for up to 3 months. Pull one out the night before you need it, let it thaw in the fridge, and cook as directed. It’s like having a restaurant meal ready to go in your freezer.
Cooked bulgogi also freezes, though with slightly more texture loss. Freeze in portions with some of the cooking liquid to prevent drying out. Thaw overnight and reheat gently in a skillet over medium heat.
Why You’ll Love This Recipe
It tastes like you spent hours in the kitchen, but the active cooking time is maybe 15 minutes. The marinade does most of the work for you. This is what I make when I want to impress someone without actually stressing about dinner.
The flavor is complex enough to keep you interested bite after bite. Sweet, savory, slightly spicy, nutty from sesame – it hits all the right notes. My kids, who normally turn their noses up at “weird” food, ask for these bowls by name.
It’s healthier than takeout but satisfies the same craving. You control the sugar, the sodium, the quality of beef. Loading up on vegetables makes it feel virtuous while still being completely satisfying. When I’m trying to eat better but don’t want to feel deprived, this is my go-to.
The customization options mean everyone at the table can be happy. My husband loads his bowl with extra gochujang and kimchi. I add extra vegetables and go easy on the rice. The kids want theirs mild with no kimchi but extra sesame seeds. One recipe, multiple happy people.
Finally, it genuinely tastes like restaurant food. That caramelized, slightly charred, intensely flavored beef you get at a Korean restaurant? You can make that at home. The first time I succeeded, I actually did a little happy dance in my kitchen.
These Korean beef bulgogi bowls have earned a permanent spot in my weeknight dinner rotation, right up there with teriyaki salmon bowl and other quick favorites. They’re proof that you don’t need hours or complicated techniques to make something truly special. Just good ingredients, a solid marinade, and high heat.
The beauty of this Korean beef bulgogi recipe is how it adapts to your life. Busy weeknight? Marinate in the morning, cook in 10 minutes after work. Meal prepping for the week? Double the batch and portion it out. Having friends over? Set up a bowl bar and let everyone customize. It works for all of it.
I keep coming back to these bowls because they never get boring. The balance of flavors, the textural contrast, the way everything comes together when you mix it all up in the bowl – it’s comfort food that happens to be relatively healthy. And honestly, anything that makes my family excited about eating vegetables is a win in my book.
Still wondering what to cook tomorrow? Take the stress out of dinner with my simple 7-day meal plan.
Get the 7-Day Meal Plan for $2.99