My daughter came home from school last December asking if we could “make cookies that taste like hot chocolate.” I laughed at first, thinking she meant chocolate cookies. But she was serious – she wanted the marshmallows, the cocoa, that cozy feeling you get wrapping your hands around a warm mug. So we experimented, and honestly? These hot cocoa cookies turned out better than I imagined.
They’re soft, deeply chocolatey, and packed with mini marshmallows that get all gooey when baked. The trick is using both cocoa powder and melted chocolate for that rich hot cocoa flavor. And the marshmallows? They create little pockets of sweetness that make every bite different.
These cookies come together in about 30 minutes, and you don’t need any fancy equipment. Just a bowl, a whisk, and your hands for mixing. The dough is forgiving, which makes this recipe perfect if you’re baking with kids or just want something simple for a desserts and sweet treats craving.
Tired of Deciding What to Cook Every Night?
I’ve put together a simple 7-day dinner meal plan using my most-loved recipes — complete with a grocery list and flexible swaps.
Just $2.99 – Instant Download
Get the Meal PlanWhy This Hot Cocoa Cookies Recipe Works
The combination of melted butter and brown sugar creates a chewy texture that stays soft for days. I use Dutch-process cocoa powder because it has a smoother, less acidic taste – more like actual hot cocoa than regular cocoa powder. But regular works fine too.
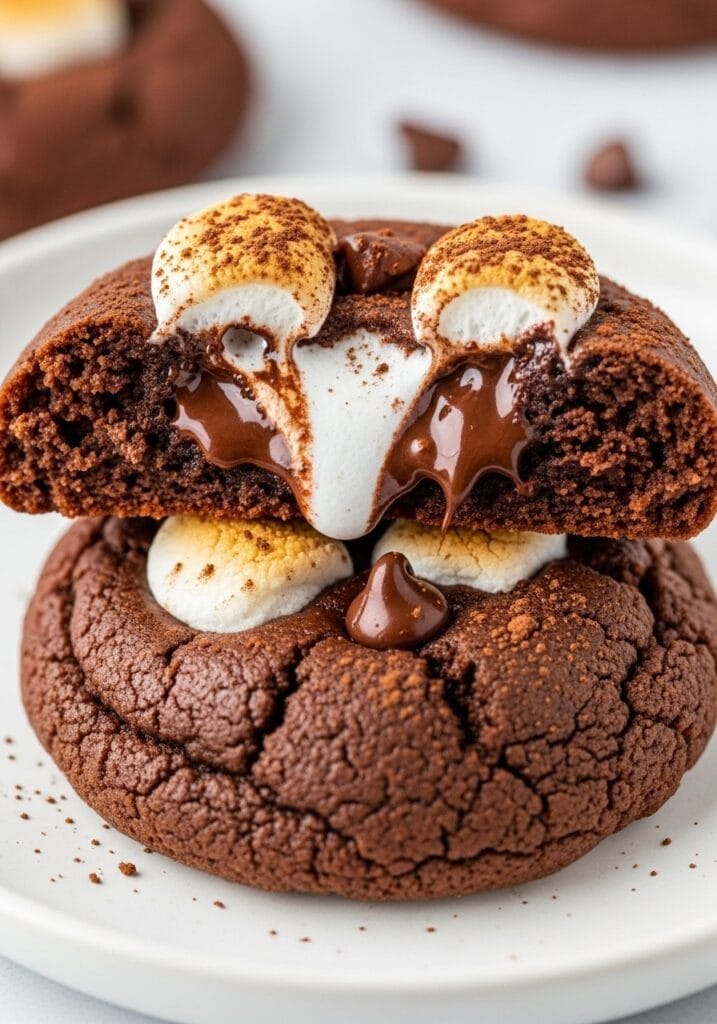
Adding mini marshmallows right before baking is important. If you mix them into the dough too early, they’ll dissolve. Wait until you’ve shaped the cookies, then press them gently into the tops. Some will sink in while baking, creating those melty pockets. Others stay on top and get slightly toasted.
The optional peppermint extract takes these in a festive direction if you want peppermint hot cocoa cookies. Just a quarter teaspoon is enough – too much and it overpowers the chocolate. My kids prefer them without, but I love making a peppermint version during the holidays.
What You’ll Need
For the Cookie Dough:
- 170g (3/4 cup) unsalted butter, melted and slightly cooled
- 200g (1 cup) brown sugar, packed
- 100g (1/2 cup) granulated sugar
- 2 large eggs, room temperature
- 2 tsp vanilla extract
- 1/4 tsp peppermint extract (optional, for hot cocoa peppermint cookies)
- 280g (2 1/4 cups) all-purpose flour
- 60g (3/4 cup) Dutch-process cocoa powder
- 1 tsp baking soda
- 1/2 tsp salt
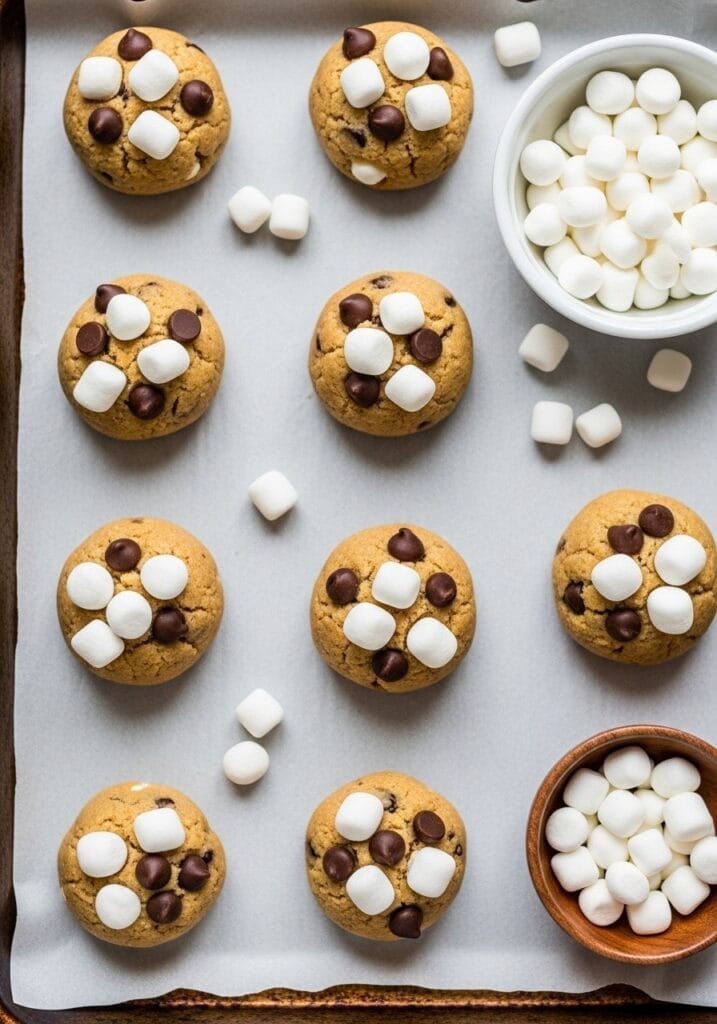
- 180g (1 cup) semi-sweet chocolate chips
- 100g (1 1/2 cups) mini marshmallows, plus extra for topping
For Dusting:
- 2 tbsp cocoa powder
- 1 tbsp powdered sugar
Substitutions: You can use regular cocoa powder instead of Dutch-process. Milk chocolate chips work if you prefer sweeter cookies. Regular marshmallows can be cut into quarters if you can’t find minis.
Step-by-Step Instructions
Step 1: Prep Your Space Preheat your oven to 175°C (350°F). Line two baking sheets with parchment paper. Set them aside. Room temperature eggs mix better with melted butter, so take them out of the fridge first if you forgot.
Step 2: Mix the Wet Ingredients Pour the melted butter into a large mixing bowl. Add both sugars. Whisk vigorously for about 1 minute until the mixture looks lighter and slightly fluffy. This aerates the dough a bit. Crack in the eggs one at a time, whisking after each. Add vanilla and peppermint extract if using. Whisk until everything looks smooth and combined.
Step 3: Combine the Dry Ingredients In a separate bowl, whisk together flour, cocoa powder, baking soda, and salt. Make sure there are no cocoa lumps. I usually sift the cocoa powder because it tends to clump, but whisking works too if you’re thorough.
Step 4: Form the Dough Pour the dry ingredients into the wet mixture. Use a wooden spoon or spatula to fold everything together. Don’t overmix – stop when you don’t see any more dry flour streaks. The dough will be thick and slightly sticky. Fold in the chocolate chips gently. They should be distributed throughout but not broken up.
Step 5: Add Marshmallows Carefully This is where timing matters. Scoop the dough into balls using a cookie scoop or spoon – about 2 tablespoons each. Roll them between your palms quickly. Now press 4-5 mini marshmallows into the top of each dough ball. Press them in gently so they stick but don’t flatten the whole cookie. Place them on the prepared baking sheets, leaving about 5cm (2 inches) between each cookie.
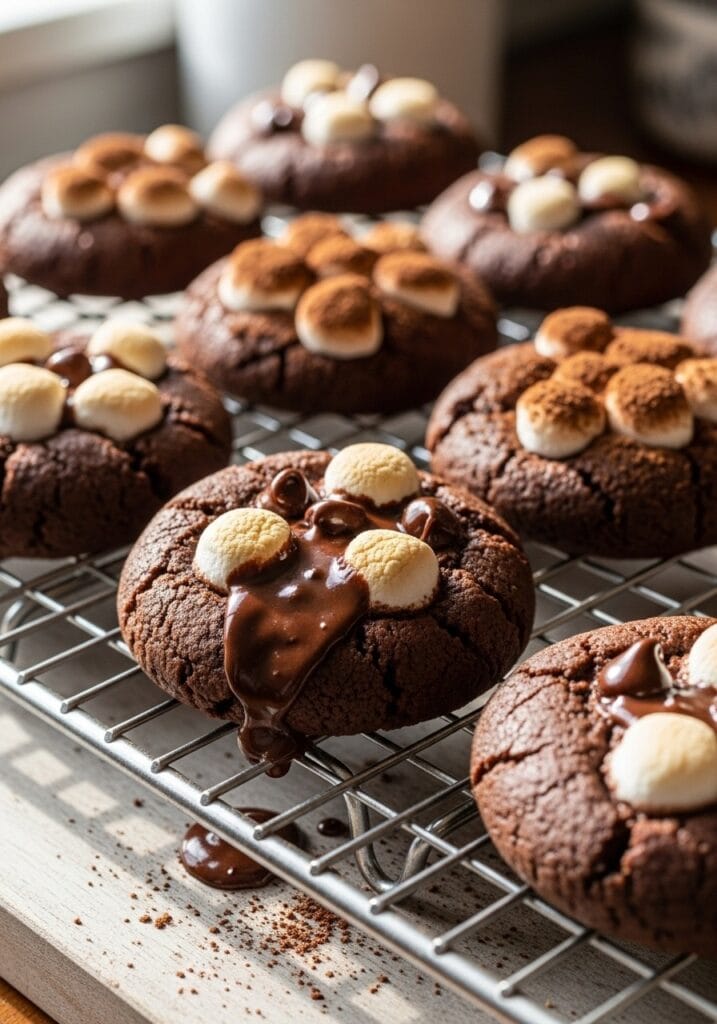
Step 6: Bake Until Just Set Bake for 10-12 minutes. The edges should look set, but the centers will still seem slightly underdone. This is what you want. The marshmallows will puff up and some might brown slightly on top. Don’t overbake – these cookies continue cooking on the hot pan after you remove them. Let them sit on the baking sheet for 5 minutes before moving them to a cooling rack.
Step 7: Dust and Serve Once the cookies are completely cool, mix the cocoa powder and powdered sugar in a small bowl. Use a fine-mesh sieve to dust this mixture lightly over the tops. It looks like the cocoa powder on top of hot chocolate and adds a nice finishing touch.
Tips for Perfect Hot Cocoa Cookies
Don’t skip melting the butter. Using melted butter instead of softened creates a chewier, denser cookie that holds the marshmallows better. Cold butter makes them too cakey.
Press marshmallows in right before baking. I tried mixing them into the dough once, and they just dissolved into sticky spots. Pressing them on top keeps their shape and creates that signature look.
Watch them closely near the end. Every oven is different. Mine runs hot, so I check at 10 minutes. Yours might need the full 12. The moment the edges look firm, they’re done.
Store them properly. These stay soft for 4-5 days in an airtight container at room temperature. Layer them with parchment paper if you stack them. The marshmallows can make them stick together otherwise.
If you’re making these as part of a holiday cookie spread, they pair really well with easy Christmas sugar cookies or gingerbread cheesecake bars. The chocolate richness balances out lighter, sweeter cookies.
Variations to Try
For a more intense chocolate experience, swap half the chocolate chips for dark chocolate chunks. The bitterness plays nicely against the sweet marshmallows.
Want to make these truly feel like hot cocoa peppermint cookies? Add 1/2 cup crushed peppermint candies or candy canes to the dough along with the chocolate chips. The little crunchy bits are addictive.
You can also drizzle melted white chocolate over the cooled cookies and sprinkle with crushed peppermint. This makes them look more festive and adds another layer of flavor. I do this when I’m giving them as gifts.
Serving Suggestions

These are fantastic on their own, but serving them warm with a glass of cold milk is my favorite way. The temperature contrast is perfect. You can also warm them in the microwave for 10-15 seconds to get the marshmallows melty again.
They’re also great for cookie exchanges. People always ask for the recipe because they’re different from the usual chocolate chip cookies everyone brings. The marshmallows make them memorable.
If you’re packing them for a gift, place them in a clear cellophane bag tied with ribbon. The marshmallow tops look beautiful, and the cocoa dusting shows through. Add a little tag with reheating instructions if you want to be extra thoughtful.
Recipe Details
Serving Size: Makes 24 cookies Cooking Time: 10-12 minutes per batch Total Time: 30 minutes (including prep) Difficulty Level: Easy Equipment Needed: Mixing bowls, whisk, baking sheets, parchment paper, cooling rack, fine-mesh sieve
These cookies have become a December staple in our house now. That first batch we made with my daughter turned into a tradition. Every year when the weather gets cold, someone asks when we’re making “the hot chocolate cookies.” And honestly? I never get tired of them. They’re cozy, chocolatey, and they make the whole house smell like a winter dream. If you’re looking for something that feels special but doesn’t require hours in the kitchen, this hot cocoa cookies recipe is worth trying.
Still wondering what to cook tomorrow? Take the stress out of dinner with my simple 7-day meal plan.
Get the 7-Day Meal Plan for $2.99