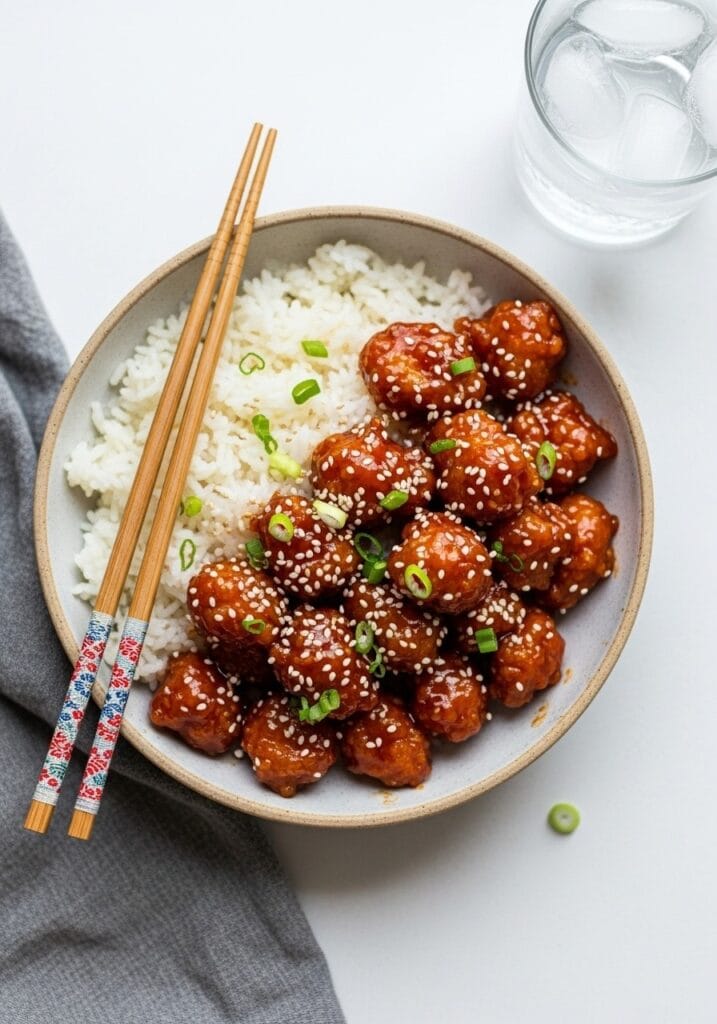
My roommate came home one evening to find me licking sauce off my fingers, staring at an empty plate like I’d just witnessed something life-changing. That was the night I cracked the code on honey sriracha chicken. The balance between sticky sweetness and that slow-building heat? It’s the kind of thing that makes you forget about takeout menus entirely.
This recipe takes about 30 minutes from start to finish, needs only one pan, and uses ingredients you likely already have sitting in your pantry. The skill level is beginner-friendly, but the taste? That’s restaurant-level addictive. We’re talking crispy edges, a glossy glaze that clings to every bite, and a flavor profile that walks the line between sweet comfort and spicy excitement.
If you love bold flavors that don’t require fancy techniques or hard-to-find ingredients, you’re going to want to bookmark this one. It works beautifully over rice, tucked into wraps, or even tossed with noodles when you’re feeling creative.
Tired of Deciding What to Cook Every Night?
I’ve put together a simple 7-day dinner meal plan using my most-loved recipes — complete with a grocery list and flexible swaps.
Just $2.99 – Instant Download
Get the Meal PlanWhy This Honey Sriracha Chicken Works
The magic happens when honey meets sriracha in just the right ratio. Too much honey and you lose the heat. Too much sriracha and it becomes one-dimensional spice without that sticky, caramelized finish. This recipe finds that sweet spot (pun intended) where both elements shine.
What makes this version different from most quick easy meals is the technique. We’re not just tossing everything together and hoping for the best. Instead, we get a proper sear on the chicken first, then build the sauce in the same pan. This creates layers of flavor – the caramelized bits on the bottom of the pan dissolve into the sauce, adding depth you simply can’t get any other way.
The texture contrast is another reason this dish feels special. Crispy, golden-brown chicken on the outside, juicy and tender inside, all wrapped in that glossy, sticky coating. When you nail the glaze consistency, it should coat the back of a spoon but still drip slowly. That’s when you know you’ve hit the mark.
Ingredient Breakdown and Smart Substitutions
For the Chicken:
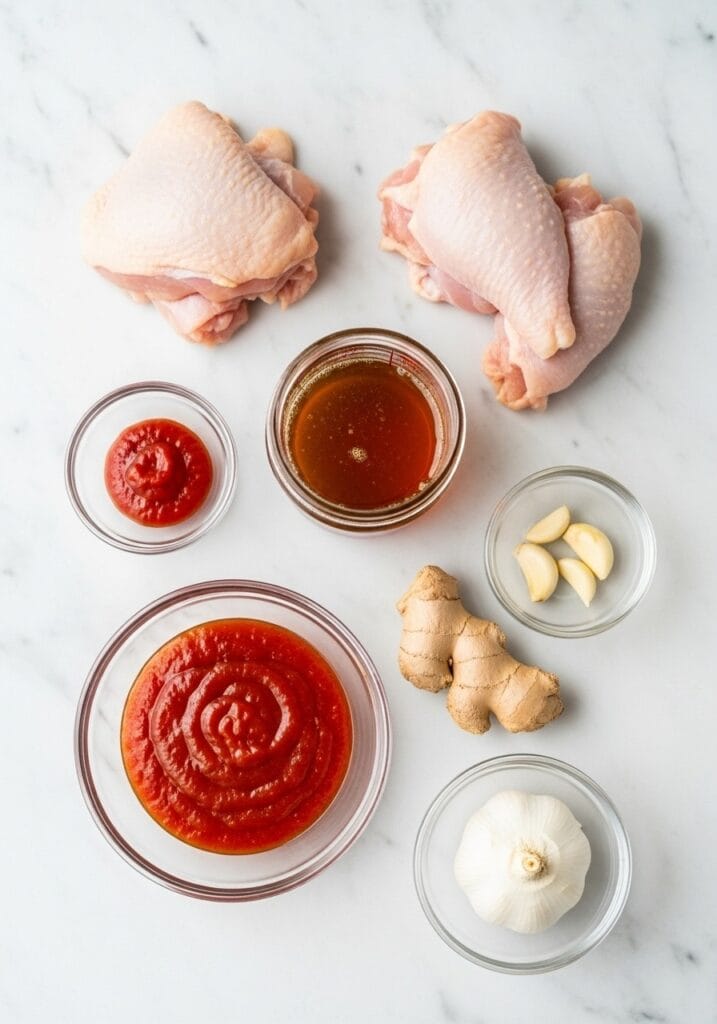
- 680g (1.5 lbs) boneless, skinless chicken thighs or breasts, cut into bite-sized pieces
- 1 tsp salt
- 1/2 tsp black pepper
- 2 tbsp cornstarch
- 2 tbsp neutral oil (vegetable or canola)
For the Honey Sriracha Sauce:
- 80ml (1/3 cup) honey
- 60ml (1/4 cup) sriracha sauce
- 2 tbsp soy sauce (regular or low sodium)
- 1 tbsp rice vinegar
- 3 cloves garlic, minced
- 1 tsp fresh ginger, grated
- 1 tsp sesame oil
For Garnish:
- 2 green onions, sliced
- 1 tbsp sesame seeds
- Red pepper flakes (optional, for extra heat)
Let’s talk substitutions because cooking should be flexible. If you can’t find chicken thighs, breasts work fine but watch them closely – they dry out faster. The cornstarch creates that restaurant-style velvety coating, but in a pinch, all-purpose flour can step in (though you’ll lose some of that silky texture).
For the honey sriracha sauce itself, the honey is non-negotiable for this recipe, but the sriracha level is adjustable. Start with 3 tablespoons if you’re heat-sensitive, or bump it up to 5 if you want more fire. No rice vinegar? Apple cider vinegar brings a similar tang. Fresh ginger adds brightness, but 1/2 tsp ground ginger can substitute if that’s what you have.
The sesame oil in the sauce is optional but recommended. It adds a nutty depth that rounds out the flavors beautifully. If you skip it, the dish still works, just with a slightly different finish.
Step-by-Step Cooking Instructions
1. Prepare the Chicken
Pat the chicken pieces completely dry with paper towels. This step matters more than you think – moisture is the enemy of a good sear. Season the chicken evenly with salt and black pepper, then toss with cornstarch until each piece has a light, even coating. Let it sit for 5 minutes while you prep other ingredients. This short rest helps the coating stick better.
2. Make the Honey Sriracha Sauce
In a medium bowl, whisk together honey, sriracha, soy sauce, rice vinegar, minced garlic, grated ginger, and sesame oil. Whisk vigorously for about 30 seconds until everything is fully combined and the honey is no longer clumping. The sauce should look smooth and glossy. Set aside within arm’s reach of your stove.
3. Sear the Chicken
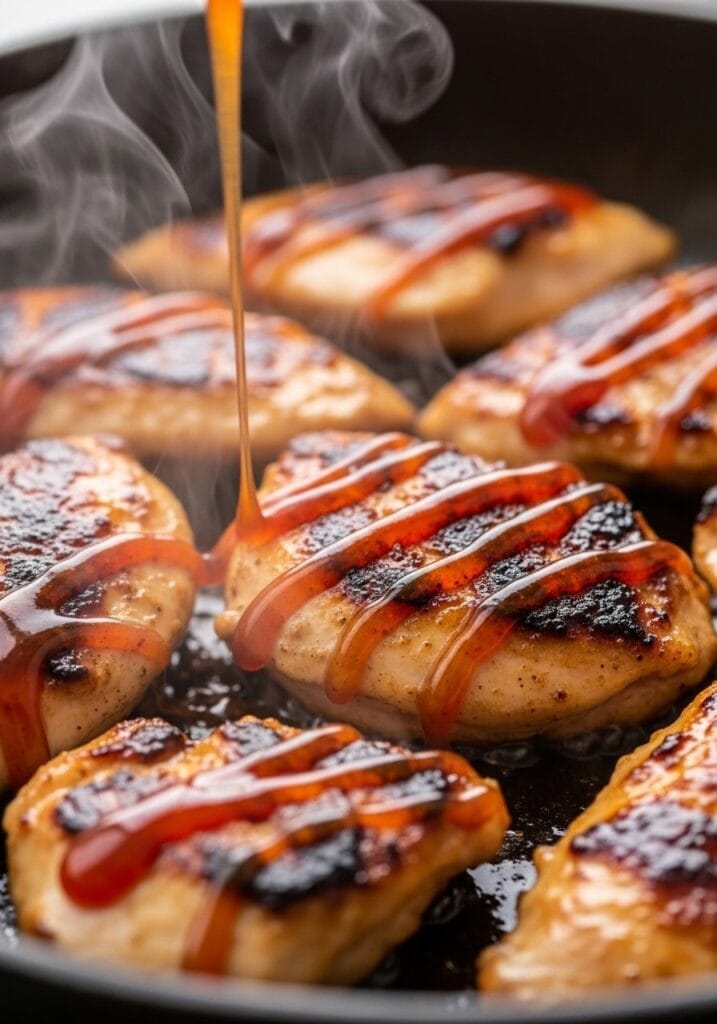
Heat a large skillet or wok over medium-high heat. Add the neutral oil and swirl to coat the pan. Once the oil shimmers (about 1-2 minutes), add the chicken pieces in a single layer. Don’t overcrowd the pan – work in batches if needed. Let the chicken cook undisturbed for 3-4 minutes until the bottom develops a golden-brown crust. Flip each piece and cook another 3-4 minutes on the second side. The internal temperature should reach 74°C (165°F). Transfer cooked chicken to a plate.
4. Build the Glaze
Reduce heat to medium. In the same skillet (don’t wipe it clean – those browned bits are flavor), pour in your prepared honey sriracha sauce. It will bubble immediately. Stir constantly for 2-3 minutes, scraping up all the caramelized bits from the bottom. The sauce will thicken noticeably and reduce by about one-third. You’ll know it’s ready when it coats the back of your spoon and drips slowly rather than running off quickly.
5. Combine and Coat
Return the chicken to the skillet. Toss everything together for 1-2 minutes, making sure every piece gets fully coated in that glossy sauce. The chicken will absorb some of the glaze while the rest clings to the surface. Keep tossing until the sauce looks thick and sticky, clinging to the chicken rather than pooling at the bottom of the pan.
6. Garnish and Serve
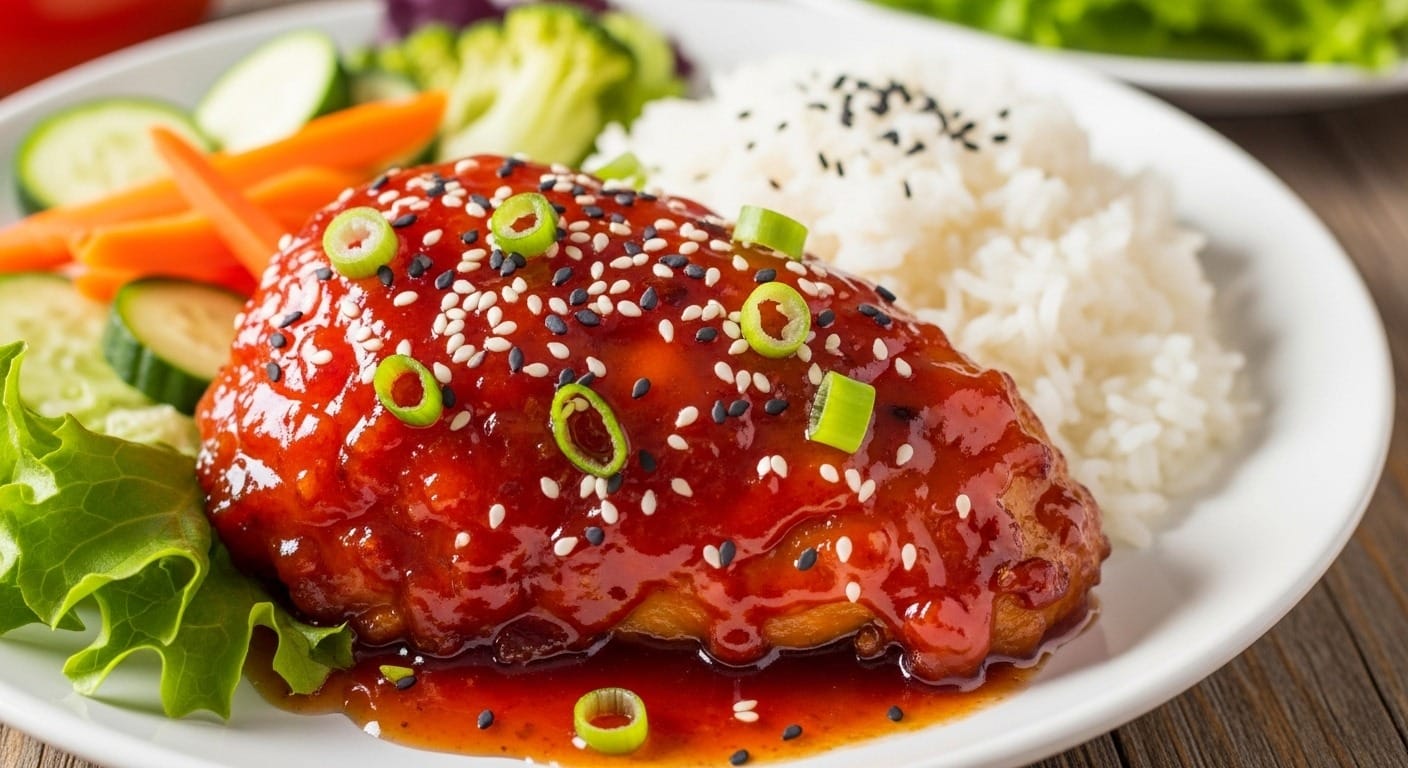
Transfer to your serving plate immediately. Sprinkle with sliced green onions and sesame seeds. If you want extra heat, add a pinch of red pepper flakes. Serve hot over steamed rice, quinoa, or alongside your favorite vegetables.
Cooking Tips for the Perfect Result
The difference between good honey sriracha chicken and unforgettable honey sriracha chicken often comes down to these small details.
First, don’t skip drying the chicken. Even five extra seconds with paper towels makes a difference in how well that cornstarch coating adheres. Wet chicken steams instead of sears, and you’ll miss out on that crispy exterior everyone loves.
When you’re making the sauce, taste as you go. Honey varies in sweetness, and sriracha brands have different heat levels. I usually start conservative and add more sriracha at the end if needed. It’s easier to add heat than to take it away. If your sauce tastes too sweet, a splash more vinegar or soy sauce brings it back into balance. Too spicy? An extra tablespoon of honey mellows things out.
Temperature control matters here more than in most weeknight dinners. Medium-high heat for searing, then drop to medium for the sauce. If your heat is too high when the sauce goes in, the honey can burn and turn bitter in seconds. Keep stirring once that sauce hits the pan.
One trick I learned the hard way: have everything ready before you start cooking. Once that chicken hits the pan, things move fast. Your sauce should be mixed, your garnishes should be prepped, and your serving dish should be standing by. This isn’t the time to be hunting through drawers for measuring spoons.
If you’re doubling the recipe, resist the urge to cram all the chicken into one pan. Overcrowding drops the pan temperature, leading to steamed, soggy chicken instead of that crispy sear we’re after. Use two pans or cook in batches. The extra few minutes are worth it.
Serving Suggestions and What to Pair It With
The beauty of honey sriracha chicken is how well it plays with different sides and presentations. The most straightforward approach? Serve it over steamed white or jasmine rice with a side of steamed broccoli or snap peas. The mild rice soaks up extra sauce, and the vegetables add freshness that cuts through the richness.
But let’s get creative. I’ve tucked this chicken into flour tortillas with shredded cabbage and a drizzle of ranch for quick tacos that disappear in minutes. It’s also fantastic over quinoa chickpea buddha bowls when you want something more substantial and nutrient-dense.
For a lower-carb option, serve it alongside cauliflower rice taco bowls or over spiralized zucchini noodles. The sticky sauce clings just as well to vegetables as it does to traditional starches. Add some pickled cucumbers or a quick cucumber salad on the side – the acidity balances the sweetness beautifully.
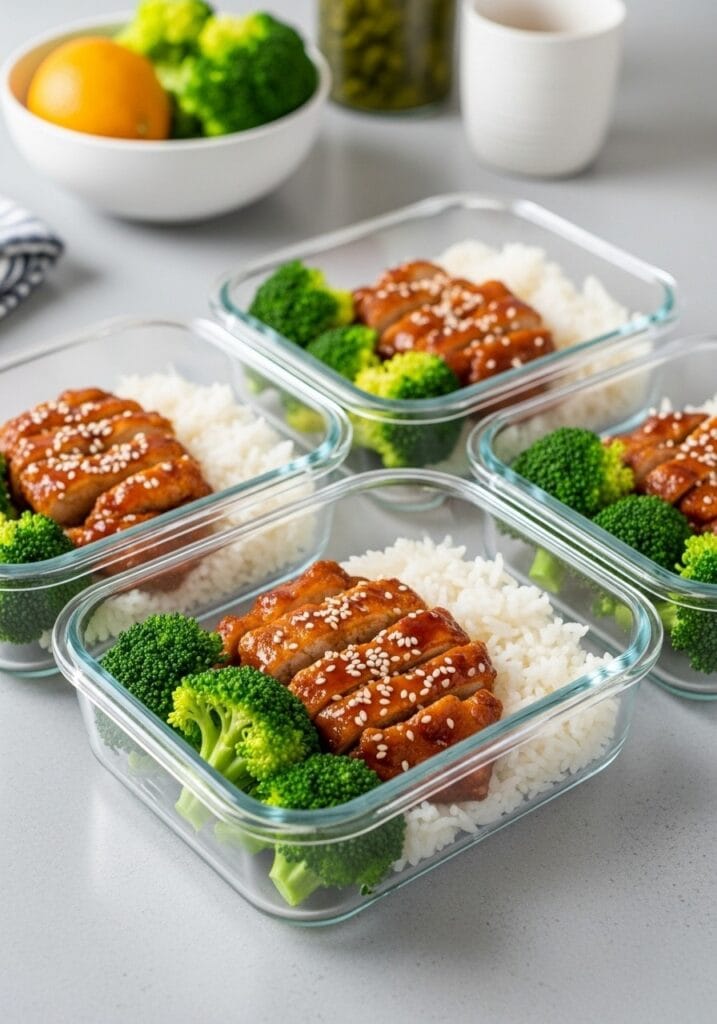
If you’re meal prepping, this chicken holds up remarkably well. Pack it in containers with rice and roasted vegetables for lunches throughout the week. The sauce actually improves after sitting for a day as the flavors meld together. Just reheat gently in the microwave or on the stovetop with a splash of water if it seems dry.
Want to turn it into something more substantial? Toss the finished chicken with lo mein noodles or add it to fried rice. The sauce becomes the seasoning for whatever base you choose. I’ve even chopped it up and used it as a pizza topping with mozzarella and red onion. Unconventional? Sure. Delicious? Absolutely.
Understanding the Honey Sriracha Sauce Magic
Let’s break down why this particular combination works so well. Honey brings natural sweetness, but it also acts as a thickening agent once heated. As the water content evaporates, the sugars concentrate and create that signature sticky coating. Sriracha contributes heat, yes, but also garlic flavor and a slight fermented tanginess from the chili paste.
The soy sauce adds umami depth and salt, which amplifies both the sweet and spicy elements. Without it, the sauce would taste flat and one-dimensional. Rice vinegar cuts through the richness with acidity, preventing the dish from becoming cloying. That brightness keeps you reaching for another bite.
Garlic and ginger are the supporting players that shouldn’t be overlooked. Fresh garlic adds a pungent kick that dried garlic powder simply can’t match. Fresh ginger brings a subtle heat that’s different from the chili heat in sriracha – it’s more aromatic and warming. Together, they create complexity.
The sesame oil at the end is what I call the “secret weapon.” Just one teaspoon adds a toasted, nutty finish that makes people wonder what that extra something is. It’s subtle but noticeable, especially to anyone who’s had similar dishes at Asian restaurants.
When you combine all these elements and reduce them in a hot pan, something magical happens. The sauce transforms from a thin liquid into a glossy glaze that clings to protein like it was designed for that exact purpose. The heat causes the honey to partially caramelize, adding depth and a slight bitterness that balances the sweetness.
This is why timing matters in step four. Cook the sauce too little and it’s runny. Cook it too long and it becomes thick and sticky before you add the chicken back, making it hard to coat evenly. Those 2-3 minutes of constant stirring are when you’re watching for that perfect consistency – thick enough to coat but still pourable.
Making It Your Own: Variations Worth Trying
Once you’ve mastered the basic version, there are endless directions you can take this recipe. Some of my favorite variations came from happy accidents or late-night pantry raids.
For honey sriracha ground chicken, use 680g ground chicken instead of pieces. Brown it in the pan, breaking it into crumbles with a wooden spoon. Drain any excess fat, then add the sauce and cook until it thickens and coats the meat. This version is perfect for rice bowls, lettuce wraps, or even as a protein-packed topping for baked potatoes. It reminds me of something you might find on the menu at Chipotle inspired chicken bowls.
If you want to lean into the spicy side, try adding 1 tsp of gochugaru (Korean chili flakes) to the sauce. It brings a different kind of heat – fruity and complex rather than just straight-up spicy. Or swap half the sriracha for sambal oelek for a more intense chili flavor without additional sweetness.
For a tropical twist, replace 2 tablespoons of honey with pineapple juice and add some diced fresh pineapple chunks in the last minute of cooking. The fruit caramelizes slightly and adds juicy pockets of sweetness throughout. This version pairs incredibly well with coconut rice.
Want to make it more substantial? Add vegetables directly to the pan. Bell peppers, snap peas, and sliced onions all work beautifully. Toss them in after removing the cooked chicken, stir-fry for 2-3 minutes, then add the sauce and return the chicken. You’ve just turned a protein dish into a complete meal similar to a 20 minute chicken stir fry.
For meal prep enthusiasts, try baking this instead of pan-frying. Arrange the cornstarch-coated chicken on a lined baking sheet, spray lightly with cooking oil, and bake at 220°C (425°F) for 15-18 minutes, flipping halfway. Meanwhile, make the sauce on the stovetop. Once the chicken is done, toss everything together in a large bowl. Less hands-on time, same delicious result.
Common Mistakes and How to Avoid Them
Even though this recipe is straightforward, a few common pitfalls can trip up first-timers. I’ve made every single one of these mistakes, so you don’t have to.
Mistake number one: adding cold chicken to a cold pan. Your chicken needs to hit a hot surface to get that sear. If the pan isn’t properly preheated, the chicken will stick, steam, and generally make a mess. Wait for the oil to shimmer before adding protein.
Second common issue: overcrowding the pan. When chicken pieces touch each other, they release moisture that can’t evaporate quickly enough. This leads to steaming instead of browning. Leave space between pieces, even if it means cooking in batches. Your patience will be rewarded with crispier chicken.
Another mistake is not whisking the sauce thoroughly before adding it to the pan. Honey tends to sit at the bottom of the bowl, so if you just pour without mixing, you’ll end up with uneven sweetness. Thirty seconds of vigorous whisking ensures every bite tastes consistent.
Burning the sauce is probably the most heartbreaking mistake because it happens fast. Once honey starts to burn, there’s no saving it – the bitter taste will permeate everything. This is why we drop the heat to medium before adding the sauce and why constant stirring isn’t optional. Keep that spoon moving.
Some people add the chicken back too early, before the sauce has had time to thicken. If your sauce is still watery when the chicken goes back in, it won’t cling properly. You’ll end up with saucy chicken instead of glazed chicken. Wait for that visual cue – the sauce should coat the back of your spoon and drip slowly.
Finally, underseasoning the chicken before coating with cornstarch is a missed opportunity. That salt and pepper aren’t just for flavor – they also help the cornstarch adhere better and create a more even crust. Don’t skip this step even though it seems minor.
Storage and Reheating for Best Results
Leftover honey sriracha chicken (if you’re lucky enough to have any) stores beautifully and actually develops even more flavor after a day in the fridge. Transfer cooled chicken to an airtight container and refrigerate for up to 4 days.
When you’re ready to reheat, you have several options. The microwave is fastest – heat in 30-second intervals, stirring between each, until warmed through. Add a tablespoon of water before reheating to help restore moisture. The sauce may look separated when cold but will come back together as it heats.
For better texture, reheat in a skillet over medium heat. Add a splash of water or chicken broth to the pan, then add the chicken. Stir frequently for 3-4 minutes until heated through. This method helps maintain that slightly crispy exterior better than the microwave.
If you’re reheating from frozen (yes, this freezes well for up to 3 months), thaw in the refrigerator overnight first. Then use either the microwave or stovetop method described above. I don’t recommend reheating from frozen as the texture suffers more noticeably.
One trick for meal prep: store the cooked chicken and sauce separately if you’re planning to reheat multiple times throughout the week. Keep the plain cooked chicken in one container and the sauce in another. When you’re ready to eat, reheat the chicken, warm the sauce separately, then combine. This prevents the chicken from getting too soft from sitting in sauce for days.
The rice or noodles you serve this with should be stored separately from the chicken. Starches absorb moisture over time and can become mushy if stored together. Keep them in separate containers and combine just before eating.
Why This Recipe Beats Takeout Every Time
I used to order something similar from my local Thai place at least twice a week. Then I did the math on what I was spending versus what these ingredients cost, and it wasn’t even close. A single takeout order ran me about fifteen dollars. This recipe costs maybe eight dollars and feeds three to four people generously.
But it’s not just about money. The quality control you get from cooking at home means you can adjust everything to your exact preferences. Want it spicier? Add more sriracha. Need to watch your sodium? Use low-sodium soy sauce. Trying to avoid refined sugar? Swap in a touch of maple syrup. You’re in charge.
There’s also something satisfying about creating restaurant-quality flavors in your own kitchen. The first time I nailed this recipe, I felt like I’d unlocked a secret. That glossy, sticky coating looked exactly like what I’d been paying for – maybe even better because it was piping hot and fresh instead of sitting in a takeout container for twenty minutes.
The time factor surprises people. They assume homemade means complicated and time-consuming. But from start to finish, including prep time, you’re looking at 30 minutes maximum. Most takeout places have longer wait times than that once you factor in ordering, waiting for preparation, and pickup or delivery.
Plus, you know exactly what’s going into your food. No mystery ingredients, no excessive amounts of sugar or sodium hiding in the sauce, no questionable oil choices. When you make it yourself, you control the quality of every single ingredient.
This recipe has saved me on countless weeknights when the alternative was either expensive takeout or uninspiring leftovers. It feels special enough to serve to guests but easy enough to make on a Tuesday when you’re tired. That balance is rare and valuable.
Nutritional Notes and Dietary Adaptations
For those keeping track, one serving of this honey sriracha chicken (about 170g or 6 oz) comes in around 320 calories, with approximately 28g protein, 35g carbohydrates, and 8g fat. The majority of carbs come from the honey in the sauce, while the protein is all from the chicken.
If you’re watching sodium, you can reduce the soy sauce to 1 tablespoon and add a splash more vinegar to maintain the balance. Low-sodium soy sauce is another easy swap that cuts sodium by about 40% without sacrificing much flavor. You can also dilute regular soy sauce with water in a 1:1 ratio.
For a lower-sugar version, reduce the honey to 3 tablespoons and add an extra tablespoon of sriracha. The dish will be spicier but significantly lower in sugar. You could also try using a sugar-free honey substitute, though I haven’t personally tested this and can’t vouch for the texture.
The recipe is naturally gluten-free if you use tamari instead of regular soy sauce and ensure your sriracha brand doesn’t contain gluten (most don’t, but always check). The cornstarch is already gluten-free, so no other substitutions are needed.
For a dairy-free option – good news, this recipe already is dairy-free. No modifications needed there. It’s also naturally nut-free unless you choose to garnish with cashews or peanuts instead of sesame seeds.
If you’re following a keto or low-carb diet, this recipe needs some tweaking. Skip the cornstarch coating and reduce the honey to 1-2 tablespoons maximum. Use a sugar-free sweetener like monk fruit or allulose for the rest. The texture won’t be as sticky, but the flavor profile remains similar. You might also enjoy pairing it with keto creamy chicken alfredo for more low-carb inspiration.
For a higher-protein version without changing the recipe itself, simply increase your portion of chicken and decrease your rice serving. Or serve it over cauliflower rice taco bowls for a lighter, veggie-forward meal that still feels substantial.
Final Thoughts on This Sweet and Spicy Favorite
There’s a reason sticky, sweet-spicy chicken dishes show up on menus everywhere from casual chains to upscale Asian fusion restaurants. The combination just works. It hits multiple taste receptors at once – sweet, spicy, salty, umami – creating a flavor experience that feels complete and satisfying.
What I love most about this particular version is its accessibility. You don’t need specialized equipment, unusual ingredients, or advanced cooking skills. If you can sear chicken and stir a sauce, you can make this. And yet it tastes impressive enough that people will assume you spent way more time and effort than you actually did.
The recipe also scales beautifully. Making it for just yourself? Cut everything in half. Feeding a crowd? Double or triple it. The ratios stay consistent, and the method doesn’t change. That kind of flexibility makes it a reliable go-to whether you’re meal prepping for the week or hosting a casual dinner party.
I’ve taught this recipe to friends who claimed they “couldn’t cook,” and they’ve all succeeded. That’s the real test of a good recipe – it should work for anyone willing to follow the steps. No secret techniques, no years of experience required, just straightforward cooking that delivers consistent results.
If you’re looking for more inspiration for your weeknight dinners, this honey sriracha chicken deserves a permanent spot in your rotation. It’s quick enough for busy evenings but special enough that it never feels boring. Give it a try, and I’m willing to bet it becomes one of those recipes you make so often you stop needing to look at the instructions.
Recipe Card
Honey Sriracha Chicken
Prep Time: 10 minutes
Cook Time: 20 minutes
Total Time: 30 minutes
Servings: 4
Difficulty: Easy
Equipment: Large skillet or wok, mixing bowls, whisk, tongs or spatula
Ingredients
For the Chicken:
- 680g boneless, skinless chicken thighs or breasts, cut into bite-sized pieces
- 1 tsp salt
- 1/2 tsp black pepper
- 2 tbsp cornstarch
- 2 tbsp neutral oil
For the Honey Sriracha Sauce:
- 80ml honey
- 60ml sriracha sauce
- 2 tbsp soy sauce
- 1 tbsp rice vinegar
- 3 cloves garlic, minced
- 1 tsp fresh ginger, grated
- 1 tsp sesame oil
For Garnish:
- 2 green onions, sliced
- 1 tbsp sesame seeds
- Red pepper flakes (optional)
Instructions
- Pat chicken completely dry with paper towels. Season with salt and black pepper, then toss with cornstarch until evenly coated. Let sit for 5 minutes.
- In a medium bowl, whisk together honey, sriracha, soy sauce, rice vinegar, minced garlic, grated ginger, and sesame oil until smooth. Set aside.
- Heat large skillet over medium-high heat. Add neutral oil and swirl to coat. Once oil shimmers, add chicken in a single layer. Cook undisturbed for 3-4 minutes until golden brown on bottom. Flip and cook 3-4 more minutes until internal temperature reaches 74°C. Transfer to a plate.
- Reduce heat to medium. Pour honey sriracha sauce into the same skillet. Stir constantly for 2-3 minutes, scraping up browned bits, until sauce thickens and reduces by about one-third.
- Return chicken to skillet. Toss for 1-2 minutes until every piece is fully coated in glossy sauce.
- Transfer to serving plate. Garnish with sliced green onions, sesame seeds, and red pepper flakes if desired. Serve immediately over rice or with your favorite sides.
Storage: Refrigerate in an airtight container for up to 4 days. Reheat in microwave with a splash of water or in a skillet over medium heat.
This honey sriracha chicken has earned its place as a household favorite for good reason. The balance of flavors, the ease of preparation, and the reliable results make it worth trying at least once. And once you try it, I’m guessing it won’t be the last time.
Still wondering what to cook tomorrow? Take the stress out of dinner with my simple 7-day meal plan.
Get the 7-Day Meal Plan for $2.99