My son doesn’t like vegetables, won’t touch fish, and turns his nose up at anything remotely “fancy.” But chicken tenders? He’d eat them for breakfast if I let him. And honestly, I get it. There’s something universally comforting about tender chicken wrapped in a perfectly crispy coating.
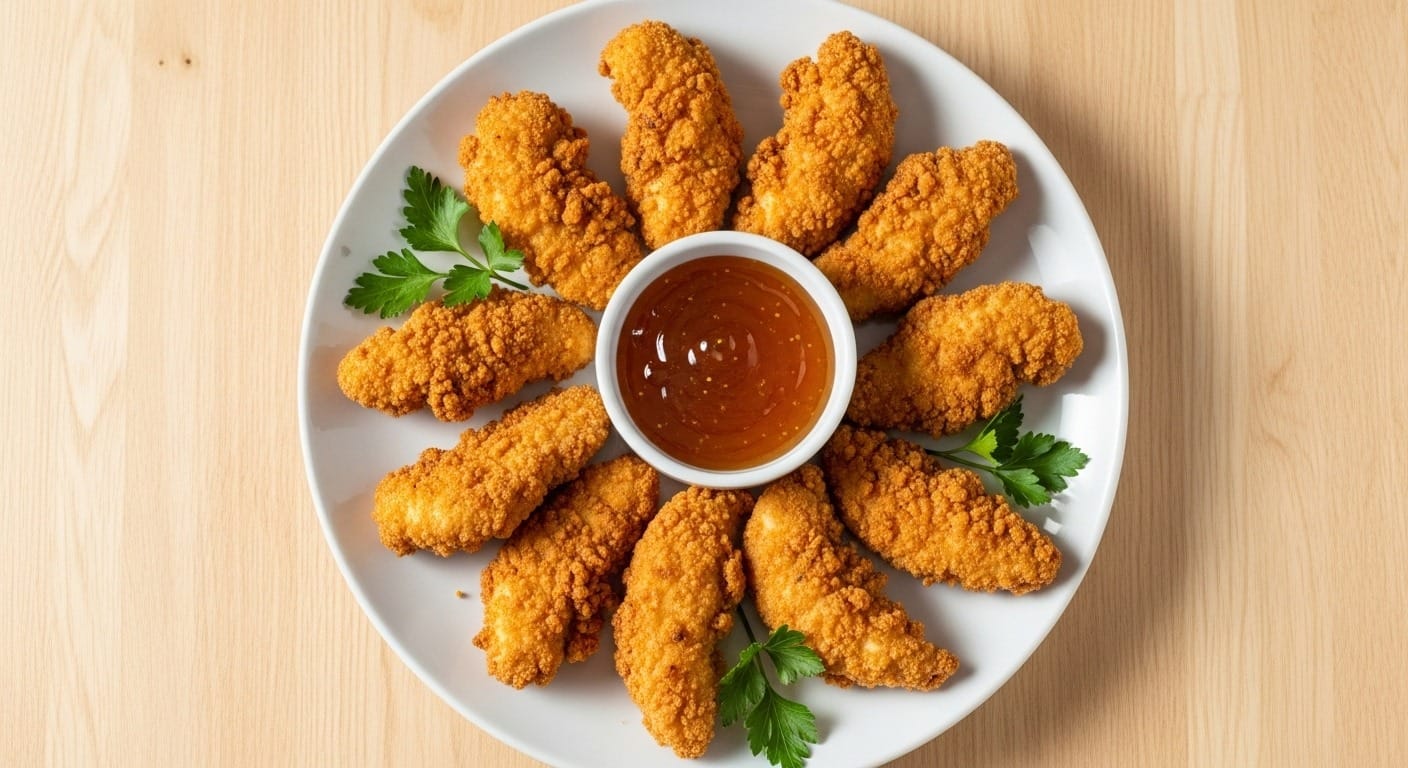
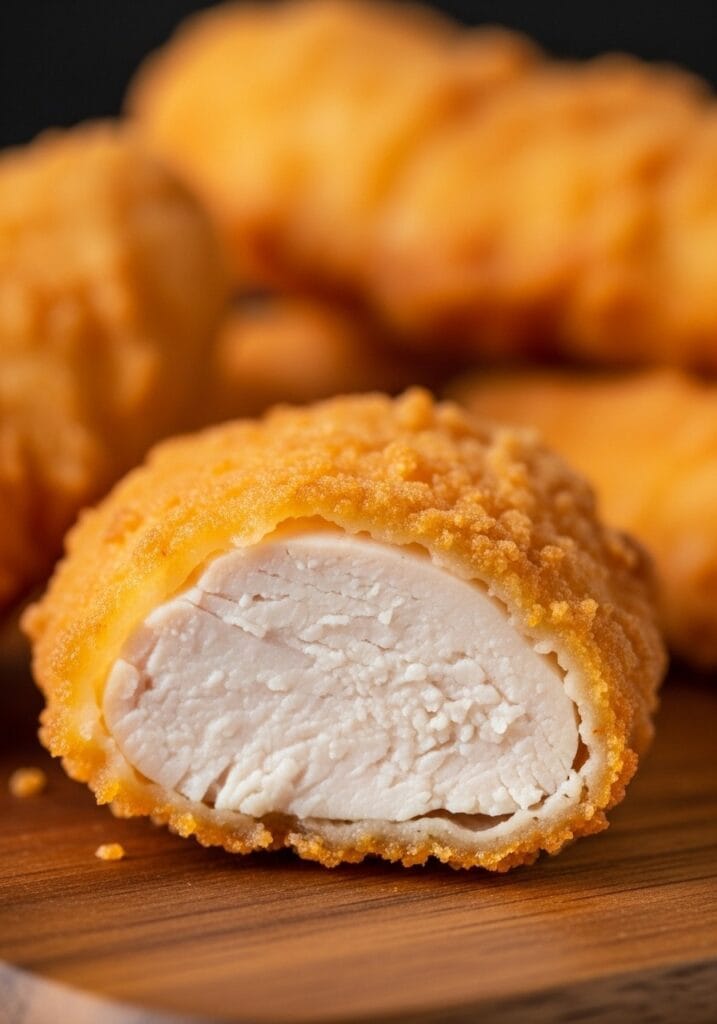
The problem with most baked chicken tender recipes is that they turn out soggy or dry. You end up with something that tastes healthy but not delicious. These crispy baked chicken tenders solve that problem completely. They’re crunchy on the outside, juicy on the inside, and genuinely satisfying for both kids and adults.
Time to cook: 30 minutes total (10 minutes prep, 20 minutes baking) Skill level: Beginner-friendly Taste profile: Savory, crunchy, mildly seasoned with customizable flavor options
Tired of Deciding What to Cook Every Night?
I’ve put together a simple 7-day dinner meal plan using my most-loved recipes — complete with a grocery list and flexible swaps.
Just $2.99 – Instant Download
Get the Meal Plan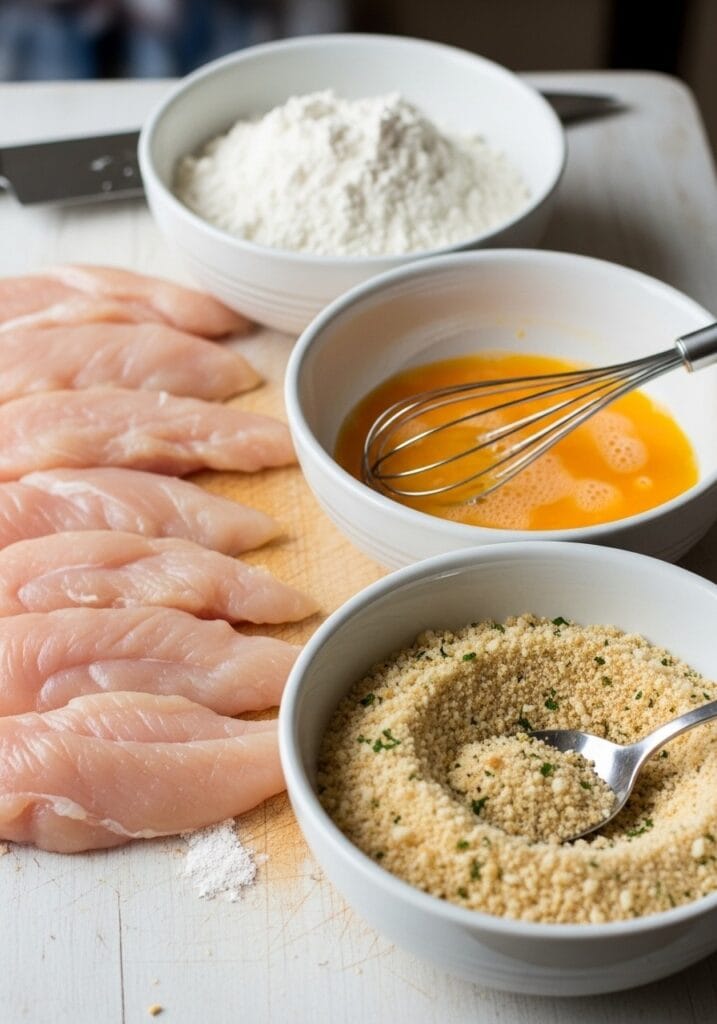
The secret? A three-step breading process and a few simple tricks that create an incredibly crunchy coating without any frying. You’ll use panko breadcrumbs, which have larger flakes than regular breadcrumbs and create that signature crispiness. Whether you’re feeding picky eaters or looking for a quick and easy meal that doesn’t compromise on taste, this recipe delivers every time.
Why These Oven Baked Crispy Chicken Tenders Work
Most baked chicken tenders fail because they skip crucial steps. The coating either slides off during baking or never gets truly crispy. This recipe fixes both issues.
First, we dry the chicken thoroughly. Moisture is the enemy of crispiness. Pat those tenders until they’re completely dry before you start breading.
Second, we use a proper breading station with three distinct layers – flour, egg, and seasoned panko. Each layer has a purpose. The flour creates a dry surface for the egg to grip. The egg acts as glue. The panko provides the crunch.
Third, and this is crucial – we spray the breaded tenders with cooking oil before baking. This mimics the effect of deep frying by helping the coating crisp up in the oven. Without this step, your tenders will taste baked, not fried.
The texture you get from this method rivals anything you’d find at a restaurant. I’ve served these at birthday parties where kids asked if we ordered takeout. The adults were equally impressed, especially when they learned these were baked, not fried.
Ingredients For Crispy Baked Chicken Tenders Panko
For the chicken:
- 680g (1.5 lbs) chicken tenders (about 8-10 pieces)
- 1 tsp salt
- ½ tsp black pepper
For the breading station:
- 95g (¾ cup) all-purpose flour
- 2 large eggs
- 2 tbsp milk
- 180g (2 cups) panko breadcrumbs
- 65g (⅔ cup) grated Parmesan cheese
- 1 tsp garlic powder
- 1 tsp onion powder
- 1 tsp paprika
- ½ tsp dried oregano
- ½ tsp salt
- Cooking spray (olive oil or avocado oil spray works best)
Substitutes:
- No panko? Use regular breadcrumbs, but crush them slightly for better texture
- Skip Parmesan? Add 2 tbsp more breadcrumbs and increase salt slightly
- Dairy-free? Replace milk with water and skip Parmesan
- Gluten-free? Use gluten-free flour and gluten-free panko breadcrumbs
Equipment You’ll Need
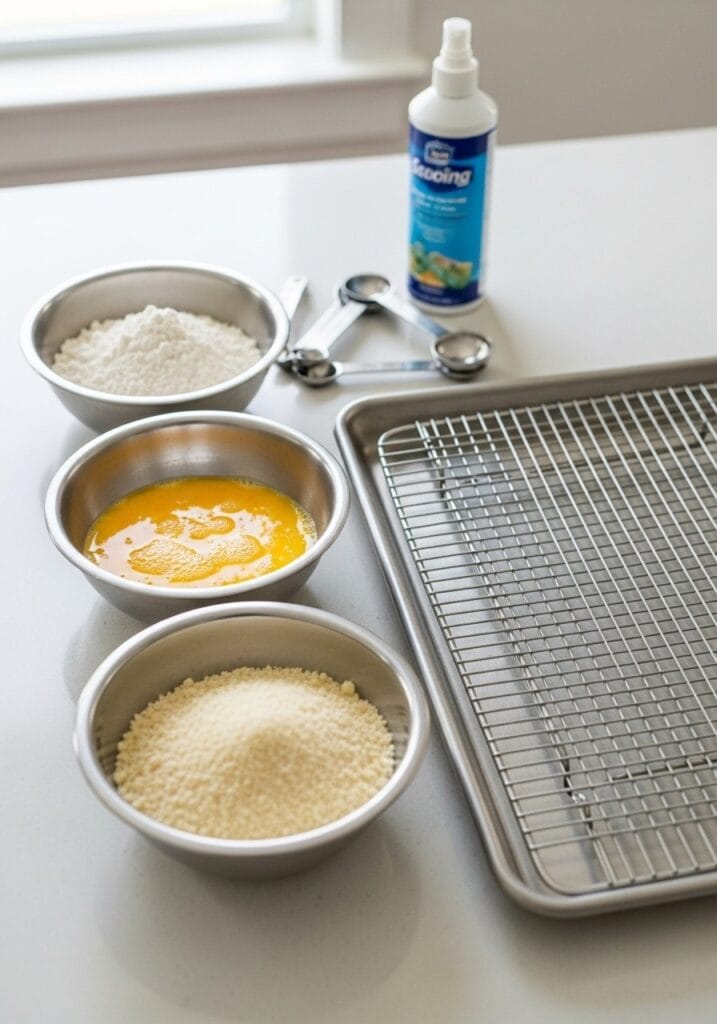
You don’t need any special tools for this recipe. Here’s what you’ll use:
- Large baking sheet
- Wire cooling rack (optional but recommended)
- Three shallow bowls or pie plates
- Measuring cups and spoons
- Paper towels
- Cooking spray
The wire rack is optional, but it helps air circulate around the tenders so the bottom stays crispy. If you don’t have one, you can bake directly on a parchment-lined baking sheet. Just flip the tenders halfway through cooking.
Step-By-Step Instructions
1. Preheat and prepare (5 minutes) Preheat your oven to 220°C (425°F). Line a baking sheet with aluminum foil and place a wire rack on top. Spray the rack generously with cooking spray. This prevents sticking and helps with cleanup.
2. Prep the chicken (2 minutes) Pat the chicken tenders completely dry with paper towels. Any moisture will make your breading slide off. Season both sides with 1 tsp salt and ½ tsp black pepper.
3. Set up breading station (3 minutes) Place flour in the first shallow bowl. In the second bowl, whisk together eggs and milk until well combined. In the third bowl, mix panko breadcrumbs, Parmesan cheese, garlic powder, onion powder, paprika, oregano, and ½ tsp salt. Stir until everything is evenly distributed.
4. Bread the chicken (8-10 minutes) Working with one tender at a time, coat it completely in flour, shaking off excess. Dip into the egg mixture, letting excess drip off. Press into the panko mixture, coating all sides and pressing gently so the crumbs stick. Place on the prepared wire rack. Repeat with remaining tenders, leaving space between each piece.
5. Spray with oil (1 minute) This step is critical. Spray the tops of the breaded tenders generously with cooking spray. You want to see the coating glisten slightly. This oil helps the panko turn golden and crispy.
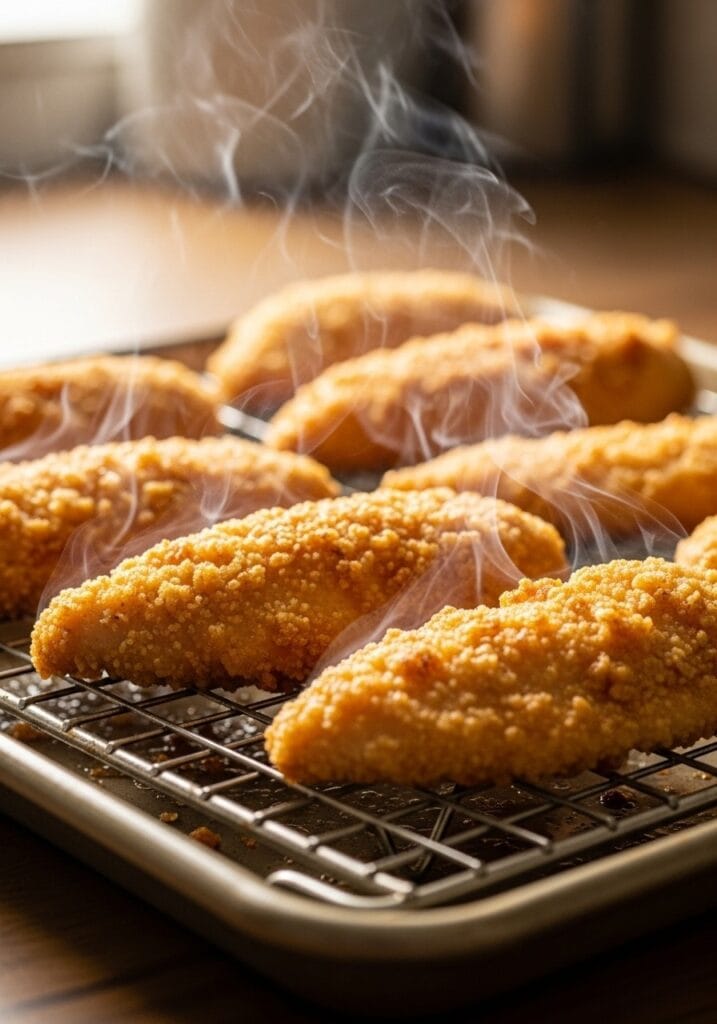
6. Bake (18-20 minutes) Bake on the middle rack for 18-20 minutes until the coating is golden brown and the internal temperature reaches 74°C (165°F). The tenders should be crispy on the outside and no longer pink inside. If using a meat thermometer, insert it into the thickest part of a tender to check.
7. Rest and serve (2 minutes) Let the tenders rest on the rack for 2 minutes before serving. This allows the coating to set and stay extra crispy.
Serving size: 8-10 chicken tenders (serves 4 people) Total cooking time: 30 minutes Difficulty level: Easy
Pro Tips For The Crispiest Results
Don’t crowd the pan. Leave at least 2.5 cm (1 inch) between each tender. If they touch, steam gets trapped and softens the coating.
Use fresh panko if possible. Stale breadcrumbs won’t crisp up as well. You can tell panko is fresh if it still has some spring when you press it.
The temperature matters. If your oven runs cool, increase the temperature to 230°C (450°F). The high heat is what creates that crispy exterior while keeping the inside juicy.
Flip halfway if not using a rack. If you’re baking directly on the pan, flip the tenders at the 10-minute mark to ensure both sides get crispy.
Don’t skip the oil spray. I know it seems like a small step, but it makes a huge difference. The tenders won’t get that deep golden color or satisfying crunch without it.
Flavor Variations To Try

Crispy Baked Ranch Chicken Tenders: Add 2 tbsp ranch seasoning mix to the panko mixture. Replace the garlic powder, onion powder, and oregano with the ranch seasoning for an extra tangy flavor that kids especially love. Serve with extra ranch dressing for dipping.
Spicy version: Add 1 tsp cayenne pepper and 1 tsp chili powder to the panko mixture. You can also toss the finished tenders in buffalo sauce for spicy buffalo chicken tenders.
Italian style: Increase oregano to 1 tbsp and add 1 tsp Italian seasoning and ½ tsp dried basil. Serve with marinara sauce for dipping, similar to air fryer chicken parmesan.
Asian-inspired: Replace the Parmesan with sesame seeds and add 1 tsp ground ginger to the panko. Serve with sweet chili sauce or teriyaki sauce.
Lemon pepper: Add 2 tsp lemon pepper seasoning and 1 tsp lemon zest to the panko mixture. Fresh and bright, perfect for spring and summer meals.
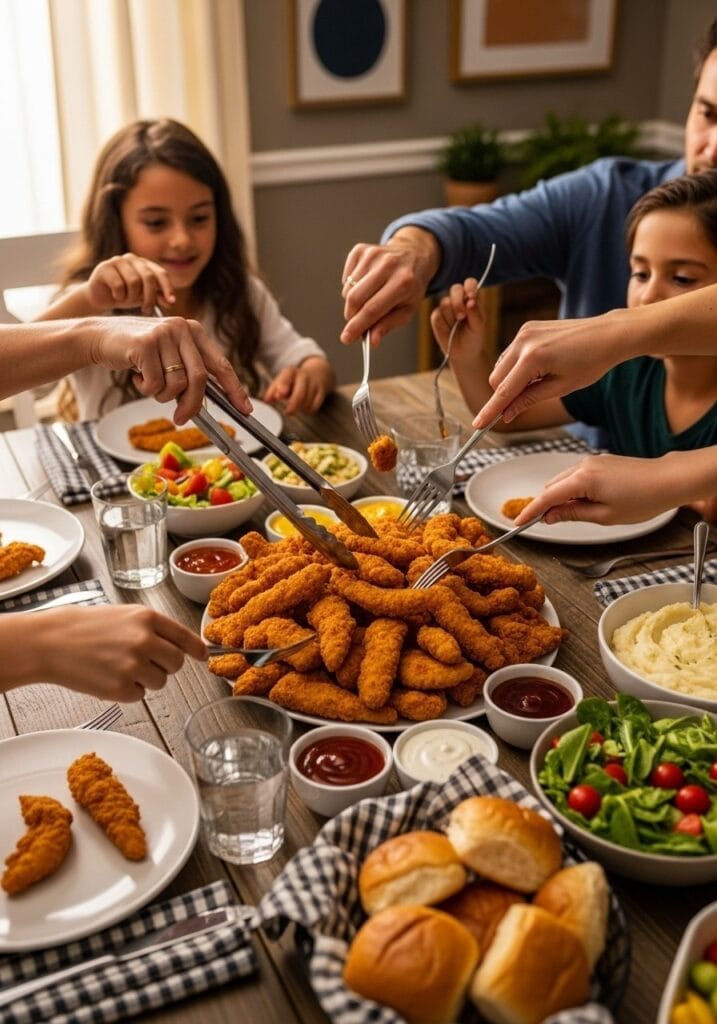
What To Serve With Chicken Tenders
These tenders are incredibly versatile. On busy weeknights, I serve them with frozen fries and carrot sticks for a classic combination that takes minimal effort.
For a healthier meal, pair them with roasted vegetables or a simple salad. The crispy tenders add protein and substance to lighter sides. You could also slice them and add to grain bowls similar to greek chicken rice bowl or chipotle inspired chicken bowls.
Dipping sauces make these tenders even more fun:
- Honey mustard (mix equal parts honey and Dijon mustard)
- BBQ sauce
- Ranch dressing
- Ketchup (classic for kids)
- Sweet chili sauce
- Garlic aioli
For a complete weeknight dinner, add mac and cheese and steamed broccoli. Everything can be ready in about 30 minutes if you time it right.
Storage And Reheating Tips
Refrigerator storage: Store cooled chicken tenders in an airtight container in the refrigerator for up to 3 days. Place parchment paper between layers to prevent sticking.
Freezing: Freeze uncooked breaded tenders on a baking sheet until solid, then transfer to a freezer bag. They’ll keep for up to 3 months. Bake from frozen, adding 5-7 minutes to the cooking time.
You can also freeze cooked tenders, but the texture won’t be quite as crispy when reheated. If freezing cooked tenders, reheat in the oven, not the microwave.
Reheating: Never microwave leftover chicken tenders if you want them crispy. The microwave creates steam that makes the coating soggy.
Instead, reheat in a 200°C (400°F) oven for 8-10 minutes. Place them on a wire rack over a baking sheet for best results. They won’t be quite as crispy as fresh, but they’ll be close.
An air fryer also works brilliantly for reheating. Set it to 190°C (375°F) and heat for 4-5 minutes.
Why This Recipe Is Better Than Deep Frying
I used to deep fry chicken tenders until I perfected this baked version. Now I rarely fry them anymore.
Baking is simply easier. You don’t need to heat a pot of oil, stand over the stove monitoring temperature, or deal with oil splatter. There’s no lingering fried food smell in your kitchen. Cleanup is minimal – just a baking sheet and a few bowls.
It’s also healthier. These tenders use just a light spray of oil instead of cups of frying oil. You save hundreds of calories without sacrificing flavor or texture.
The texture difference is minimal when you follow this method properly. The panko coating gets genuinely crispy, and the chicken inside stays incredibly moist. Most people can’t tell these were baked rather than fried.
Cost is another factor. You don’t waste money on frying oil that you’ll use once and throw away. These tenders are budget-friendly, especially if you catch chicken on sale.
Common Mistakes To Avoid
Using wet chicken: This is the number one mistake. If your chicken isn’t completely dry, the breading won’t stick properly. I’ve seen people skip this step and wonder why their coating falls off in patches.
Skipping the flour layer: Some recipes only use egg and breadcrumbs. Don’t do this. The flour creates a base that helps everything else adhere. Without it, you’ll lose coating during baking.
Pressing too hard: When coating with panko, press gently. If you press too hard, you compact the breadcrumbs and lose that airy texture that makes them crispy.
Overcrowding the pan: Give each tender space. When they’re too close, they steam instead of bake, and you end up with a soggy coating.
Forgetting the oil spray: I can’t stress this enough. The spray is what transforms these from “baked chicken” to “crispy chicken tenders.” Don’t skip it.
Overbaking: Chicken tenders cook quickly because they’re thin. Watch them carefully after 15 minutes. Overcooked tenders are dry and tough.
Making This Recipe Kid-Friendly
Kids love chicken tenders, but some are sensitive to seasonings. If you’re cooking for very young children or picky eaters, reduce the garlic powder and onion powder to ½ tsp each. You can also skip the paprika if they’re sensitive to even mild spice.
Cut the tenders into smaller nugget-size pieces before breading if you have toddlers. Smaller pieces are easier for little hands to manage and cook slightly faster (about 15 minutes instead of 20).
Let kids help with the breading process. It’s messy but fun, and children are more likely to eat food they helped prepare. Give them the panko bowl and let them press the coating onto each tender.
Serve with familiar dipping sauces. Even the pickiest eaters usually enjoy these tenders with ketchup or ranch dressing. You can gradually introduce new sauces as they become more adventurous.
These tenders are also excellent for meal prep. Make a double batch on Sunday and use them throughout the week for quick lunches or dinners, similar to how you might prep 5 ingredient chicken tenders for busy days.
Nutritional Information
Per serving (2-3 tenders):
- Calories: approximately 280
- Protein: 32g
- Carbohydrates: 18g
- Fat: 8g
- Fiber: 1g
These numbers will vary based on the size of your tenders and exact brands used. The protein content makes these tenders satisfying and filling.
If you’re looking for a lighter version, you can skip the Parmesan cheese and use an egg white instead of whole eggs. This reduces calories and fat while maintaining the crispy texture.
For a higher protein meal, serve these alongside protein-rich sides or check out other options like high protein chicken salad.
Frequently Asked Questions
Can I use chicken breast instead of tenders? Yes, absolutely. Cut boneless, skinless chicken breasts into strips about 2 cm (¾ inch) thick. They’ll take the same amount of time to cook as regular tenders.
Do these work in an air fryer? They do! Check out my air fryer chicken tenders recipe for specific air fryer instructions. The cooking time is slightly different.
Can I make these ahead? You can bread the tenders up to 4 hours in advance. Place them on the prepared baking sheet, cover with plastic wrap, and refrigerate until ready to bake. Add 2-3 minutes to the baking time if cooking straight from the refrigerator.
Why aren’t my tenders crispy? The most common reasons are: chicken wasn’t dry enough, you skipped the oil spray, oven temperature was too low, or you crowded the pan. Make sure you’re following all the steps, especially drying the chicken and using cooking spray.
Can I use this method for bone-in chicken? The breading method works, but bone-in pieces need longer cooking time and lower temperature. These specific instructions are designed for boneless tenders.
Why These Belong In Your Weekly Rotation
I make these crispy baked chicken tenders at least twice a month. They’re reliable, quick, and universally loved in my house. Even on nights when I’m tired and don’t feel like cooking, I can pull these together in 30 minutes.
They’re also economical. Chicken tenders often go on sale, and you can stock up and freeze them. The other ingredients are pantry staples you probably already have.
The versatility is another huge plus. These tenders work for fancy dinners when you serve them with nice sides, casual weeknight meals with fries, or packed in lunchboxes the next day. You can change up the seasonings to match whatever you’re craving.
Most importantly, they actually taste good. Not “good for baked chicken” but genuinely delicious. The coating stays crispy even the next day, and the chicken inside is always juicy and tender.
If you’re tired of the same rotation of quick easy meals and want something that feels special but doesn’t require much effort, this is your recipe. It’s the kind of dish that makes you feel like you really cooked, even though it came together in less time than delivery would have taken.
Make a batch this week. I think you’ll be surprised at just how good baked chicken tenders can be when you use the right technique. And don’t be surprised when everyone asks for seconds.
Still wondering what to cook tomorrow? Take the stress out of dinner with my simple 7-day meal plan.
Get the 7-Day Meal Plan for $2.99