Late-night sweet tooth hitting hard? I’ve been there more times than I can count. Standing in front of the fridge at 10 PM, staring at ingredients, wondering if I could whip up something decadent without pulling out a mixer or waiting 40 minutes. That’s exactly how this chocolate lava mug cake became my go-to rescue recipe.
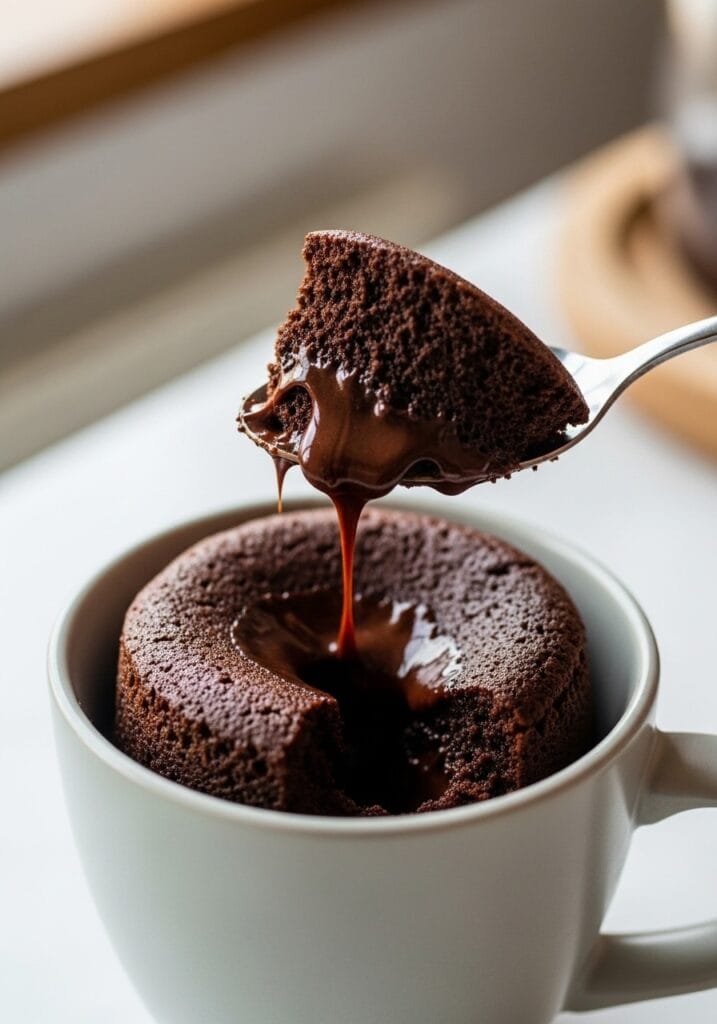
This isn’t just any chocolate mug cake. It’s the kind that delivers a warm, gooey center in under five minutes – start to finish. No oven preheating. No fancy equipment. Just you, a mug, and a microwave. The best part? It tastes like you spent way more effort than you actually did.
Whether you’re treating yourself after a long day or impressing someone with minimal effort (we won’t tell), this recipe has your back. It’s rich, chocolatey, and hits that sweet spot between a fudgy brownie and a molten lava cake. Plus, you only dirty one mug. Cleanup? Basically nonexistent.
Tired of Deciding What to Cook Every Night?
I’ve put together a simple 7-day dinner meal plan using my most-loved recipes — complete with a grocery list and flexible swaps.
Just $2.99 – Instant Download
Get the Meal PlanWhy This Chocolate Lava Mug Cake Works Every Time
Let’s talk about why this recipe is foolproof. Traditional chocolate lava cake requires precise timing, ramekins, and a water bath. This version? It relies on the microwave’s quick heat to create that signature molten center without any fuss.
The secret is in the ratios. Too much flour and you get a cakey texture. Too little and it turns into a puddle. This recipe balances everything perfectly so you get a soft, tender cake with a lava-like core. The batter comes together in less than two minutes, and the cooking time is just right to set the edges while keeping the middle gloriously gooey.
I’ve tested this with different mugs, wattages, and even ingredient swaps. It’s surprisingly forgiving. If your microwave runs hot, shave off 10 seconds. If it’s weaker, add 10-15 seconds. You’ll figure out your sweet spot after the first try.
And here’s the kicker – you can customize it endlessly. Swap the chocolate chips for peanut butter chips. Add a pinch of espresso powder for depth. Toss in some crushed nuts or a dollop of Nutella in the center before microwaving. It’s basically a blank canvas for your cravings.
Ingredients You’ll Need
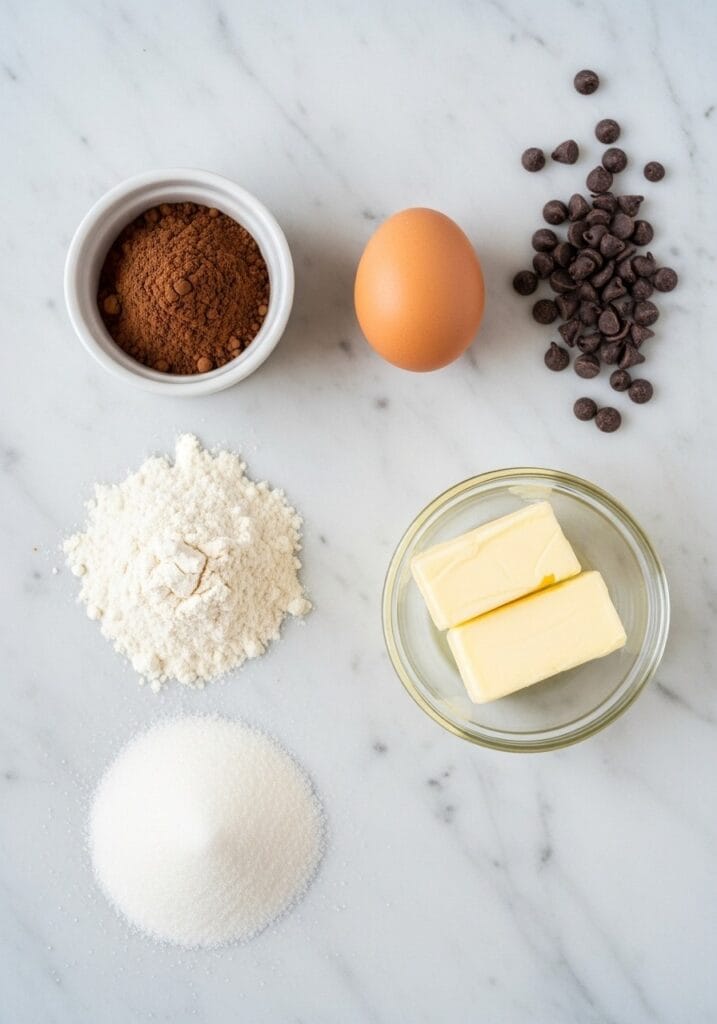
For the mug cake:
- 3 tablespoons (25g) all-purpose flour
- 3 tablespoons (40g) granulated sugar
- 2 tablespoons (10g) unsweetened cocoa powder
- 1/4 teaspoon baking powder
- Pinch of salt
- 3 tablespoons (45ml) milk (dairy or non-dairy works)
- 2 tablespoons (28g) melted butter (or coconut oil)
- 1/4 teaspoon vanilla extract
- 2 tablespoons (30g) chocolate chips (or chopped dark chocolate)
Substitutes:
- Replace butter with melted coconut oil or vegetable oil.
- Use almond milk or oat milk instead of regular milk.
- Swap chocolate chips with chopped chocolate bars or Nutella for the center.
Step-by-Step Instructions
1. Prep your mug. Grab a microwave-safe mug that holds at least 12 ounces. Lightly grease the inside with butter or cooking spray. This helps if you want to flip it out later (though eating straight from the mug is totally acceptable).
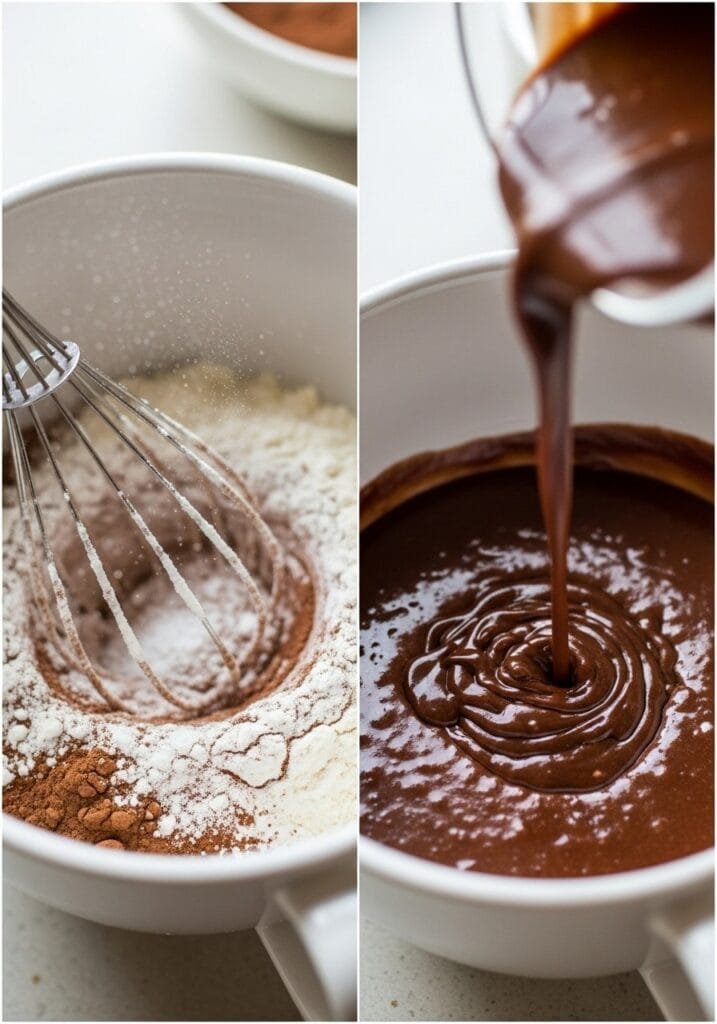
2. Mix the dry ingredients. Add flour, sugar, cocoa powder, baking powder, and salt directly into the mug. Use a fork to whisk everything together until no lumps remain. This takes about 30 seconds.
3. Add the wet ingredients. Pour in milk, melted butter, and vanilla extract. Stir until the batter is smooth and well combined. Make sure to scrape the bottom and sides so nothing gets left behind. The batter should be thick but pourable.
4. Add the chocolate chips. Drop chocolate chips into the batter and give it one final stir. Some will sink, some will stay on top – that’s exactly what you want. They’ll melt into pockets of gooey chocolate as it cooks.
5. Microwave. Place the mug in the microwave. Cook on high for 60-75 seconds. The top should look set but still slightly glossy in the center. Don’t overcook it or you’ll lose that molten lava effect. Start with 60 seconds and add time if needed.
6. Let it rest. Remove the mug carefully (it’ll be hot). Let it sit for 30 seconds. This allows the center to stay molten while the edges firm up just enough to hold their shape.
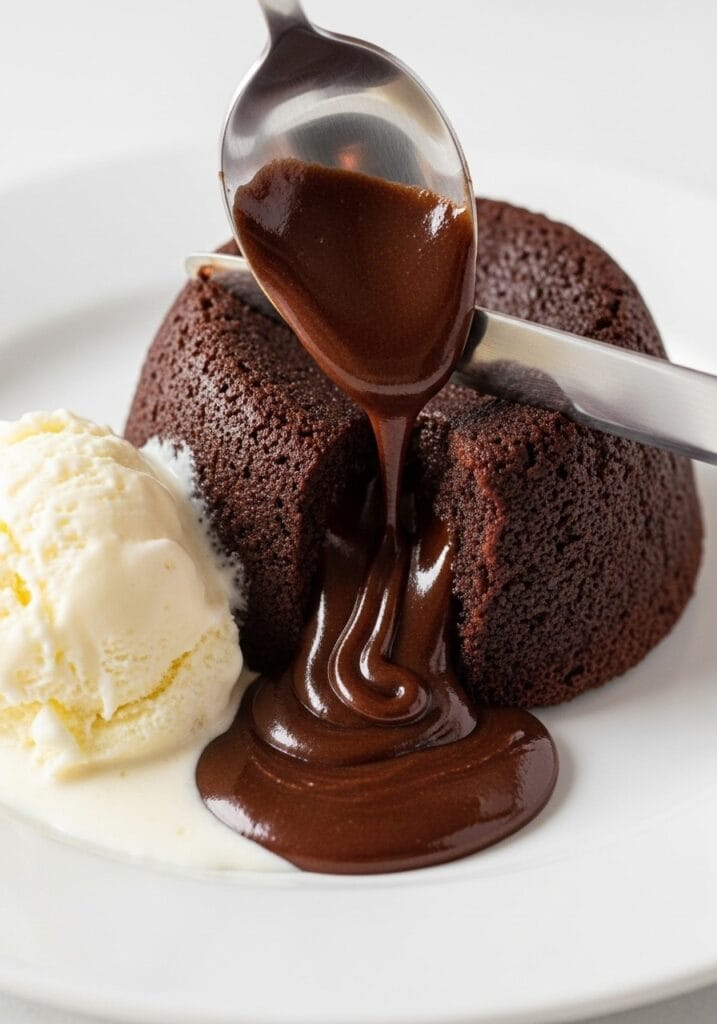
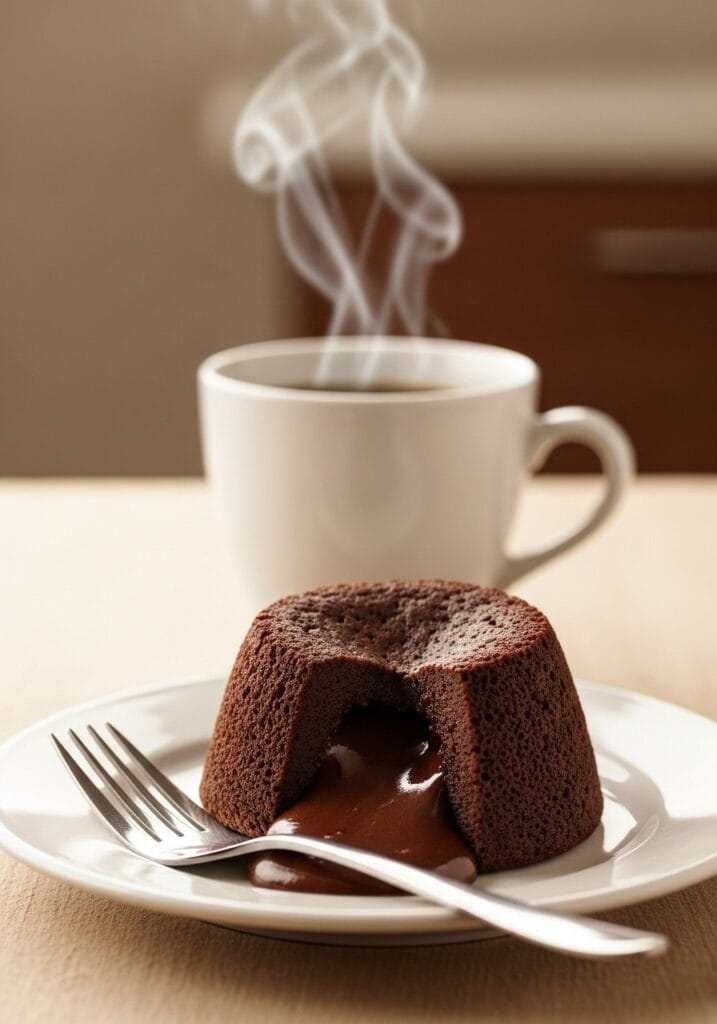
7. Serve immediately. Eat it straight from the mug or invert it onto a plate for a fancier presentation. Top with a scoop of vanilla ice cream, whipped cream, or a dusting of powdered sugar if you’re feeling extra.
Tips For The Perfect Molten Center
Getting that lava center right is all about timing. Undercook it slightly. The top should look just set – not dry or cracked. If it looks wet in the very center, that’s your sweet spot. Microwaves vary, so your first attempt might need a small adjustment.
If you want an even more dramatic lava effect, press a piece of chocolate (like a Hershey’s Kiss or a chunk of dark chocolate) into the center of the batter before microwaving. As it heats, that chocolate melts into a pool of pure indulgence.
Another trick? Use room temperature ingredients. Cold milk or butter can affect how evenly the batter cooks. If your butter just came out of the fridge, microwave it for 15-20 seconds until melted, then let it cool slightly before adding.
Don’t skip the resting time. Those 30 seconds let the residual heat finish cooking the edges while keeping the center soft. If you dig in immediately, the cake might collapse a bit. Not the end of the world, but waiting makes it picture-perfect.
Flavor Variations To Try
Peanut Butter Swirl: Add a tablespoon of peanut butter to the center of the batter before microwaving. It melts into a creamy, nutty surprise.
Mint Chocolate: Stir in 1/8 teaspoon peppermint extract along with the vanilla. Top with crushed peppermint candies after cooking for a festive twist.
Espresso Kick: Mix 1/4 teaspoon instant espresso powder into the dry ingredients. It deepens the chocolate flavor without making it taste like coffee.
Salted Caramel: Drizzle caramel sauce over the batter before microwaving. Sprinkle with flaky sea salt after cooking for a sweet-salty combo.
White Chocolate Raspberry: Swap cocoa powder with an extra tablespoon of flour and fold in white chocolate chips. Add a few fresh raspberries to the batter before cooking. They’ll burst and create fruity pockets.
Serving Suggestions
This moist chocolate cake is delicious on its own, but a few additions take it over the top. A scoop of vanilla ice cream is the classic pairing – the cold creaminess against the warm, gooey cake is unbeatable.
Whipped cream adds a light, airy contrast. Drizzle with chocolate syrup or caramel sauce for extra decadence. Fresh berries like strawberries or raspberries cut through the richness with a tart pop.
If you’re serving it for a date night or small gathering, dust the top with powdered sugar and add a sprig of mint. Suddenly, your microwave mug cake looks like it came from a fancy dessert menu.
For a fun twist, serve it alongside a cup of peppermint hot chocolate or gingerbread latte during the colder months. The flavors complement each other beautifully.
Storage And Reheating
Honestly, this is meant to be eaten fresh. The magic happens right out of the microwave when the center is still warm and flowing. But if you somehow have leftovers (unlikely), here’s what to do.
Store the cooled cake in the mug, covered with plastic wrap, in the fridge for up to 24 hours. Reheat in the microwave for 20-30 seconds before eating. It won’t have the same molten center, but it’ll still taste rich and fudgy.
You can also prep the dry ingredients ahead of time. Combine flour, sugar, cocoa powder, baking powder, and salt in a small jar or ziplock bag. When cravings hit, just dump it into a mug, add the wet ingredients, and microwave. It’s like having a chocolate lava cake kit ready to go.
Freezing isn’t recommended. The texture changes too much once thawed, and microwaving from frozen can lead to uneven cooking.
Why This Recipe Is A Game-Changer
Let’s be real – most dessert recipes require planning. You need time, tools, and energy. This chocolate lava cake throws all that out the window. It’s spontaneous. It’s quick. And it delivers that restaurant-quality experience without leaving your kitchen.
I’ve made this on busy weeknights when I needed a pick-me-up. I’ve made it when friends dropped by unexpectedly and I wanted to serve something impressive. I’ve even made it at 2 AM because, well, chocolate doesn’t care about the clock.
It’s also a fantastic recipe to make with kids. They can measure, mix, and watch the magic happen in the microwave. Just supervise the hot mug part. Bonus points if you let them choose the mix-ins – it becomes their custom creation.
For anyone who loves quick and easy meals but wants a dessert option that’s just as fast, this is your answer. It fits into busy lives without sacrificing flavor or satisfaction.
Common Mistakes To Avoid
Overcooking is the biggest pitfall. The difference between a molten center and a dry cake is literally 10-15 seconds. Keep a close eye on it, especially the first time you make it.
Using a mug that’s too small can cause overflow. Stick to at least 12 ounces to give the batter room to rise. If your mug is smaller, reduce the ingredient amounts by a third.
Not greasing the mug makes it harder to eat or remove the cake. A quick swipe of butter or spray prevents sticking and makes cleanup easier.
Skipping the resting time can lead to a messy presentation. Those 30 seconds matter. Use them to grab your toppings or take a photo for the gram.
Lastly, don’t walk away while it’s microwaving. Seriously. It cooks so fast that stepping away for a minute can mean the difference between perfect and overdone.
Nutritional Information (Per Serving)
- Serving size: 1 mug cake
- Calories: ~380
- Total fat: 18g
- Saturated fat: 11g
- Cholesterol: 50mg
- Sodium: 210mg
- Carbohydrates: 52g
- Fiber: 3g
- Sugars: 38g
- Protein: 5g
This is an indulgent treat, no doubt. But sometimes, you just need that hit of chocolate bliss. If you’re looking for lighter options, check out healthy meal ideas on the site for balance.
Final Thoughts
This chocolate lava mug cake has earned its spot as my most-made dessert. It’s reliable, fast, and satisfies every chocolate craving without the commitment of a full batch of brownies or a layered cake. Whether you’re new to baking or just short on time, this recipe works.
The beauty of it is the flexibility. Make it your own. Try different chocolates, add a splash of liqueur, or stuff it with your favorite candy bar. Every version is a winner.
If you’re into other fast desserts and sweet treats, you’ll love how this fits into your rotation. It’s the kind of recipe you’ll come back to again and again – and probably share with everyone you know.
So grab a mug, a few pantry staples, and give yourself permission to indulge. You’re only minutes away from chocolate heaven.Difficulty Level: Easy
Total Time: 5 minutes (2 minutes prep, 1-2 minutes cooking, 30 seconds rest)
Servings: 1
Equipment Needed: Microwave-safe mug (12 oz or larger), fork or small whisk, microwave
Still wondering what to cook tomorrow? Take the stress out of dinner with my simple 7-day meal plan.
Get the 7-Day Meal Plan for $2.99