My daughter’s birthday party was almost perfect. Almost. The cake was beautiful, the decorations were on point, but when I served the cake, half the kids were running around and barely touched their slices. That’s when I wished I’d made something they could grab and go. Something fun, freezer-friendly, and still special enough for a birthday.
That’s exactly what birthday cake ice cream sandwiches are. They’re playful, easy to hold, and kids (honestly, adults too) go wild for them. You get the nostalgic taste of funfetti birthday cake, but in a handheld frozen treat that doesn’t require plates or forks. Plus, you can make them ahead, which is a lifesaver when you’re hosting.
These sandwiches take about 30 minutes of active work, and they’re beginner-friendly. The cookies stay soft even after freezing, and the ice cream doesn’t melt too fast. They taste like a party – sweet, creamy, and bursting with sprinkles. If you’re looking for something that feels special without the stress, this is it.
Tired of Deciding What to Cook Every Night?
I’ve put together a simple 7-day dinner meal plan using my most-loved recipes — complete with a grocery list and flexible swaps.
Just $2.99 – Instant Download
Get the Meal PlanWhy You’ll Love This Recipe
Birthday cake ice cream sandwiches bring together two beloved desserts into one handheld treat. The cookies are tender and cake-like, not crunchy, which makes them perfect for biting into when frozen. The rainbow sprinkles add that festive birthday cake flavor without needing actual cake.
You can customize these easily. Swap vanilla ice cream for strawberry, chocolate, or even birthday cake-flavored ice cream. Use different sprinkle colors to match a party theme. They’re also make-ahead friendly, which means less stress on party day.
The texture is what really makes them work. Soft cookie, creamy ice cream, and just enough sweetness. They’re not overly heavy like some ice cream sandwiches you buy at the store. And because you control the ingredients, you know exactly what’s going into them.
What You’ll Need
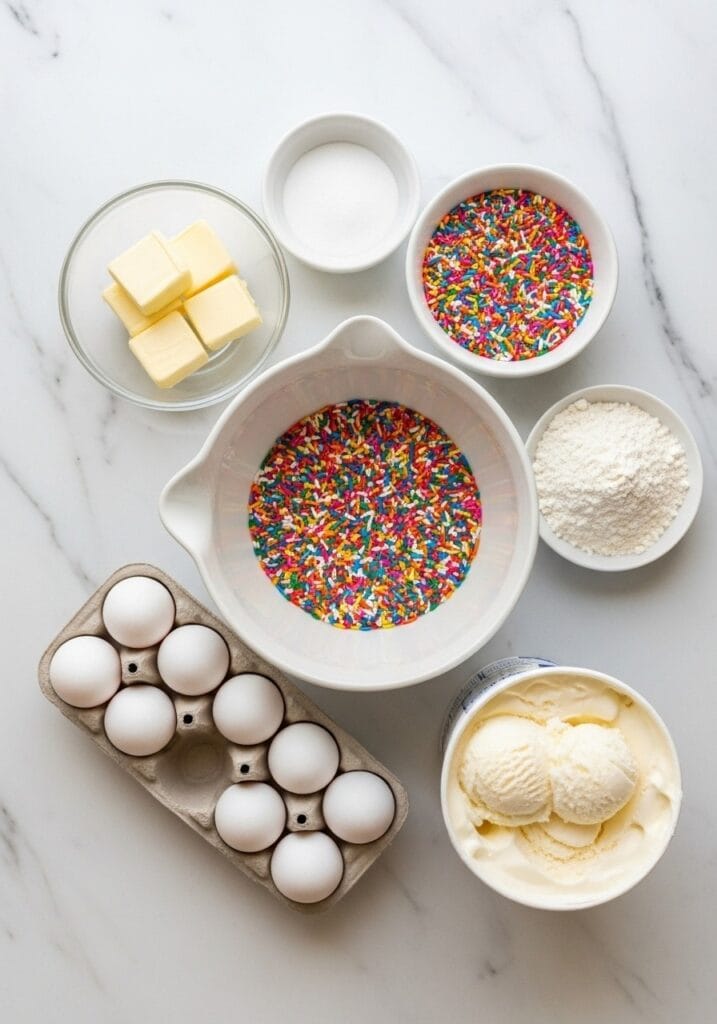
For the Funfetti Cookies
- 225g unsalted butter, softened
- 200g granulated sugar
- 100g light brown sugar, packed
- 2 large eggs
- 2 tsp vanilla extract
- 1/2 tsp almond extract (optional, but adds that cake flavor)
- 280g all-purpose flour
- 1 tsp baking powder
- 1/2 tsp baking soda
- 1/2 tsp salt
- 100g rainbow sprinkles (jimmies work best, nonpareils can bleed)
For Assembly
- 1 liter vanilla ice cream, slightly softened
- Extra sprinkles for rolling the edges
Substitutions: If you don’t have almond extract, just use more vanilla. For a gluten-free version, use a 1:1 gluten-free flour blend. You can also use dairy-free ice cream if needed.
Equipment You’ll Need
- Stand mixer or hand mixer
- Baking sheets (2-3)
- Parchment paper or silicone baking mats
- Cookie scoop (3 tablespoon size)
- Offset spatula or butter knife
- Freezer-safe container
Step-by-Step Instructions
Making the Cookies

- Preheat your oven to 175°C (350°F). Line two baking sheets with parchment paper.
- In a large bowl, cream the softened butter, granulated sugar, and brown sugar together using a mixer on medium speed for 3-4 minutes. The mixture should look pale and fluffy.
- Add the eggs one at a time, beating well after each addition. Mix in the vanilla extract and almond extract if using.
- In a separate bowl, whisk together the flour, baking powder, baking soda, and salt.
- Add the dry ingredients to the butter mixture gradually, mixing on low speed until just combined. Don’t overmix or the cookies will be tough.
- Gently fold in the rainbow sprinkles using a spatula. Stir just until evenly distributed.
- Using a 3-tablespoon cookie scoop, drop dough onto the prepared baking sheets. Space them about 7-8 cm apart as they’ll spread.
- Bake for 10-12 minutes. The edges should be set but the centers will still look slightly underdone. This is what you want for soft cookies.
- Let the cookies cool on the baking sheet for 5 minutes, then transfer to a wire rack. They’ll continue to firm up as they cool.
- Once completely cool (about 30 minutes), place the cookies in the freezer for 15-20 minutes. This makes assembly easier.
Assembling the Ice Cream Sandwiches
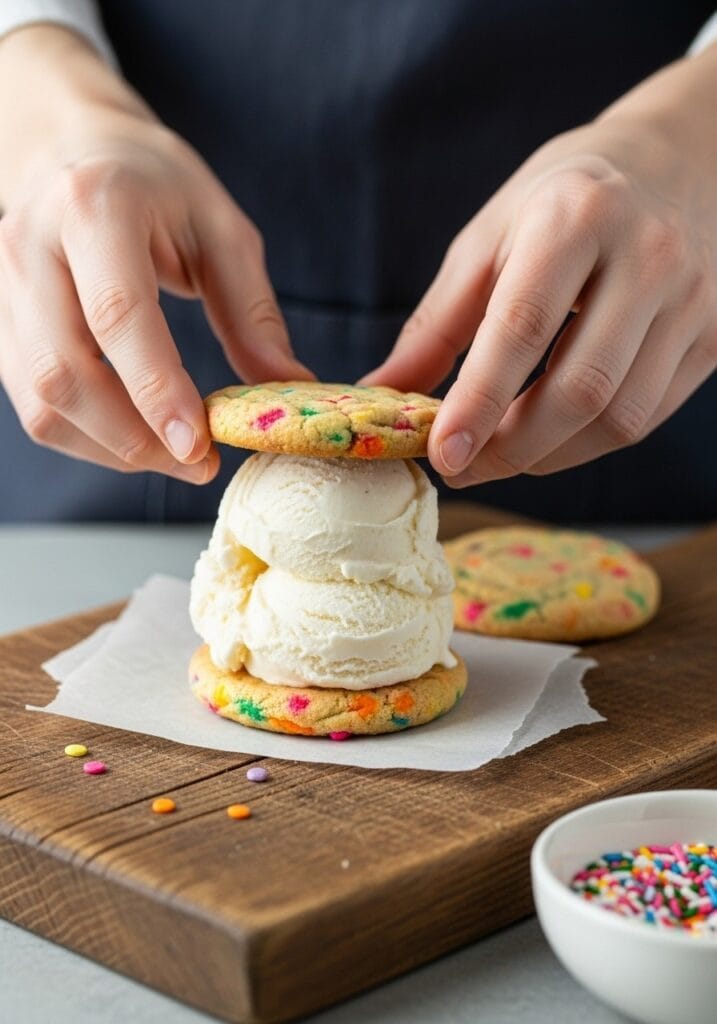
- Remove the ice cream from the freezer and let it soften at room temperature for 5-10 minutes. It should be spreadable but not melted.
- Take one cookie and place it flat-side up. Add about 1/2 cup of ice cream to the center.
- Using an offset spatula or the back of a spoon, spread the ice cream evenly to the edges of the cookie. Work quickly so the ice cream doesn’t melt too much.
- Place a second cookie on top, flat-side down. Press gently until the ice cream reaches the edges.
- Pour extra sprinkles into a shallow dish. Roll the edges of the sandwich through the sprinkles to coat.
- Place the finished sandwich on a parchment-lined baking sheet or directly into a freezer-safe container.
- Repeat with the remaining cookies and ice cream.
- Freeze the assembled sandwiches for at least 2 hours before serving. This lets everything firm up properly.
- For longer storage, wrap each sandwich individually in plastic wrap once frozen solid. They’ll keep for up to 2 weeks.
Tips for Perfect Ice Cream Sandwiches
The cookie thickness matters. If they’re too thin, they’ll crack when frozen. Too thick, and they’re hard to bite through. Aim for about 1 cm thick after baking.
Don’t skip the freezing step for the cookies before assembly. Cold cookies prevent the ice cream from melting too quickly while you’re working.
Work in batches. Assemble 2-3 sandwiches at a time, then pop them in the freezer before making more. This keeps everything at the right temperature.
If your ice cream is too hard, microwave it for 10-15 seconds. If it’s too soft, stick it back in the freezer for a few minutes. You want it soft enough to spread but firm enough to hold its shape.
For cleaner edges, use a piece of parchment paper or plastic wrap to press down on the top cookie. This spreads the ice cream evenly without getting your hands messy.
Flavor Variations to Try

Swap the vanilla ice cream for chocolate, strawberry, or mint chocolate chip. Each one gives you a completely different dessert.
Add mini chocolate chips to the cookie dough along with the sprinkles. Or use chocolate sprinkles instead of rainbow for a different look.
Try a cookies and cream filling by mixing crushed Oreos into softened vanilla ice cream before assembling.
For adults, add a tablespoon of bourbon or rum to the cookie dough. The alcohol keeps the cookies from getting rock-hard in the freezer.
Make them seasonal by using holiday-themed sprinkles. Red and green for Christmas, pastels for Easter, orange and black for Halloween.
Serving and Storage
Let the sandwiches sit at room temperature for 2-3 minutes before serving. This softens them just enough to bite through easily.
If you’re serving these at a party, keep them in a cooler with ice packs. They’ll stay frozen for about an hour in a well-iced cooler.
For kid-friendly portions, make smaller sandwiches using a 2-tablespoon cookie scoop. You’ll get more sandwiches, and they’re easier for little hands.
Store wrapped sandwiches in an airtight container in the freezer. Layer them with parchment paper between each sandwich to prevent sticking.
These taste best within the first week, but they’ll keep for up to 2 weeks. After that, the cookies can start to develop freezer burn.
Common Questions
Do the cookies stay soft when frozen? Yes, the high butter and sugar content keeps them soft and chewy even at freezer temperature. They won’t be as soft as fresh-baked, but they won’t crack your teeth either.
Can I use store-bought cookies? Absolutely. Soft sugar cookies or bakery-style chocolate chip cookies work well. Just make sure they’re soft, not crispy.
Why are my sandwiches too hard to bite? Either the cookies are too thick or the ice cream is too frozen. Let them sit out for a few minutes before serving. You can also use a serrated knife to cut them in half.
Can I make these without a mixer? Yes, but it takes more arm work. Make sure your butter is very soft, and beat it thoroughly with a wooden spoon until fluffy before adding the other ingredients.
What if I don’t have rainbow sprinkles? Mini chocolate chips, crushed candy, or even leaving them plain works fine. The sprinkles are mostly for the birthday cake look and a bit of crunch.
Why This Recipe Works for Parties
Birthday cake ice cream sandwiches solve the biggest party dessert problem – serving a crowd without the mess. No cutting, no plates, no melting cake sitting out. Everyone grabs one and keeps moving.
You can make these days in advance. Actually, you should. Having them ready in the freezer means one less thing to worry about when you’re setting up. I usually make them two days before a party.
They’re also budget-friendly compared to buying individual frozen treats or a fancy cake. One batch makes about 12-14 sandwiches, depending on size, and costs less than most bakery orders.
Kids love the rainbow sprinkles and the novelty of a handheld ice cream treat. Adults appreciate that they’re not overly sweet or artificial-tasting like some store-bought versions.
Making It Your Own

The beauty of these sandwiches is how adaptable they are. Once you’ve made the basic version, you can experiment with different cookie bases. Peanut butter cookies with chocolate ice cream is incredible. Or try oatmeal cookies with cinnamon ice cream for a fall version.
You can also add mix-ins to the ice cream layer. Crushed candy bars, chopped nuts, or swirls of caramel or fudge sauce. Just spread a thin layer of ice cream, add your mix-in, then top with more ice cream before sandwiching.
For a real showstopper, dip half of each sandwich in melted chocolate and let it harden in the freezer. Or drizzle chocolate over the top and add extra sprinkles before they’re fully frozen.
The cookies themselves can be flavored differently too. Add cocoa powder for chocolate cookies, lemon zest for citrus cookies, or espresso powder for a coffee twist.
Final Thoughts
Birthday cake ice cream sandwiches are one of those recipes that looks impressive but doesn’t require any fancy skills. You’re basically making cookies and buying ice cream. The magic happens when you put them together and freeze them.
They’ve become my go-to for birthday parties, summer barbecues, and even just because. My kids ask for them constantly, and I don’t mind making them because they’re simple and I can prep ahead. Plus, having a stash of homemade ice cream sandwiches in the freezer feels like a small victory.
If you’re looking for more easy desserts that work well for gatherings, check out these quick treats that won’t keep you in the kitchen all day. And for other fun party food, browse through our collection of weeknight dinners that can easily scale up for a crowd.
Give these a try for your next celebration. Or just make them on a random Tuesday because you deserve something fun. Either way, you’ll end up with a freezer full of happiness that’s ready whenever you need it.
Recipe Summary
Prep Time: 20 minutes Baking Time: 12 minutes Freezing Time: 2 hours Total Time: 2 hours 32 minutes Difficulty Level: Easy Servings: 12-14 sandwiches
Have you made these birthday cake ice cream sandwiches? I’d love to know what flavor combinations you tried. Drop a comment or share your photos – seeing your creations always makes my day.
Still wondering what to cook tomorrow? Take the stress out of dinner with my simple 7-day meal plan.
Get the 7-Day Meal Plan for $2.99