There’s something about the first chilly evening of fall that makes me crave warm, spiced desserts straight from the oven. This caramel apple crumble skillet became my go-to after a particularly busy week when I needed something impressive but didn’t want to dirty every dish in my kitchen. The best part? Everything happens in one pan, and your house will smell absolutely incredible.
This recipe combines tender, cinnamon-kissed apples with a buttery oat crumble and a homemade caramel sauce that seeps into every crevice. It’s easier than pie (no rolling dough!), feeds a crowd, and pairs perfectly with vanilla ice cream. Whether you’re hosting friends or just treating yourself on a cozy night in, this skillet dessert delivers that comforting fall feeling we all crave.
Time to Make: 45 minutes | Skill Level: Easy | Taste Profile: Sweet, spiced, buttery with hints of cinnamon and brown sugar
Tired of Deciding What to Cook Every Night?
I’ve put together a simple 7-day dinner meal plan using my most-loved recipes — complete with a grocery list and flexible swaps.
Just $2.99 – Instant Download
Get the Meal PlanWhy You’ll Love This Caramel Apple Crumble Skillet
Forget complicated desserts with multiple components. This apple crumble recipe comes together quickly and bakes in a single cast iron skillet. The caramel sauce cooks right alongside the apples, creating pockets of gooey sweetness that make each bite irresistible.
I love how forgiving this recipe is. Your apples can be slightly different sizes, your crumble might be chunkier or finer, and it still turns out beautifully every time. Plus, serving it directly from the skillet gives it that rustic, farmhouse charm that looks stunning on any table.
The combination of textures is what really makes this special. You get soft, jammy apples on the bottom, a crispy-chewy crumble on top, and that luscious caramel tying everything together. It’s the kind of dessert that disappears fast, with everyone going back for seconds.
Ingredients You’ll Need
For the Caramel Sauce:
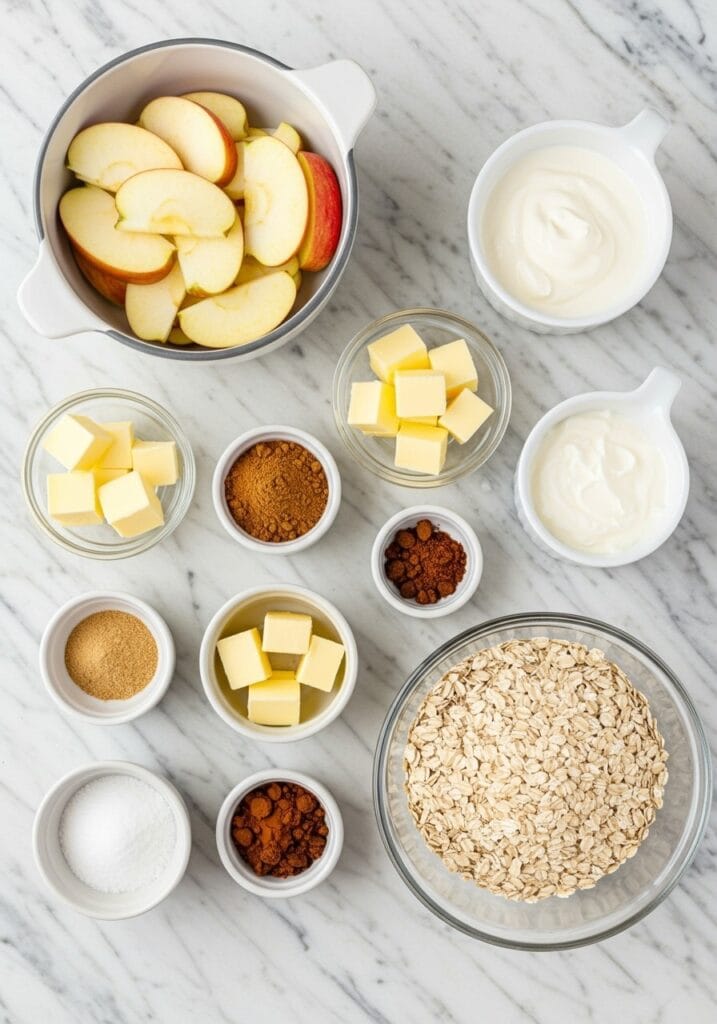
- 150g (3/4 cup) granulated sugar
- 60g (4 tbsp) unsalted butter, cubed
- 120ml (1/2 cup) heavy cream
- 1/2 tsp sea salt
For the Apple Filling:
- 1kg (about 6 medium) Granny Smith or Honeycrisp apples, peeled and sliced 1/4-inch thick
- 50g (1/4 cup) light brown sugar
- 2 tsp ground cinnamon
- 1/4 tsp ground nutmeg
- 1 tbsp cornstarch
- 1 tbsp fresh lemon juice
- 1/2 tsp vanilla extract
For the Crumble Topping:
- 100g (1 cup) old-fashioned rolled oats
- 80g (2/3 cup) all-purpose flour
- 100g (1/2 cup) light brown sugar
- 1/2 tsp ground cinnamon
- 1/4 tsp salt
- 115g (1/2 cup) cold unsalted butter, cubed
Substitution Tips: Don’t have heavy cream? Use full-fat coconut milk for the caramel. If you’re avoiding gluten, swap the flour with almond flour or a 1:1 gluten-free blend. Maple syrup can replace some of the brown sugar if you prefer a deeper flavor.
Equipment Needed
- 10-inch or 12-inch cast iron skillet (or oven-safe skillet)
- Medium saucepan
- Large mixing bowl
- Whisk
- Wooden spoon
- Measuring cups and spoons
Step-by-Step Instructions
Making the Caramel Sauce
1. Heat the granulated sugar in a medium saucepan over medium heat without stirring.
2. Wait for the sugar to begin melting around the edges (about 3-4 minutes), then gently swirl the pan to distribute heat evenly.
3. Continue cooking and swirling until all sugar melts into a deep amber liquid (about 6-8 minutes total).
4. Remove from heat and carefully add the cubed butter, whisking constantly as it bubbles vigorously.
5. Slowly pour in the heavy cream while whisking (the mixture will bubble up dramatically, so be cautious).
6. Return to low heat and whisk for 1-2 minutes until smooth and glossy.
7. Stir in the sea salt, then set aside to cool slightly.
Visual Cue: The caramel should coat the back of a spoon and have a rich, golden-brown color.
Preparing the Apple Filling
8. Preheat your oven to 350°F (175°C).
9. Toss the sliced apples with brown sugar, cinnamon, nutmeg, and cornstarch in a large bowl.
10. Add the lemon juice and vanilla extract, mixing until apples are evenly coated.
11. Let the mixture sit for 5 minutes to release some juices.
Making the Crumble Topping
12. Combine oats, flour, brown sugar, cinnamon, and salt in a mixing bowl.
13. Add the cold butter cubes and use your fingers to rub the butter into the dry ingredients.
14. Continue working the mixture until it resembles coarse crumbs with some pea-sized butter chunks remaining.
15. Refrigerate the crumble while you assemble the skillet.
Tip: Cold butter is key here. It creates those crispy, golden pockets when baked.
Assembling the Skillet Dessert
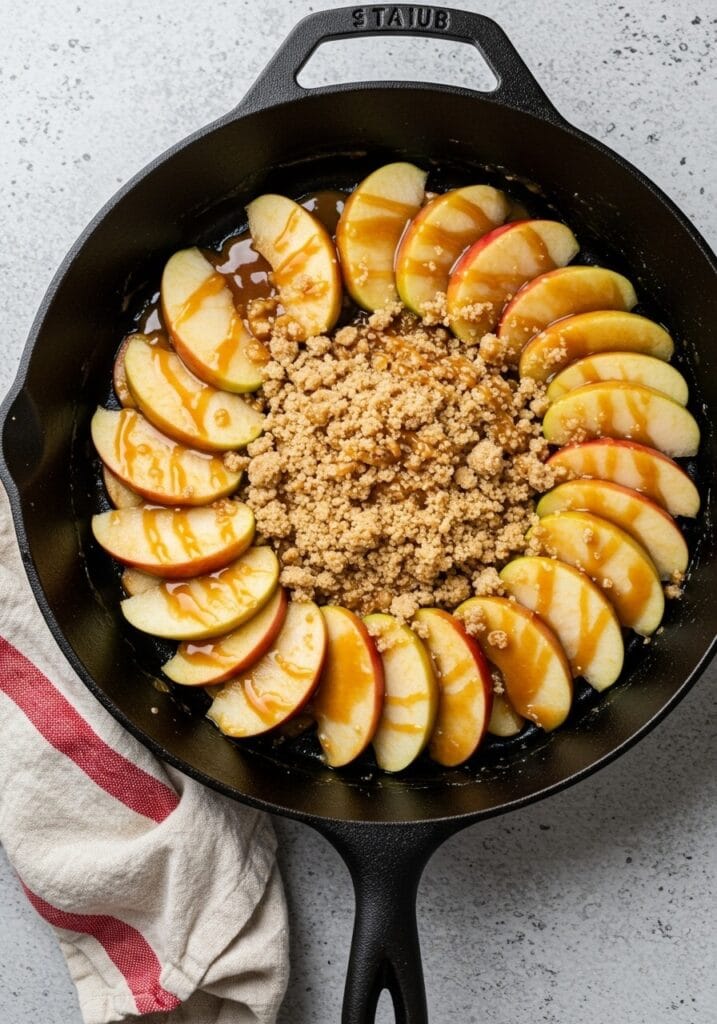
16. Pour half of the caramel sauce into the bottom of your cast iron skillet.
17. Layer the apple mixture evenly over the caramel.
18. Drizzle the remaining caramel sauce over the apples, reserving 2-3 tablespoons for serving.
19. Sprinkle the crumble topping evenly over the entire surface, creating a thick layer.
20. Press the crumble down very gently with your hands.
Baking
21. Place the skillet on a baking sheet (to catch any drips) and bake for 35-40 minutes.
22. Check at 30 minutes – the topping should be golden brown and the apples should be bubbling around the edges.
23. If the crumble is browning too quickly, tent loosely with aluminum foil.
24. Remove from oven when the apples are tender when pierced with a knife and the topping is crisp.
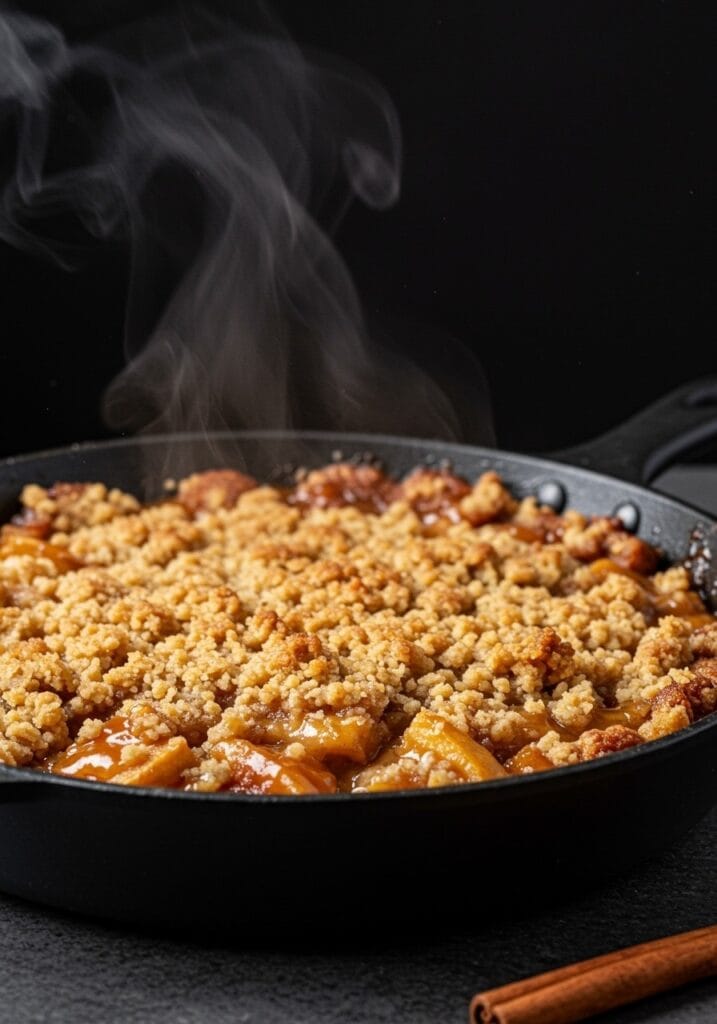
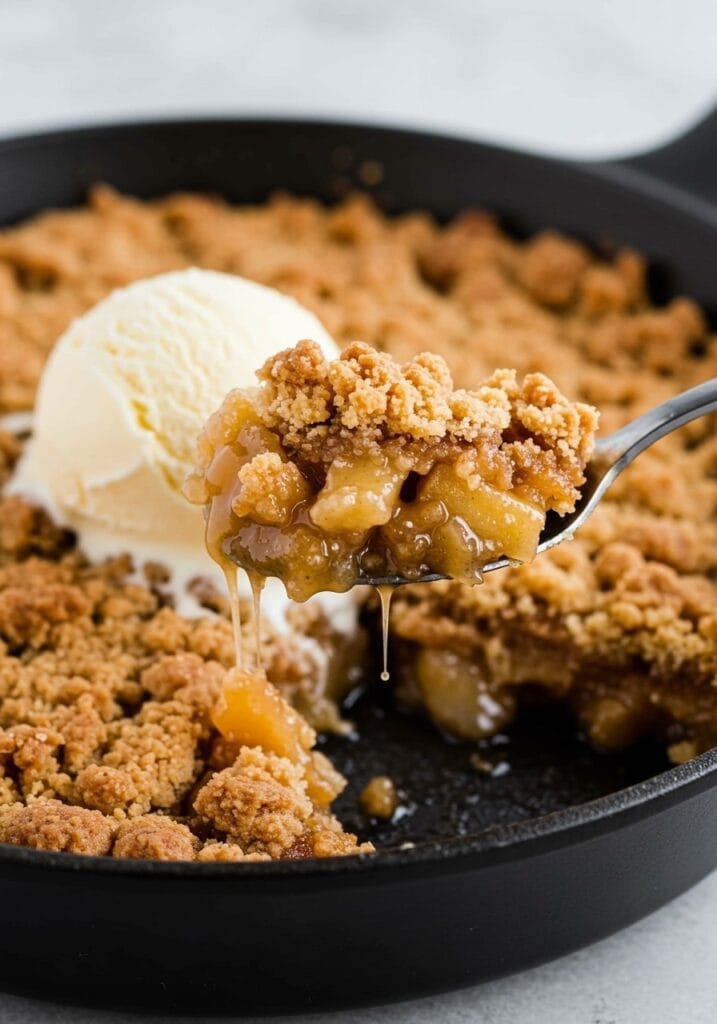
Visual Cue: You’ll see caramel bubbling up through the crumble, and the top should be deeply golden.
Serving
25. Let the skillet rest for 10-15 minutes before serving (this helps the caramel thicken slightly).
26. Scoop portions into bowls and drizzle with the reserved caramel sauce.
27. Top with vanilla ice cream or whipped cream if desired.
Serving Size: 6-8 servings | Total Time: 45 minutes (15 min prep + 30 min baking) | Difficulty: Easy
Tips for the Perfect Caramel Apple Crumble
Choose the right apples. Granny Smith apples hold their shape beautifully and provide a tart contrast to the sweet caramel, while Honeycrisp offers a sweeter, juicier result. I sometimes mix both varieties for complexity.
Don’t skip the lemon juice. It brightens the filling and prevents the apples from browning too quickly. Even if your apples are tart, that little bit of acid makes everything taste more vibrant.
Watch your caramel carefully. Sugar can go from perfect to burnt in seconds. If you’re nervous about making caramel, keep a bowl of ice water nearby to stop the cooking by briefly placing the pan bottom in the water.
The crumble should look rough and chunky. Those irregular butter pieces create the best texture when baked. If your mixture becomes too uniform or starts holding together like dough, you’ve overworked it.
Serve this warm, not hot. Letting it rest for 10-15 minutes allows the caramel to set just enough that it’s not dangerously molten, but it’s still wonderfully gooey. This is when the flavors also meld together beautifully.
Variations to Try
Make it more indulgent by adding 1/2 cup of chopped pecans or walnuts to the crumble topping. They toast while baking and add a wonderful crunch.
For a bourbon caramel version, stir 2 tablespoons of bourbon into the finished caramel sauce. The warmth pairs incredibly well with the apples and spices.
Try mixing in fresh or frozen cranberries with the apples for a tart pop of color and flavor. Reduce the sugar by 2 tablespoons if using cranberries.
Want individual portions? Divide the recipe among 4-6 mini cast iron skillets or ramekins. Reduce baking time to 25-30 minutes.
Storage and Reheating
Store leftovers covered in the refrigerator for up to 3 days. The crumble will soften slightly, but it’s still delicious.
To reheat, warm individual portions in the microwave for 30-45 seconds, or reheat the entire skillet in a 300°F oven for 15-20 minutes until warmed through.
The caramel sauce can be made up to 1 week in advance and stored in an airtight container in the fridge. Warm it gently before using.
You can assemble the entire skillet dessert (without baking) and refrigerate for up to 4 hours before baking. Add 5-10 minutes to the baking time if starting from cold.
Why This Works for Fall Gatherings
This caramel apple crumble skillet is my secret weapon for entertaining. Unlike individual desserts that require precise plating, you just set the warm skillet on a trivet and let everyone serve themselves. It feels casual and inviting, which is exactly the vibe I want when friends come over.
The timing works perfectly for dinner parties too. You can prep everything earlier in the day, then pop it in the oven when you sit down to eat. By the time you’re ready for dessert, it’s perfectly warm and ready to go.
I’ve served this at Thanksgiving, Halloween parties, and regular weeknight dinners. It scales well, looks impressive, and honestly tastes better than most apple pies I’ve had. The skillet presentation feels rustic and homey in a way that fancy plated desserts sometimes don’t.
Pairing Suggestions
Vanilla ice cream is the classic choice, and watching it melt into the warm caramel is part of the experience. But I’ve also served this with maple whipped cream, salted caramel ice cream, or even a dollop of crème fraîche for something less sweet.
Coffee or hot apple cider alongside this creates the ultimate cozy fall moment. The spices in the crumble echo beautifully with warm drinks.
If you’re looking for a quick weeknight dinner to serve before this dessert, something light works best since this is quite rich and satisfying.
What Makes This Different from Regular Apple Crumble
The skillet changes everything. Cast iron distributes heat evenly and creates those crispy, caramelized edges that you just don’t get in a baking dish. Plus, it goes straight from oven to table, staying warm throughout your meal.
Making homemade caramel instead of using store-bought transforms this from good to unforgettable. Yes, it adds a step, but it’s worth every minute. That deep, complex sweetness with a hint of salt elevates the entire dessert.
The ratio here leans heavily on apples with a thinner crumble layer than most recipes. I prefer this because you get more of that tender, spiced fruit and less of the heavy topping. Every bite feels balanced rather than overly dense.
Final Thoughts
This recipe reminds me of Sunday afternoons at my grandmother’s house, where something was always baking and the kitchen was the heart of every gathering. While she never made this exact version, the spirit is the same – simple ingredients transformed into something warm and welcoming.
The beauty of this caramel apple crumble skillet is how it makes you look like a skilled baker without requiring advanced techniques. If you can stir sugar and mix butter into flour, you can make this. And the payoff is enormous – that first bite with the crispy topping, soft apples, and ribbons of caramel is pure magic.
I hope this becomes your go-to fall dessert like it has for me. There’s something about pulling a bubbling skillet from the oven that makes any evening feel special. Whether you’re feeding a crowd or just treating yourself after a long day, this delivers comfort in every spoonful. For more cozy recipes perfect for fall, check out our collection of easy desserts and sweet treats on Tasty Dish Diary. Happy baking!
Still wondering what to cook tomorrow? Take the stress out of dinner with my simple 7-day meal plan.
Get the 7-Day Meal Plan for $2.99