When my air fryer arrived last year, I’ll admit I was skeptical. Another kitchen gadget collecting dust? But then I made this honey garlic chicken on a random Tuesday night, and it changed everything. The chicken came out so crispy on the outside, tender inside, with this glossy, sticky coating that had my kids scraping the plate. No deep frying, no splattering oil on the stove – just perfectly caramelized chicken in less time than it takes to order takeout.
This honey garlic chicken air fryer recipe is what I call a “weekly rotation” meal. You know, the kind you make over and over because it’s ridiculously easy, tastes like restaurant food, and uses ingredients you already have. The honey caramelizes in the air fryer’s heat, creating these amazing crispy edges while keeping the chicken juicy. It works beautifully with boneless thighs or breasts, and if you’re wondering about honey garlic chicken thighs air fryer specifically, they’re my personal favorite since the extra fat keeps everything moist.
The best part? This isn’t one of those recipes where you need to marinate overnight or stand by the stove. Everything comes together in one bowl, cooks in 15 minutes, and you’re done. It’s become my go-to for busy weeknights when I need something that feels special without the fuss.
Tired of Deciding What to Cook Every Night?
I’ve put together a simple 7-day dinner meal plan using my most-loved recipes — complete with a grocery list and flexible swaps.
Just $2.99 – Instant Download
Get the Meal PlanWhy This Recipe Works
The air fryer is basically magic for this dish. The circulating hot air creates a crispy exterior that rivals deep frying, while the honey in the sauce caramelizes into a sticky glaze that coats every piece. You get texture contrast – that satisfying crunch giving way to tender, juicy chicken – without any complicated techniques.
I’ve tested this recipe with both chicken breasts and thighs, and both work great. Thighs have more fat, so they stay a bit juicier and are more forgiving if you accidentally overcook them by a minute or two. Breasts are leaner and get a slightly crispier edge. Either way, you can’t really mess this up.
The sauce is a simple mix of honey, soy sauce, garlic, and just a touch of heat. It’s sweet but not cloying, savory enough to balance the sugar, and garlicky in the best way. If you’ve made baked honey garlic salmon before, you’ll recognize some of these flavors, but the air fryer takes it to another level.
What You’ll Need
Skill Level: Beginner Prep Time: 10 minutes Cook Time: 15 minutes Total Time: 25 minutes Servings: 4 people
Equipment:
- Air fryer (3.5 quart or larger)
- Mixing bowl
- Whisk
- Meat thermometer (optional but helpful)
- Tongs
For the Chicken:
- 680g (1.5 lbs) boneless, skinless chicken thighs or breasts, cut into 5cm (2-inch) pieces
- 15ml (1 tbsp) olive oil
- 2.5ml (½ tsp) salt
- 1.25ml (¼ tsp) black pepper
- 7g (1 tbsp) cornstarch
For the Honey Garlic Sauce:
- 80ml (⅓ cup) honey
- 45ml (3 tbsp) soy sauce (use tamari for gluten-free)
- 15ml (1 tbsp) rice vinegar
- 4 garlic cloves, minced (about 12g)
- 5ml (1 tsp) fresh ginger, grated (or ½ tsp ground ginger)
- 2.5ml (½ tsp) sesame oil
- 1.25ml (¼ tsp) red pepper flakes (adjust to taste)
- 7g (1 tbsp) cornstarch mixed with 15ml (1 tbsp) water (for thickening)
For Garnish:
- 2 green onions, sliced
- 7g (1 tbsp) sesame seeds
- Fresh cilantro (optional)
Substitutions: If you don’t have rice vinegar, use apple cider vinegar. No fresh ginger? Ground works fine, just use half the amount. For a less sweet version, reduce honey to 60ml (¼ cup) and add a splash more soy sauce.
How to Make Air Fryer Honey Garlic Chicken
Step 1: Prepare the Chicken
Pat the chicken pieces completely dry with paper towels. This is important – any moisture will prevent crisping. Cut larger pieces into uniform 5cm chunks so everything cooks evenly. In a large bowl, toss chicken with olive oil, salt, pepper, and cornstarch until each piece is lightly coated. The cornstarch creates an extra crispy coating.
Step 2: Make the Sauce
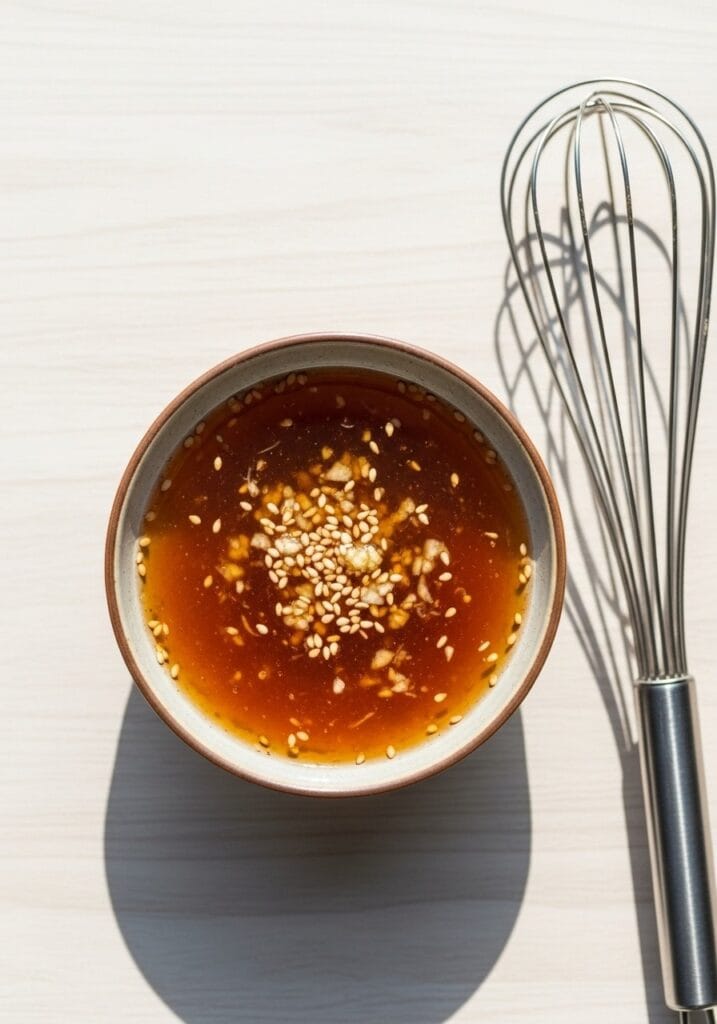
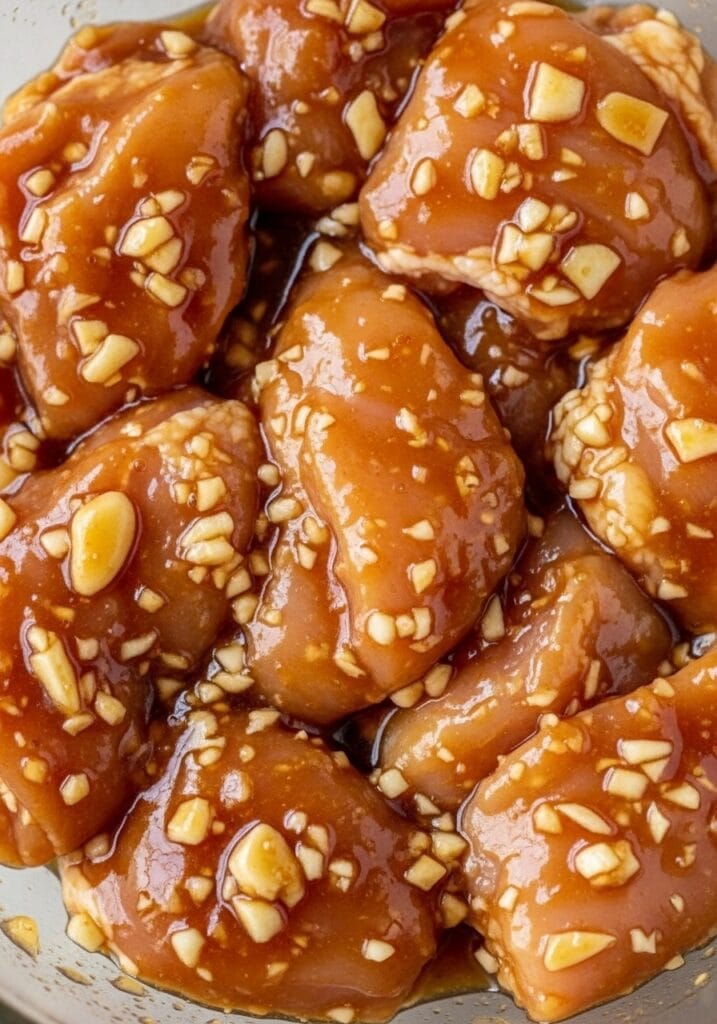
In a separate bowl, whisk together honey, soy sauce, rice vinegar, minced garlic, grated ginger, sesame oil, and red pepper flakes. Set aside half of this sauce in a small saucepan – you’ll use it later for glazing. Keep the other half for coating the raw chicken.
Step 3: Coat and Marinate
Pour half the sauce over the cornstarch-coated chicken. Toss well to coat every piece. Let it sit for 5 minutes while you preheat the air fryer. This brief marinating time lets the flavors start to penetrate.
Step 4: Preheat Air Fryer
Set your air fryer to 200°C (400°F) and let it preheat for 3 minutes. A hot air fryer means crispier chicken from the start.
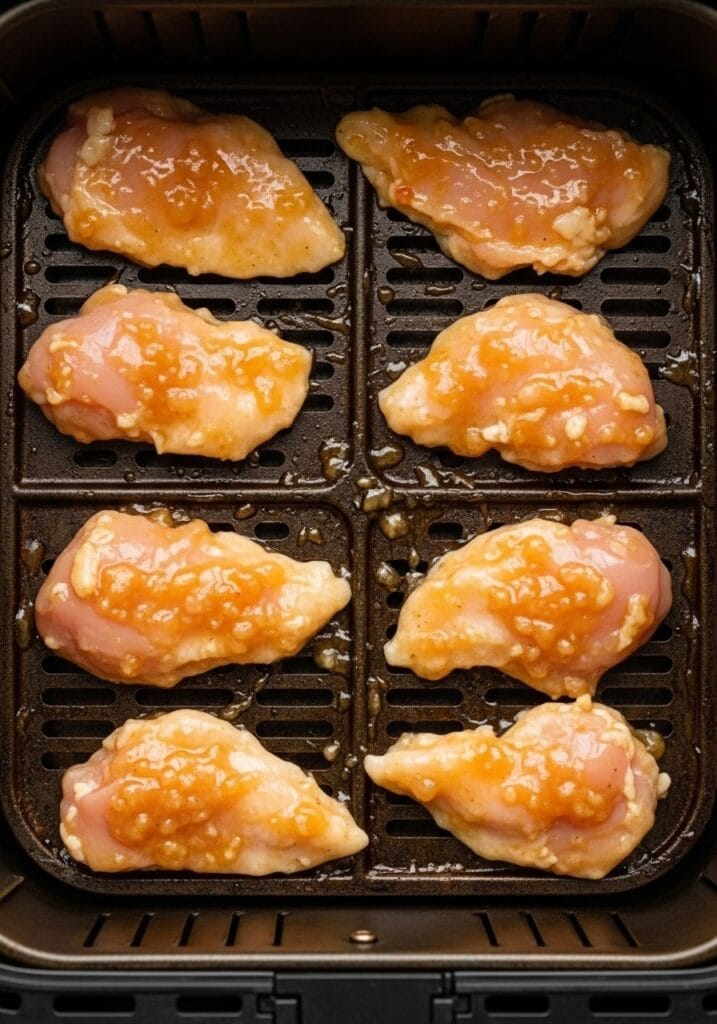
Step 5: First Cook
Arrange chicken pieces in a single layer in the air fryer basket. Don’t overcrowd – leave space between pieces for air circulation. You may need to cook in two batches depending on your air fryer size. Cook at 200°C (400°F) for 8 minutes.
Step 6: Flip and Continue
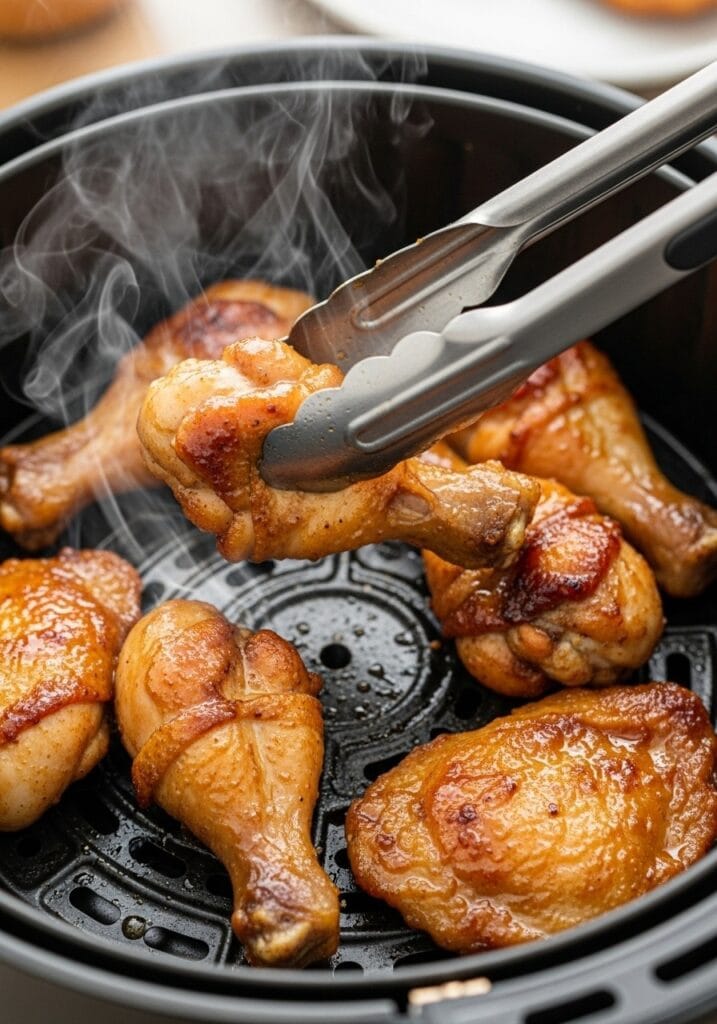
Open the air fryer and flip each piece using tongs. The chicken should be starting to brown and crisp. Cook for another 6-7 minutes until the internal temperature reaches 74°C (165°F) and the edges are golden and crispy.
Step 7: Thicken the Reserved Sauce
While the chicken finishes cooking, place the reserved sauce in a small saucepan over medium heat. Once it starts bubbling, add the cornstarch-water mixture and whisk constantly. Cook for 1-2 minutes until the sauce thickens and becomes glossy. It should coat the back of a spoon. Remove from heat.
Step 8: Glaze and Serve
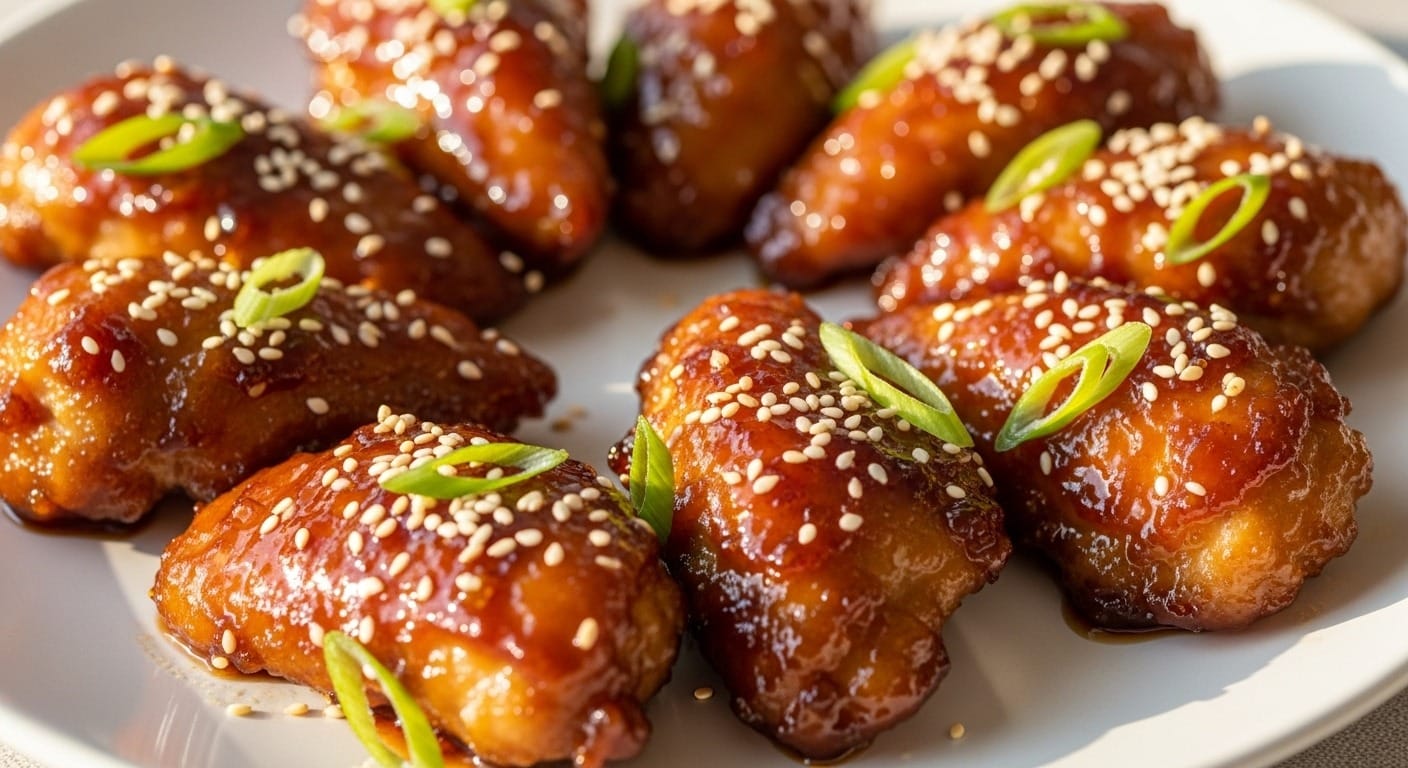
Transfer the cooked chicken to a large bowl. Pour the thickened sauce over the hot chicken and toss gently until every piece is coated in that sticky, glossy glaze. The residual heat will help the sauce cling beautifully. Transfer to a serving plate, sprinkle with sliced green onions and sesame seeds.
Tips for the Best Results

The biggest mistake people make is overcrowding the air fryer basket. I know it’s tempting to cook everything at once, but overlapping chicken pieces steam instead of crisp. Give them space, cook in batches if needed, and you’ll get that perfect texture every time.
Don’t skip patting the chicken dry. Even if it adds an extra minute to your prep, it makes a huge difference in achieving crispy skin. Water is the enemy of crispiness.
For extra sticky coating, you can brush the chicken with more sauce halfway through cooking, but honestly, the final toss in the thickened sauce is usually enough. Sometimes less fussing means better results.
If you’re using chicken breasts instead of thighs, check them a minute or two earlier since they can dry out faster. A meat thermometer is your friend here – 74°C (165°F) is perfect.
What to Serve With It
This chicken pairs beautifully with steamed jasmine rice or cauliflower rice taco bowls if you’re keeping it lighter. I love it over 20-minute veggie fried rice for a complete meal that still comes together fast.
For a protein-packed dinner, try it with quinoa chickpea buddha bowls. The fresh vegetables balance the sticky-sweet chicken perfectly.
Sometimes I’ll make a double batch and use the leftovers for meal prep bowls with steamed broccoli and rice. It reheats surprisingly well – just add a splash of water and microwave covered to keep it moist.
Storing and Reheating
Store leftover chicken in an airtight container in the fridge for up to 4 days. The sauce will thicken as it cools, which is totally normal. To reheat, I actually prefer using the air fryer again – 160°C (320°F) for 3-4 minutes brings back most of that crispy texture. Microwave works too if you’re in a hurry, but you’ll lose some crispiness.
You can freeze this for up to 2 months, though the texture won’t be quite as crispy after thawing. Freeze in a single layer on a baking sheet first, then transfer to a freezer bag.
Recipe Variations
Spicy Version: Double the red pepper flakes or add 5ml (1 tsp) of sriracha to the sauce. Sometimes I’ll add a pinch of cayenne pepper to the cornstarch coating for extra heat.
Extra Sticky: Use 120ml (½ cup) honey instead of 80ml (⅓ cup). The sauce becomes almost candy-like when it caramelizes. Kids especially love this version.
Citrus Twist: Add 15ml (1 tbsp) orange juice and some orange zest to the sauce. It brightens up the flavors and cuts through the sweetness nicely.
Low-Sodium: Use low-sodium soy sauce and skip the added salt. The honey provides plenty of flavor on its own.
If you loved this honey garlic chicken air fryer recipe, you’ll probably enjoy air fryer chicken parmesan or teriyaki chicken rice bowls for more quick dinner ideas.
This recipe has become such a staple in my house that I keep the ingredients stocked at all times. There’s something about that combination of crispy, sticky, sweet, and savory that just works. Plus, it feels like takeout but costs a fraction of the price and you know exactly what’s going into it. Give it a try next time you need dinner on the table fast – I have a feeling it’ll become a regular in your rotation too.
Still wondering what to cook tomorrow? Take the stress out of dinner with my simple 7-day meal plan.
Get the 7-Day Meal Plan for $2.99