My sister called me last week in a panic. She needed a last-minute dessert for her book club, something impressive but quick. I told her about these chocolate peanut butter truffles, and she couldn’t believe how simple they were. The next day, she texted me photos of her friends fighting over the last truffle. That’s the power of this recipe.
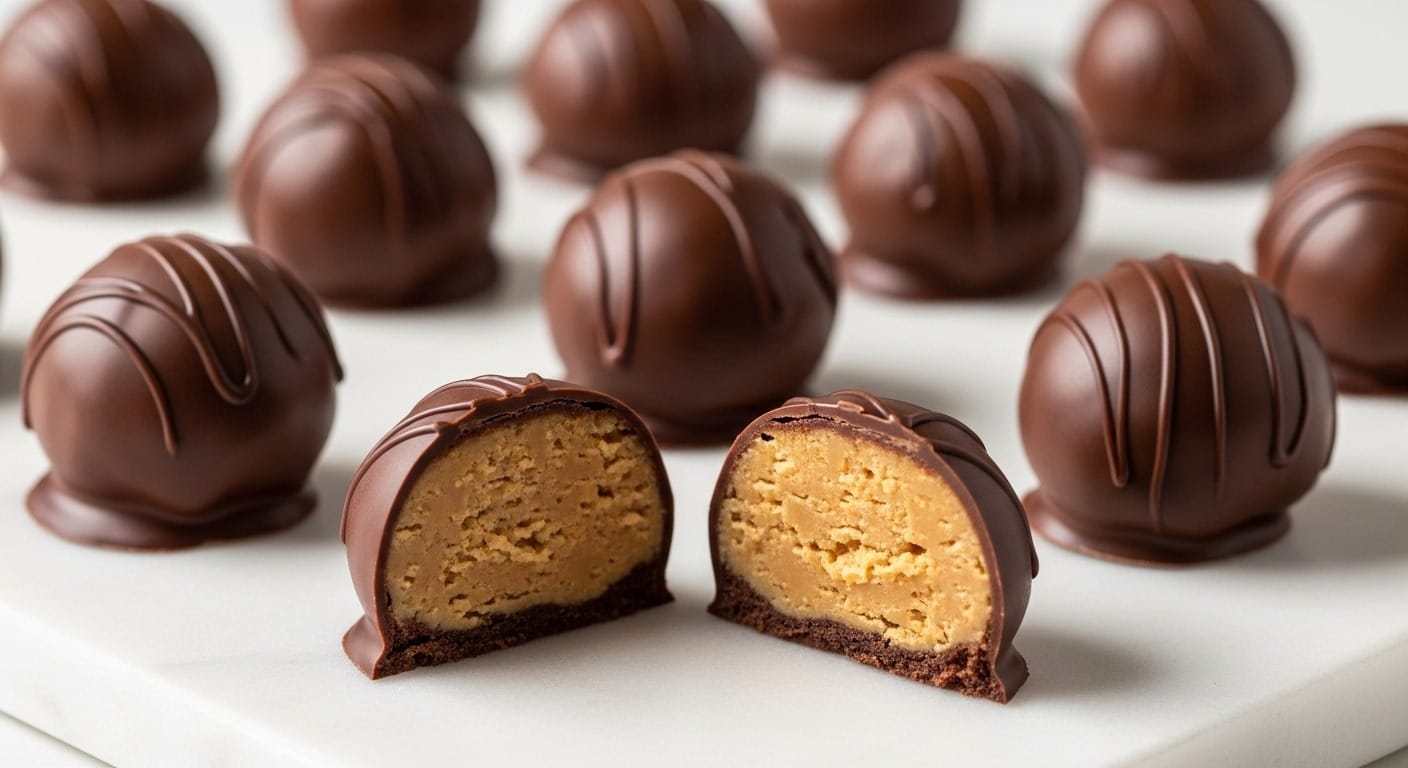
These peanut butter truffles take about 30 minutes of active time, require zero baking skills, and taste like they came from an expensive chocolatier. The combination of creamy peanut butter and rich chocolate creates a melt-in-your-mouth texture that’s dangerously addictive. They’re perfect for holiday gifting, potlucks, or when you just need something sweet right now.
Why You’ll Love This Recipe
This is one of those recipes where the effort-to-reward ratio is completely skewed in your favor. The base comes together in one bowl with a wooden spoon. No mixer needed. The most challenging part is waiting for them to chill, and even that’s only 20 minutes if you’re impatient like me.
Tired of Deciding What to Cook Every Night?
I’ve put together a simple 7-day dinner meal plan using my most-loved recipes — complete with a grocery list and flexible swaps.
Just $2.99 – Instant Download
Get the Meal PlanThe texture is what makes these truffles special. The peanut butter center is smooth and creamy, not grainy or dry like some homemade versions. The chocolate shell snaps when you bite into it, giving way to that rich filling. And because they’re no-bake, you can make them year-round without heating up your kitchen.
I’ve brought these to everything from casual game nights to fancy dinner parties. They always disappear first. Something about the peanut butter and chocolate combination just works on everyone.
What Makes These Truffles Different
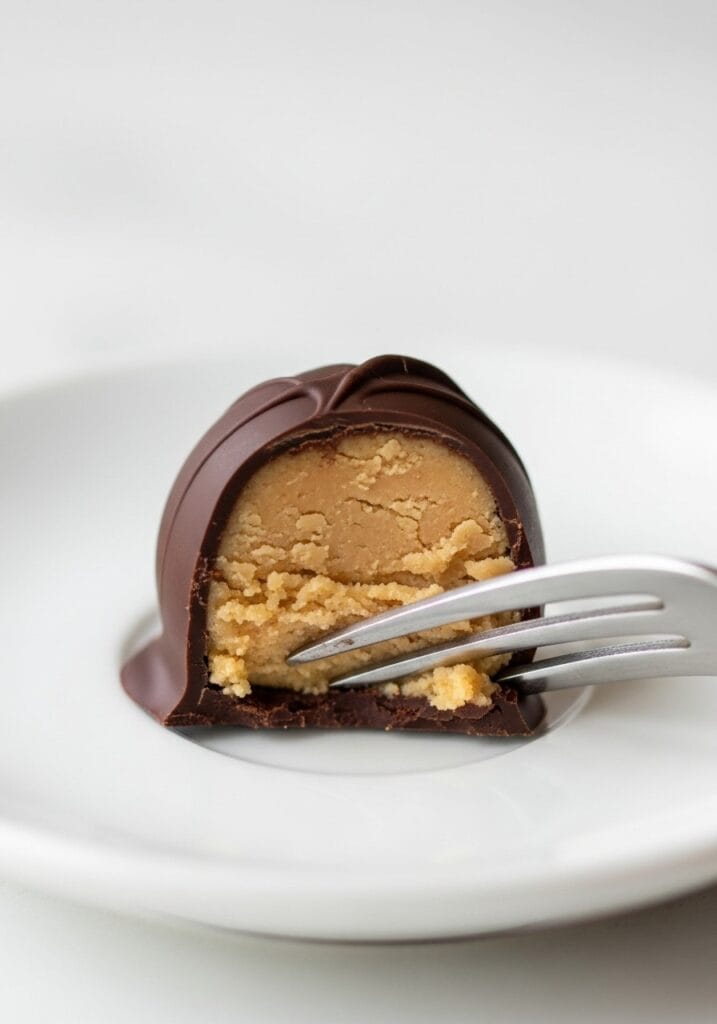
Most truffle recipes involve tempering chocolate or complicated rolling techniques. Not this one. We’re using a simple coating method that gives you that professional-looking finish without the stress. The secret is in the consistency of the peanut butter mixture – it needs to be firm enough to roll but soft enough to stay creamy.
I’ve tested this recipe with different peanut butters, and creamy natural peanut butter works best. The kind where the oil separates on top. Just stir it well before measuring. If you only have the no-stir variety, that works too, but you might need slightly less powdered sugar.
The chocolate coating uses regular chocolate chips, which technically shouldn’t work for dipping (they’re not formulated for it), but a little bit of coconut oil smooths everything out. You get that glossy finish without buying special coating chocolate.
Ingredients You’ll Need
For the Peanut Butter Filling
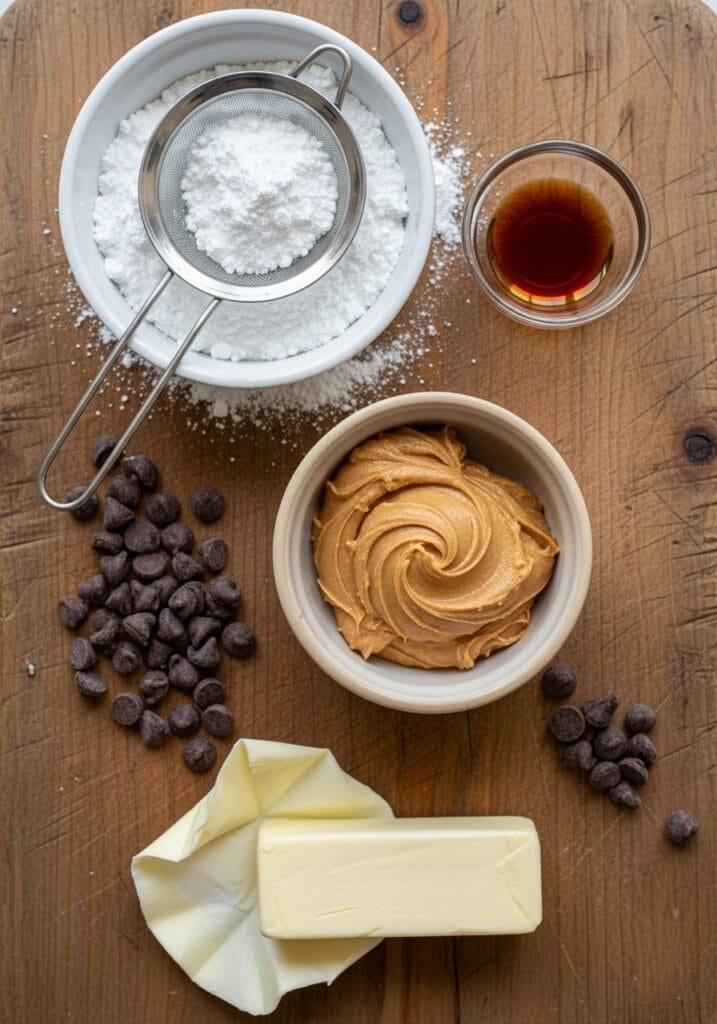
- 1 cup (250g) creamy peanut butter, well-stirred
- 3 tablespoons (42g) unsalted butter, softened
- 1 cup (120g) powdered sugar, sifted
- 1 teaspoon vanilla extract
- Pinch of salt (omit if using salted peanut butter)
For the Chocolate Coating
- 2 cups (340g) semi-sweet chocolate chips
- 1 tablespoon coconut oil (or vegetable shortening)
Substitution notes: Can’t do dairy? Use vegan butter. Need this nut-free? Try sunflower seed butter, though the texture will be slightly different. Dark chocolate chips work great if you prefer less sweetness.
Equipment You’ll Need
- Medium mixing bowl
- Wooden spoon or spatula
- Small microwave-safe bowl
- Baking sheet
- Parchment paper
- Fork (for dipping)
- Optional: melon baller or small cookie scoop for uniform sizing
Step-by-Step Instructions
Making the Peanut Butter Centers
- Line a baking sheet with parchment paper and set aside.
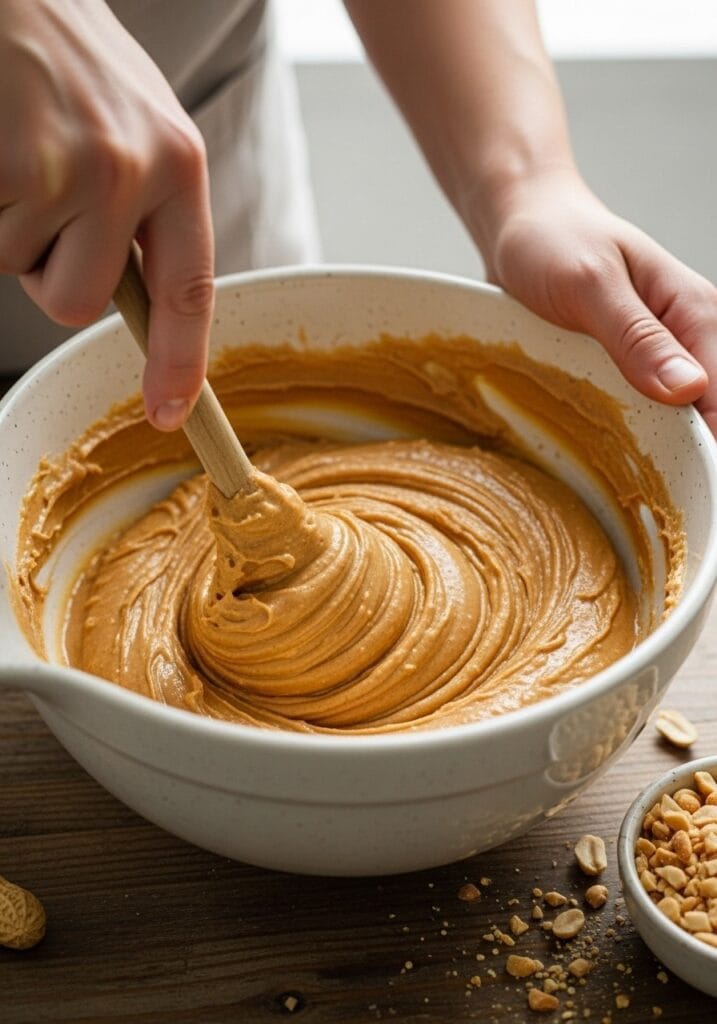
- Add peanut butter and softened butter to a medium bowl.
- Mix with a wooden spoon until completely smooth and combined (about 1 minute of stirring).
- Add powdered sugar, vanilla extract, and salt (if using).
- Stir everything together until the mixture forms a thick dough that pulls away from the sides of the bowl (this takes about 2-3 minutes of good mixing).
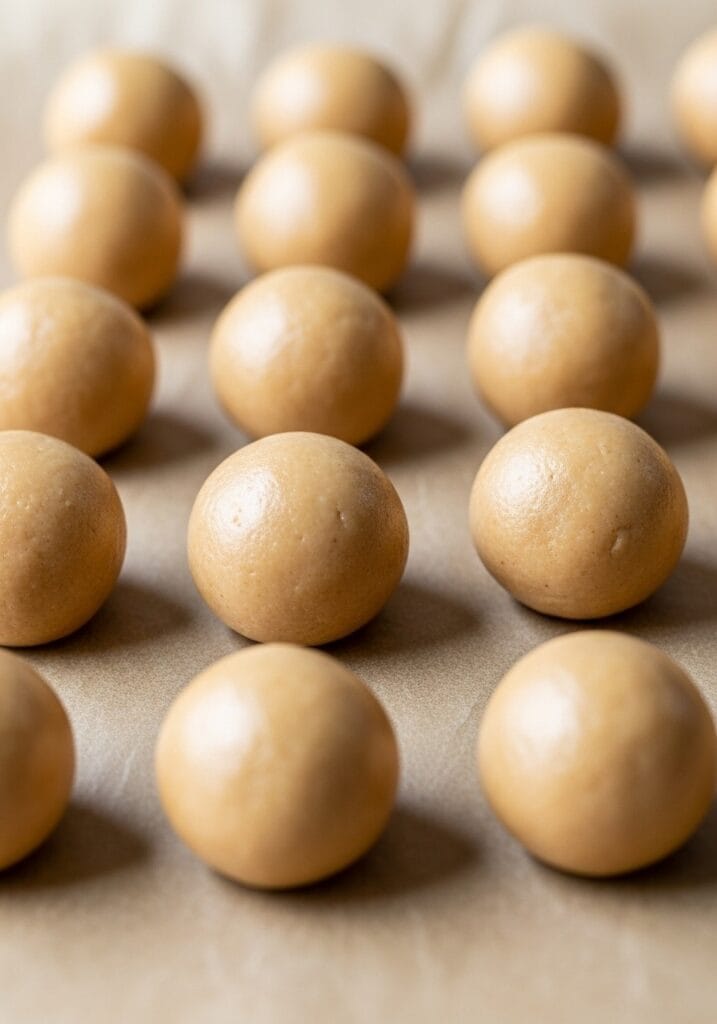
- Scoop out about 1 tablespoon of mixture using a spoon or small cookie scoop.
- Roll between your palms into a smooth ball (if the mixture sticks to your hands, lightly dust them with powdered sugar).
- Place each ball on the prepared baking sheet, spacing them about an inch apart.
- Repeat until all the mixture is used (you should get about 20-24 truffles).
- Freeze the peanut butter balls for 20 minutes or refrigerate for 45 minutes until firm.
Timing note: Don’t skip the chilling step. If the centers are too soft, they’ll fall apart when you dip them in chocolate.
Coating with Chocolate
- About 5 minutes before the peanut butter balls are done chilling, add chocolate chips and coconut oil to a microwave-safe bowl.
- Microwave on 50% power for 1 minute, then stir.
- Continue microwaving in 20-second intervals at 50% power, stirring after each interval, until chocolate is completely melted and smooth (usually takes 2-3 intervals total).
- Let the melted chocolate sit for 2 minutes to cool slightly (it should be warm but not hot).
- Remove peanut butter balls from freezer.
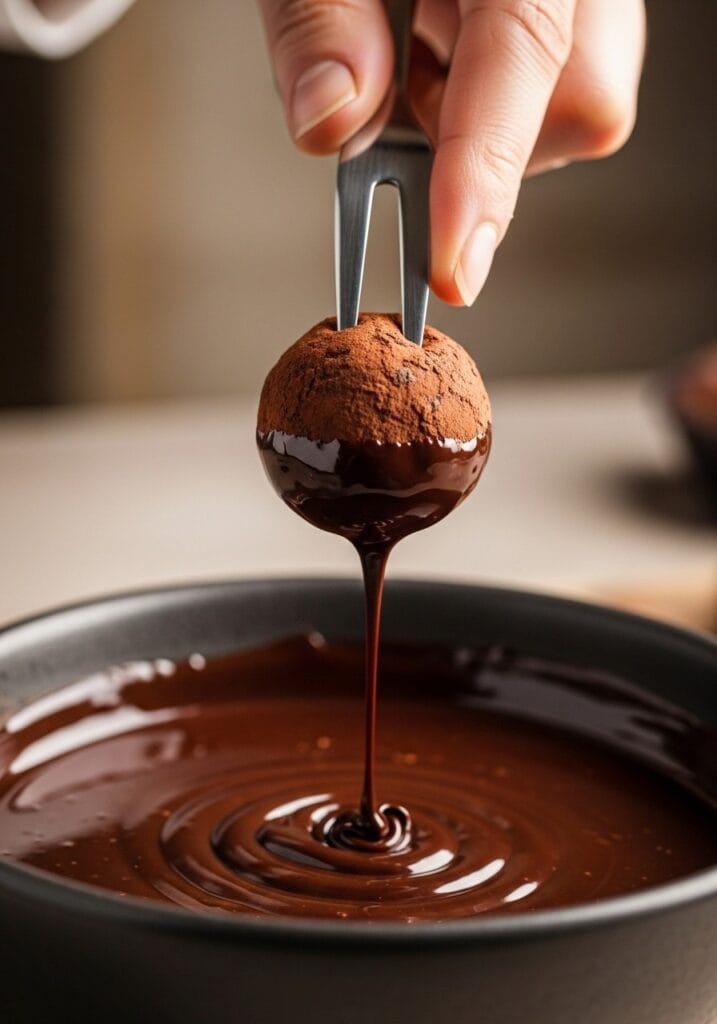
- Drop one ball into the melted chocolate.
- Use a fork to roll it around until completely coated, letting excess chocolate drip off.
- Lift the truffle with the fork, tap the fork gently on the edge of the bowl to remove more excess chocolate.
- Slide the coated truffle back onto the parchment-lined baking sheet using another fork or your finger to push it off.
- Repeat with remaining truffles, working quickly so the centers stay cold.
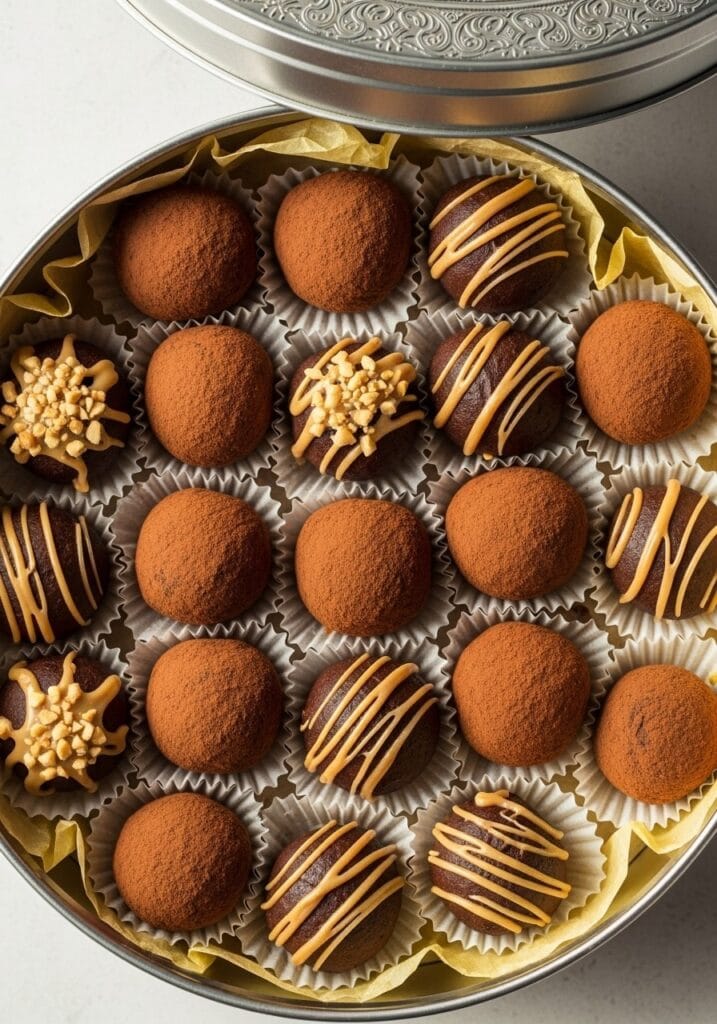
- If desired, drizzle any remaining chocolate over the tops for decoration.
- Refrigerate the coated truffles for 15 minutes until chocolate sets completely.
Visual cue: The chocolate should look glossy when you first coat the truffles. If it starts looking dull or thick, reheat it briefly in the microwave.
Recipe Information
Serving Size: Makes 20-24 truffles Prep Time: 20 minutes Chilling Time: 35 minutes total Total Time: 55 minutes Difficulty Level: Easy (beginner-friendly) Storage: Keep in an airtight container in the refrigerator for up to 2 weeks, or freeze for up to 3 months
Tips for Perfect Truffles Every Time
The temperature of everything matters more than you’d think. If your peanut butter centers are too warm, they’ll slide off the fork into the chocolate. If your chocolate is too hot, it’ll melt the peanut butter filling. Trust the timing I’ve given you.
I like to work in batches of 6-8 truffles at a time. Coat those, then put them back in the fridge while you do the next batch. This keeps the centers cold without rushing through the dipping process.
For the smoothest chocolate coating, make sure your chocolate isn’t overheated. That 50% power setting on the microwave is important. High heat can cause the chocolate to seize up or get grainy.
If you’re making these as gifts, they look beautiful in small paper candy cups placed in a decorative box. Just like the ones you’d get from a fancy candy shop, except you made them yourself for a fraction of the cost.
Common Problems and Solutions
Sometimes the chocolate coating cracks after it sets. This usually means the peanut butter centers were too cold when you dipped them. Let them sit at room temperature for 5 minutes before coating next time.
If your chocolate peanut truffles are too soft and won’t hold their shape when you roll them, add more powdered sugar, 1 tablespoon at a time, until the mixture firms up. On the flip side, if they’re too dry and crumbly, add a tiny bit more peanut butter or softened butter.
The chocolate sometimes gets thick while you’re working. Just pop it back in the microwave for 10 seconds at 50% power and stir. This happens because chocolate starts to set as it cools, which is actually what you want.
Variations to Try
Once you’ve mastered the basic recipe, the variations are endless. Roll the truffles in crushed pretzels before the chocolate sets for a salty-sweet crunch. Or add a pinch of espresso powder to the peanut butter mixture for a subtle coffee flavor.
I’ve also made these with white chocolate coating, which is pretty but very sweet. If you go that route, reduce the powdered sugar in the filling to 3/4 cup. Dark chocolate works beautifully too and cuts some of the sweetness.
For a festive touch during holidays, roll the finished truffles in colored sprinkles or crushed candy canes while the chocolate is still wet. My niece requests the candy cane version every Christmas now.
Why This Recipe Works for Busy People
Most of the time for this recipe is hands-off chilling time. You can make the peanut butter balls in the morning, let them chill while you’re doing other things, then coat them later. Or make them completely the night before you need them.
They’re also incredibly forgiving. Mess up the shape of one? Roll it again. Chocolate coating too thick? Thin it out with a bit more coconut oil. Drop one in the chocolate bowl? Fish it out and recoat it. There’s really no way to ruin these unless you forget about them in the freezer for six months.
The ingredient list is short, and chances are you already have most of what you need. When I’m craving something sweet, I can have these done before I could drive to the store and back for pre-made dessert.
Serving Suggestions
These chocolate peanut butter truffles are rich, so a little goes a long way. I usually serve 2-3 per person as dessert alongside coffee or tea. They pair especially well with peppermint hot chocolate during winter months.
For parties, arrange them on a platter with other desserts and sweet treats like no-bake strawberry cheesecake cups or toffee pretzel chocolate bark. The variety makes everyone happy, and you can make all of them ahead of time.
They’re also fantastic crumbled over ice cream. I did this accidentally when one truffle broke, and now I sometimes chop them up intentionally for sundae toppings.
Making These Ahead
This is actually the perfect make-ahead dessert. The truffles taste better after sitting in the fridge for a day anyway. Something about the flavors melding together. Make them up to a week before you need them and store in an airtight container in the refrigerator.
For longer storage, freeze them in a single layer on a baking sheet until solid, then transfer to a freezer bag with parchment paper between layers. They’ll keep for 3 months frozen. Let them thaw in the refrigerator for a few hours before serving.
I keep a stash in my freezer for unexpected guests or when I need to bring something to a last-minute gathering. They thaw quickly, and no one ever guesses they were frozen.
The Gift-Giving Angle

Around the holidays, I make triple batches of these and package them in small boxes or bags. Add a simple label and ribbon, and you have a gift that looks like you spent way more time than you actually did.
They travel well too, as long as you keep them cool. I’ve shipped them to relatives in other states packed with ice packs, and they arrived perfectly intact. Just make sure the chocolate is fully set before packaging.
Friends with dietary restrictions appreciate that you can easily see what’s in these. No hidden ingredients or mystery flavors. Just peanut butter, chocolate, and a few other basic things.
What to Do with Leftovers (If You Have Any)
In my house, leftover chocolate peanut butter truffles are a theoretical concept. But if you somehow have extras, they freeze beautifully. I’ve actually started making double batches on purpose just to have some stashed away.
You can also chop them up and mix them into brownie batter before baking, though at that point you’re making peanut butter chocolate swirl brownies with extra steps. Still delicious though.
Or press them into the bottom of a springform pan, add a layer of no-bake caramel cheesecake filling, and you’ve got an entirely new dessert. I’m not saying I’ve done this, but I’m not saying I haven’t.
Final Thoughts
This recipe has become my go-to for so many situations. Need something impressive but easy? These. Want to satisfy a chocolate craving without turning on the oven? These. Looking for a gift that shows you care but doesn’t require culinary school skills? Still these.
The beauty of peanut butter truffles is that they’re approachable enough for beginners but impressive enough for any occasion. You can make them with kids (they love the rolling part), or you can make them alone as a therapeutic Sunday afternoon activity.
Give this recipe a try next time you need a sweet treat. I think you’ll be surprised at how professional they look and taste with so little effort. And if anyone asks where you bought them, just smile and say you made them yourself. The look on their face is almost as satisfying as eating the truffles.If you loved these, check out more quick easy meals and easy recipes on Tasty Dish Diary. Happy cooking!
Still wondering what to cook tomorrow? Take the stress out of dinner with my simple 7-day meal plan.
Get the 7-Day Meal Plan for $2.99