My seven-year-old refuses most proteins. But chicken tenders? She’ll eat three before I finish plating the rest. The secret isn’t fancy marinades or expensive cuts – it’s keeping things stupidly simple with ingredients you probably have right now.
These 5 ingredient chicken tenders take about 30 minutes from fridge to table. The coating gets seriously crispy without deep frying, and the chicken stays juicy inside. Perfect for picky eaters, rushed weeknights, or anyone who wants homemade tenders without the hassle.
Skill level: Beginner
Tired of Deciding What to Cook Every Night?
I’ve put together a simple 7-day dinner meal plan using my most-loved recipes — complete with a grocery list and flexible swaps.
Just $2.99 – Instant Download
Get the Meal PlanCooking time: 30 minutes
Taste profile: Savory, crunchy, mildly seasoned
Why This Recipe Works
Most chicken tender recipes call for buttermilk soaks, multiple spice blends, or complicated breading stations. This one cuts through the noise.
Five ingredients. One baking sheet. Zero stress.
The panko breadcrumbs create that addictive crunch kids love. A bit of garlic powder adds flavor without overwhelming young taste buds. And baking instead of frying means less mess and fewer oil splatters to clean up later.
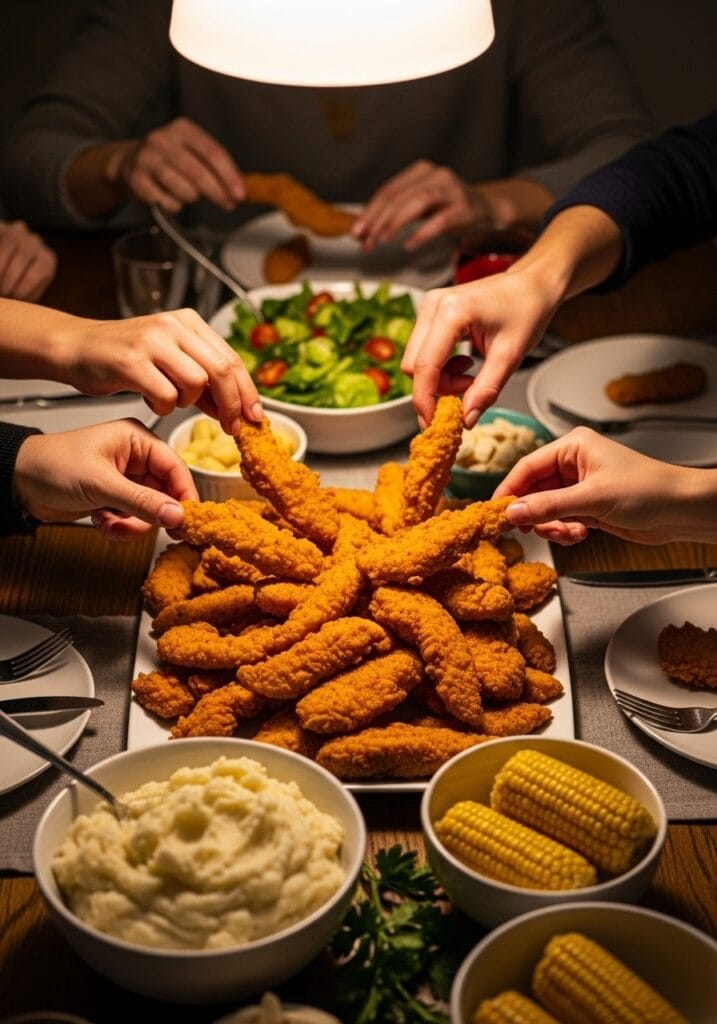
I’ve made these for playdates, packed them in school lunches (they’re good cold too), and served them alongside quick Thai noodle stir-fry when I need a complete meal fast. They work every single time.
Ingredients You’ll Need
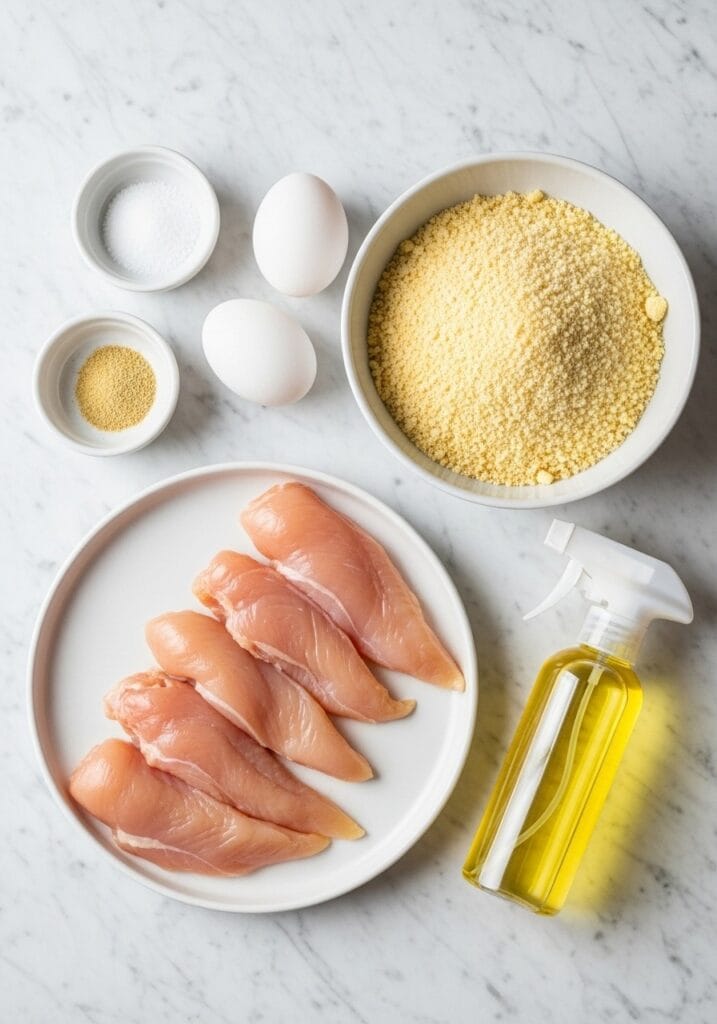
For the chicken:
- 1 lb (450g) chicken breast tenderloins (or 2 large breasts cut into strips)
- 1½ cups (150g) panko breadcrumbs
- 2 large eggs
- 1 tsp garlic powder
- ½ tsp salt
- Cooking spray or 2 tbsp olive oil
That’s it. No buttermilk, no fifteen spices, no specialty ingredients you’ll use once and forget about.
Substitutes:
- Regular breadcrumbs work but won’t be as crispy
- Season salt can replace garlic powder + salt if that’s what you have
- Chicken thighs work too, just adjust cooking time by 3-4 minutes
Step-by-Step Instructions
Prep time: 10 minutes
Cook time: 20 minutes
Equipment needed: Baking sheet, 2 shallow bowls, wire rack (optional but helpful)
- Preheat your oven to 425°F (220°C). Line a baking sheet with parchment paper or place a wire rack on top – the rack helps air circulate for extra crispiness.
- Pat the chicken tenderloins completely dry with paper towels. Any moisture will make the coating soggy.
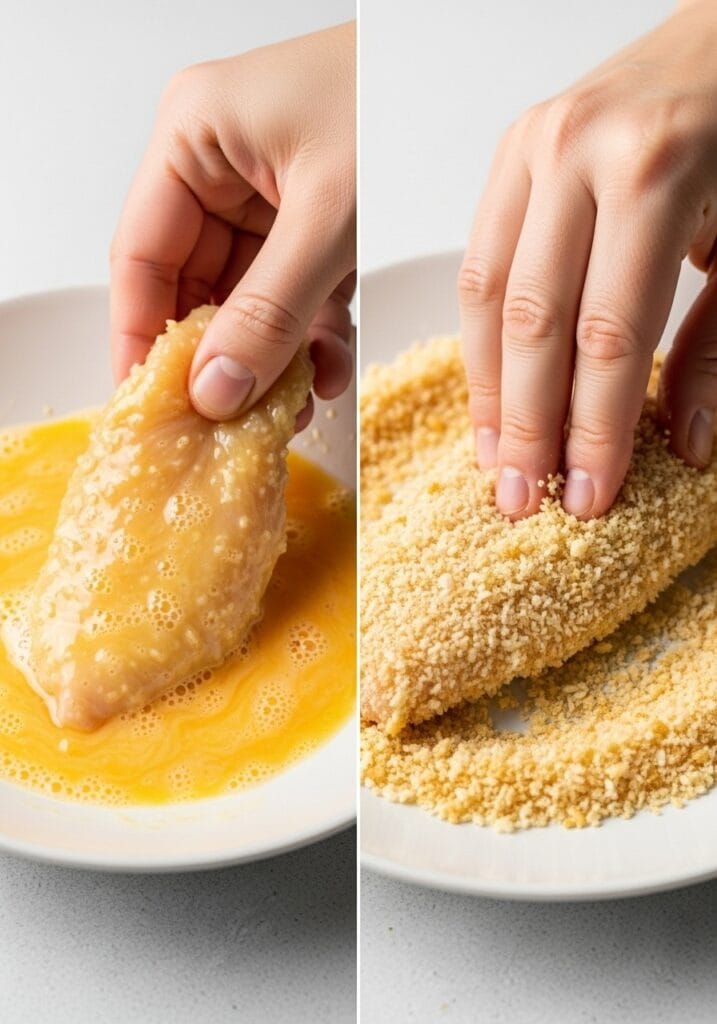
- Set up your breading station with two shallow bowls. Crack eggs into one bowl and whisk until smooth. In the second bowl, mix panko breadcrumbs, garlic powder, and salt.
- Take one chicken tender and dip it into the egg, letting excess drip off. Press it into the panko mixture, turning to coat all sides. Press firmly so the crumbs stick.
- Place the breaded tender on your prepared baking sheet. Repeat with remaining chicken, leaving a bit of space between each piece.
- Spray the tops lightly with cooking spray or drizzle with olive oil. This helps them brown and crisp up beautifully.
- Bake for 18-20 minutes, flipping halfway through. They’re done when the coating is golden brown and the internal temperature hits 165°F (74°C).
- Let them rest for 2-3 minutes before serving. The coating will firm up slightly as they cool.
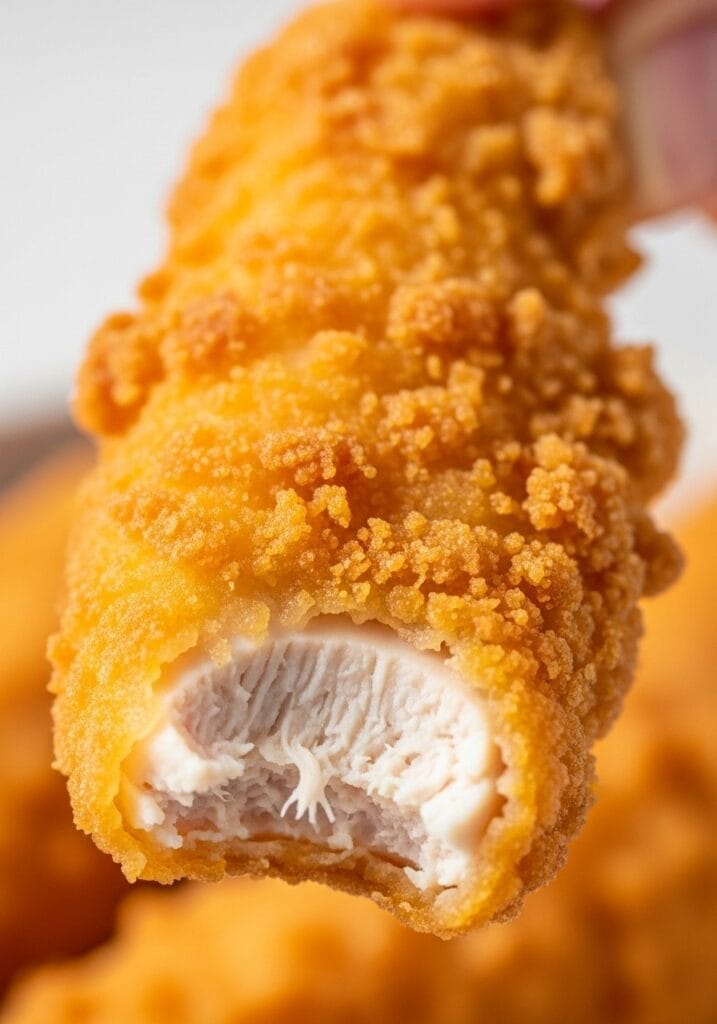
Visual cues: The coating should look deep golden, almost amber in color. If you press gently with tongs, it should feel firm and crispy, not soft.
Serving Suggestions
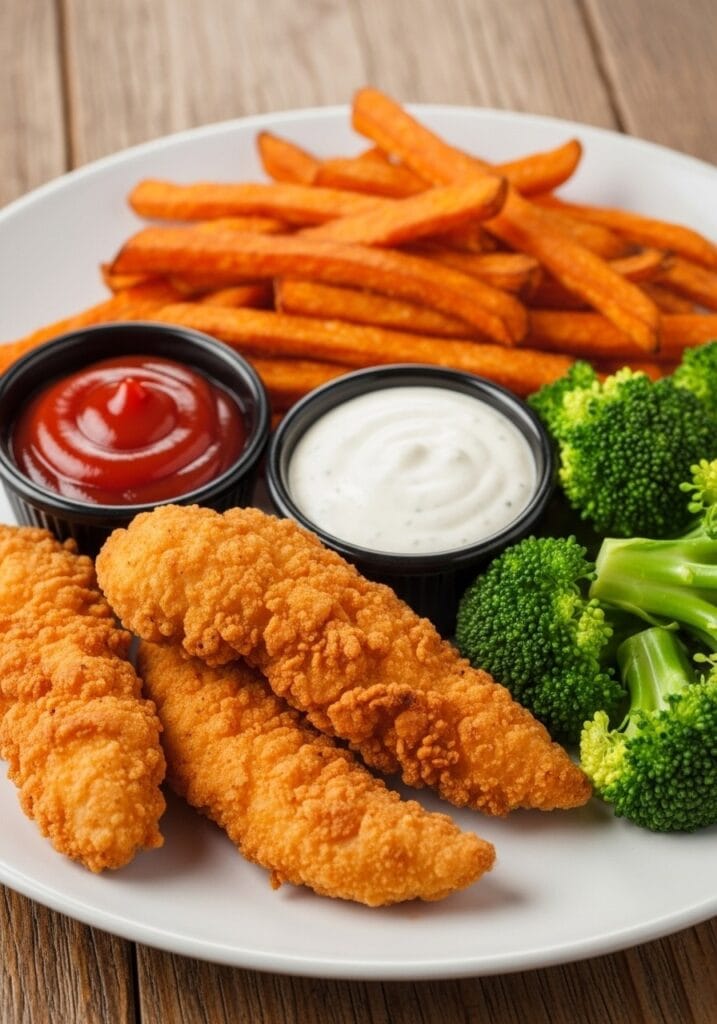
My kids dip these in ketchup, ranch, or honey mustard. Sometimes all three on the same plate, which makes no sense but whatever works, right?
For a complete meal, I pair them with:
- Simple steamed broccoli or green beans
- Sweet potato fries (baked on another sheet while the chicken cooks)
- A basic side salad with ranch dressing
- Mac and cheese from weeknight dinners for the ultimate kid-pleaser combo
These also work great sliced up in wraps the next day. Add some lettuce, tomato, and a drizzle of ranch in a tortilla – instant lunch that kids will actually eat.
Tips for Extra Crispy Results
Want restaurant-level crunch? Here’s what I’ve learned after making these probably fifty times:
The wire rack is your best friend. Elevating the chicken lets hot air circulate underneath, so you get crispy coating on all sides instead of a soggy bottom.
Don’t skip the oil spray. I tried making these “healthier” once by leaving it off. They were dry and pale. The light coating of oil is what creates that gorgeous golden color and satisfying crunch.
Use panko, not regular breadcrumbs. Japanese panko has larger, airier flakes that get way crispier in the oven. Worth the extra dollar at the store.
Temperature matters. If your oven runs cool, bump it up to 450°F. If it runs hot, check the chicken at 15 minutes. Every oven is slightly different.
Make-Ahead and Storage
These are best eaten fresh, but life happens. Here’s how to deal with leftovers:
Refrigerator: Store in an airtight container for up to 3 days. Reheat in a 375°F oven for 8-10 minutes to restore some crispiness. Microwaving makes them soggy.
Freezer: You can freeze breaded, uncooked tenders on a baking sheet, then transfer to a freezer bag once solid. Bake from frozen at 425°F for 25-28 minutes.
Meal prep tip: I sometimes bread a double batch on Sunday and freeze half. Then on a busy Wednesday, I just pop them in the oven straight from the freezer. Dinner in 30 minutes with almost zero effort.
Variations to Try

Once you’ve mastered the basic version, here are some tweaks my family enjoys:
Spicy version: Add ½ tsp cayenne pepper to the breadcrumb mixture. My older kid loves these, but they’re too much for the seven-year-old.
Parmesan boost: Mix 3 tbsp grated Parmesan into the panko. Adds a subtle savory note that even picky eaters don’t mind.
Italian style: Swap garlic powder for Italian seasoning. Serve with marinara sauce for dipping – basically deconstructed chicken parm.
Gluten-free: Use gluten-free panko and check that your garlic powder doesn’t contain additives. The texture is nearly identical.
I keep meaning to try a version with crushed cornflakes like my mom used to make, but honestly? This panko version is so good I haven’t bothered yet.
Why Kids Love These
I asked my daughter why she likes these better than restaurant chicken tenders. Her exact words: “They’re not spicy-weird and they’re crunchy all over.”
Makes sense. A lot of restaurant tenders have complex seasoning that kids find off-putting. Or they’re fried inconsistently, so some bites are crispy and others are greasy. These baked tenders are predictable – same flavor, same texture, every single time.
The mild seasoning is actually a feature, not a bug. Kids can taste the chicken itself, which builds their confidence with new proteins. And because they’re not swimming in oil, the texture stays light and crunchy instead of heavy.
Plus, letting kids help with the breading process (with supervision) makes them more excited to eat the final product. Even my picky eater will try things she helped make.
Common Mistakes to Avoid
I’ve messed these up enough times to know what not to do:
Using wet chicken: This is the number one mistake. If the chicken is damp, the egg won’t stick properly and the coating slides right off during baking. Always pat dry first.
Overcrowding the pan: Leave space between tenders. If they’re touching, they’ll steam instead of crisp up. Use two baking sheets if needed.
Skipping the flip: Yes, you need to flip them halfway through. Otherwise one side stays pale and soft.
Opening the oven too often: Every time you peek, you lose heat. Set a timer and trust the process.
Not checking temperature: Chicken is safe at 165°F, but if you go much higher, it gets dry and tough. A $15 instant-read thermometer is worth it for this alone.
Pairing Ideas for Busy Weeknights
These tenders fit into so many dinner scenarios. When I’m really short on time, I’ll pair them with:
- Store-bought coleslaw and frozen fries for a pseudo-restaurant meal
- A simple Mediterranean chickpea salad if I’m feeling slightly healthier
- Just ketchup and apple slices when we’re five minutes from baseball practice
For slightly more effort, they’re perfect alongside sheet pan fajita dinner components or the veggies from sheet pan salmon and veggies.
The beauty of a simple protein like this is how flexible it is. You’re not locked into a specific cuisine or side dish. It just… works with everything.
Budget-Friendly Notes
Chicken tenderloins can be pricey. If you’re watching costs, buy regular chicken breasts on sale and cut them into strips yourself. Takes an extra three minutes but saves a few dollars per pound.
Panko lasts forever in the pantry, and you probably already have eggs, garlic powder, and salt. So really, you’re buying one ingredient – the chicken. That’s why this is such a solid weeknight option for families on a budget.
I’ve calculated it out, and these cost about $1.20 per serving compared to $4-6 for fast food chicken tenders. Plus you control the quality and can pronounce every ingredient.
Final Thoughts
Look, I’m not going to claim these will change your life or solve all your dinner struggles. But they might solve tonight’s dinner struggle, and sometimes that’s enough.

These 5 ingredient chicken tenders are in my regular rotation for good reason. They’re foolproof, kid-approved, and use ingredients I always have around. No specialty stores, no weird equipment, no stress.
The first time you make them, follow the recipe exactly. Once you’ve got the basic technique down, you can adjust the seasoning or cooking method to suit your family’s preferences. But honestly? The original version is pretty hard to beat.
Next time your kid asks for chicken tenders, skip the drive-thru. You’ve got this.For more simple dinner ideas that actually work, check out the full collection at Tasty Dish Diary. And if you’re always hunting for fast meals that don’t sacrifice flavor, the quick and easy meals section is basically my survival guide for weeknights.
Still wondering what to cook tomorrow? Take the stress out of dinner with my simple 7-day meal plan.
Get the 7-Day Meal Plan for $2.99